Inspired by the chilling episode “Blink” from Doctor Who, and aiming for a standout piece for DragonCon, I embarked on creating my own Weeping Angel costume. Despite the project seeming daunting at first, the process was incredibly rewarding. This guide provides a detailed breakdown of how to construct your own convincingly stone-like Weeping Angel costume, perfect for cosplay or Halloween.
Assembling the Weeping Angel Dress: Stone-Effect Fabric and Structure
The foundation of the Weeping Angel’s imposing silhouette is the dress. To achieve the statue-like form, a two-layer construction was employed, combining structure and drape.
Materials Used:
- Polyester suiting fabric
- Acrylic/fabric-medium paint
- Hula hoop
- Velcro
Construction Steps:
-
Underdress Construction: The underdress acts as a structural base. Fitted to the upper body with a back zipper, it dramatically flares out into a cone shape towards the hem. A hula hoop is sewn into the bottom hem to provide the necessary rigidness and maintain the wide, statue-like base.
-
Overdress Draping: The overdress is crafted from two fabric widths joined into a large tube. This tube is then draped over the underdress. A dark grey polyester suiting fabric was chosen for its smooth finish and ability to hold folds effectively, mimicking the appearance of stone.
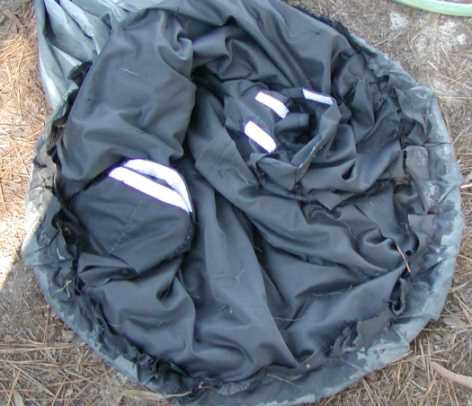
The chosen fabric, while sturdy, lacked natural drape. To overcome this, each fold was meticulously stitched into place, ensuring the dress maintained its sculpted, statue-like form.
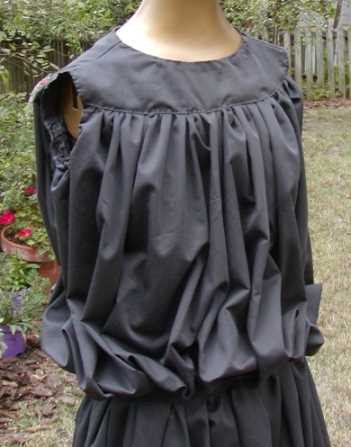 Stitched Folds of Weeping Angel Dress
 -
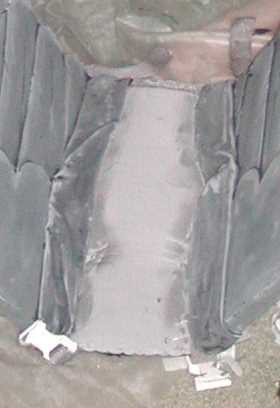
Hidden Wing Panel: A discreet panel at the back of the dress was incorporated to conceal the central wing support structure, maintaining a seamless look.
-
Stone Painting Technique: To convincingly replicate the stone texture, a highlight and lowlight painting technique was utilized. Acrylic craft paint, mixed with fabric medium for flexibility and washability, was applied in layers. First, a base coat of the darkest grey was applied to the entire dress. Then, medium grey was layered over most areas, leaving the dark grey in shadow areas and recesses. Finally, the lightest grey was used to accentuate the highlights, creating depth and realism.
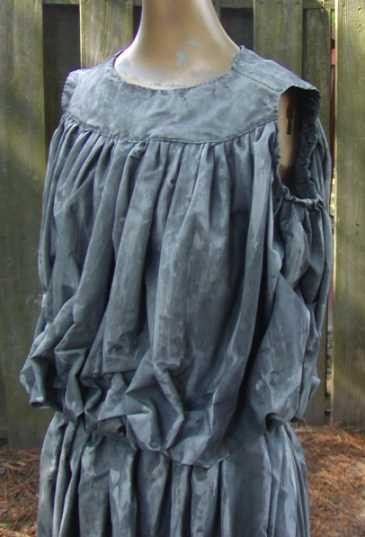 Painted Stone Effect on Weeping Angel Dress
The painted effect proved remarkably convincing, with many onlookers at DragonCon surprised to find the dress was fabric and not actual stone. The flexibility of the finished dress is demonstrated below.
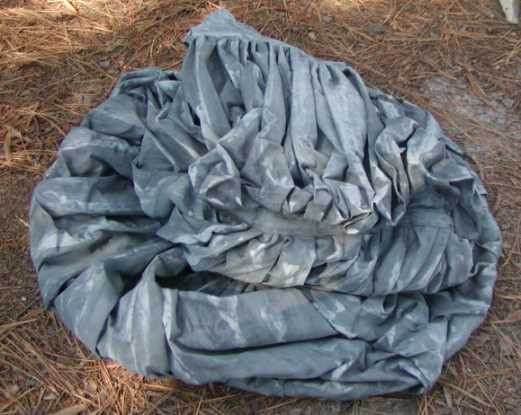 Flexible Weeping Angel Dress Fabric
 -
Practicality – Hidden Pockets: Even statues need practicality! Hidden pockets were sewn into the dress lining, perfect for carrying essentials like a wallet, phone, and water bottle.
 Hidden Pockets Inside Weeping Angel Dress
The back view illustrates how the wing panel seamlessly integrates into the dress design.
-
Personal Detail – Graffiti Touch: A unique personal touch was added with subtle graffiti-like markings on the dress, suggesting the wear and tear a stone statue might endure over time.
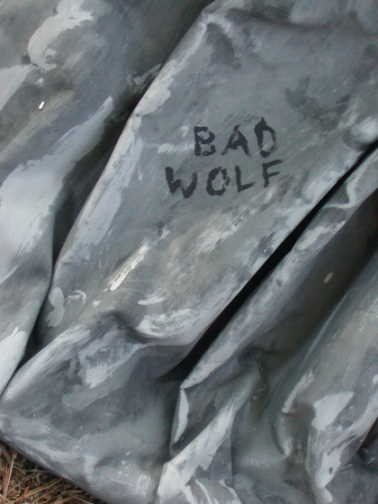 Graffiti Detail on Weeping Angel Costume Dress
Crafting Weeping Angel Wings: Lightweight and Realistic
The wings are crucial for capturing the Weeping Angel’s iconic silhouette. The goal was to create wings that were visually impressive yet lightweight and manageable for wearing at a convention.
Materials Used:
- Foamcore posterboard
- Craft foam
- Galvanized wire
- Foam
- Hot glue
- Acrylic paint
- Backpack strapping and buckles
Construction Steps:
-
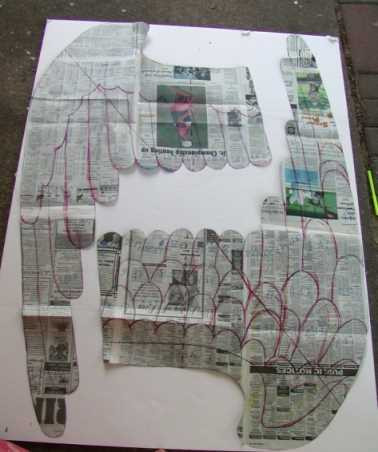
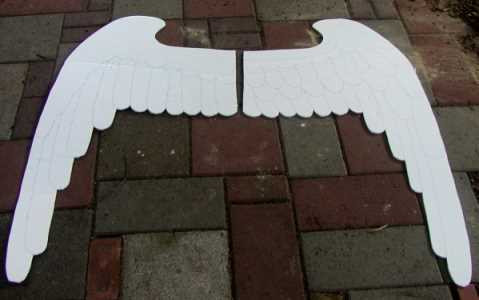
Reference and Patterning: Reference images of Weeping Angel wings were essential for accurate shaping and feather placement. Patterns were initially sketched on newspaper before being transferred to the foam core base.
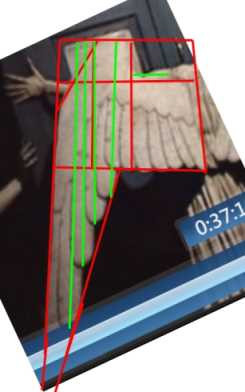 Weeping Angel Wing Reference Image
 -
Foamcore Wing Base: Foamcore poster board provided a sturdy yet lightweight base for the wings. Due to size limitations of standard foamcore sheets, large display boards intended for science fairs were utilized. These boards have folds, but by layering two pieces and aligning the folds in opposite directions, a strong, flat base was achieved.
 Foamcore Base for Weeping Angel Wings
 -
Wing Halves: Each wing consists of two halves – a front and a back piece – constructed from the layered foamcore.
 Front and Back Halves of Weeping Angel Wings
 -
Craft Foam Feathers: The feather details were created using craft foam. The pattern was divided into individual feathers, with extra material added to allow for overlapping. These foam feathers were then glued onto the foamcore base.
 Craft Foam Feathers Applied to Weeping Angel Wings
 -
Wing Support Structure: For structural integrity, galvanized wire was integrated into the wings. The central panel connecting the wings was made of two layers of stiff upholstery foam, with galvanized wire sewn between them and extending outwards to provide internal support within each wing.
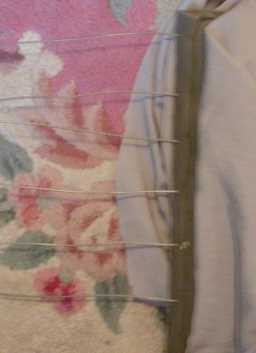 Internal Wire Support Structure for Weeping Angel Wings
 -
Fabric Covering: Fabric was draped and sewn over the entire wing structure, providing a surface for the glue to better adhere to and further securing the components. Excess fabric was trimmed away after gluing.
-
Assembly and Weighting: Massive amounts of hot glue were applied to the wing halves, sandwiching the wire supports between them. A marble-topped coffee table served as the ideal weight to apply pressure while the glue dried, ensuring a strong bond.
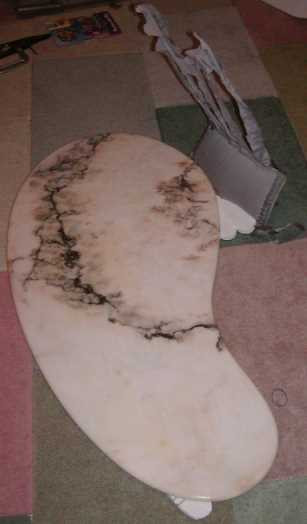 Wing Halves Being Glued and Weighted
 -
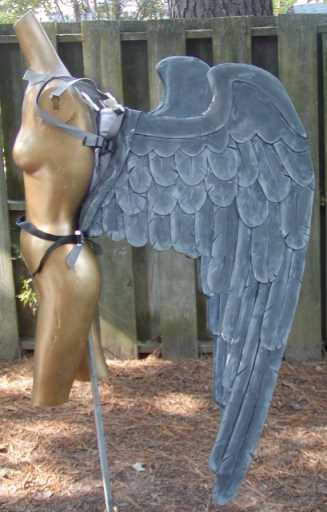
Wing Base Blending: To seamlessly integrate the wings with the dress, extra fabric from the dress was draped around the base of each wing, softening the transition and enhancing the overall costume silhouette.
 Wing Base Blended with Dress Fabric
 -
Wing Painting and Detailing: The same highlight and lowlight painting technique used for the dress was applied to the wings, using acrylic paint without fabric medium. Notches were cut into the foam feathers to enhance their realism and texture.
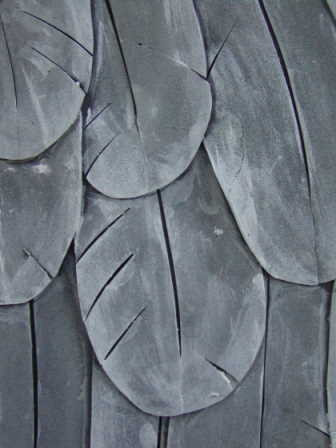 Painted and Detailed Weeping Angel Wings
 -
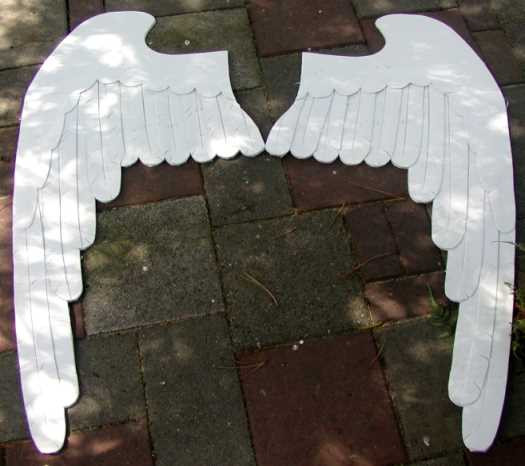
Finished Wings: The completed wings showcase the dramatic feathered texture and stone-like paint finish.
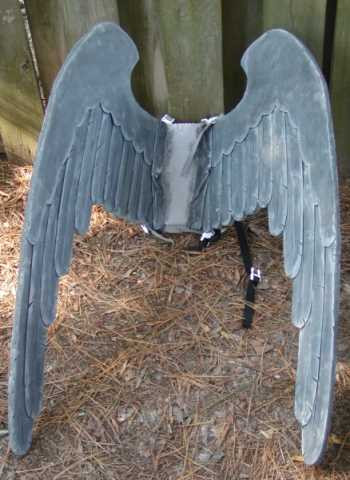 Finished Weeping Angel Wings
 -
Strap Assembly: Backpack straps and buckles were used to create a harness for wearing the wings. Future improvements include redesigning the strap system for easier independent donning and removal of the wings and dress.
 Backpack Strap Assembly for Weeping Angel Wings
Creating the Weeping Angel Mask: Eerie and Vision-Limiting
The mask is essential for embodying the terrifying visage of the Weeping Angels. The goal was to create a mask that was both visually accurate and, despite limited visibility, functional enough for navigating a convention.
Materials Used:
- Paper-mache mask
- Paperclay
- Acrylic paint
- Elmer’s glue
- Plastic gumball machine capsules
- Pantyhose
Construction Steps:
-
Mask Base and Sculpting: Pre-made paper mache masks were used as a base. Paperclay was then applied and sculpted to create the distinctive Weeping Angel facial features. This was the first time attempting sculpting, presenting a new and exciting challenge.
 Paperclay Sculpting on Weeping Angel Mask
 -
Eyes – Vision Capsules: The eyes were constructed using plastic capsules from gumball machines. Lenses were cut from these capsules, covered with grey pantyhose to obscure vision and create an eerie effect, and then hot-glued into the mask eye openings. The inside of the mask was painted black to minimize light reflection and further reduce visibility, enhancing the unsettling nature of the costume.
 Gumball Capsule Eyes for Weeping Angel Mask
 -
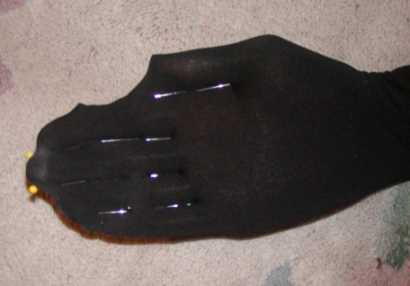
Visibility Test: A photo taken through the mask’s eye lens demonstrates the limited visibility, even in daylight. Nighttime visibility was significantly reduced. However, functional visibility was maintained, allowing for movement and interaction.
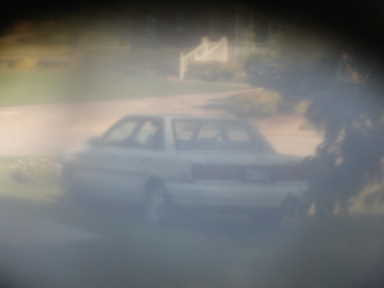 Visibility Test Through Weeping Angel Mask Eye
 -
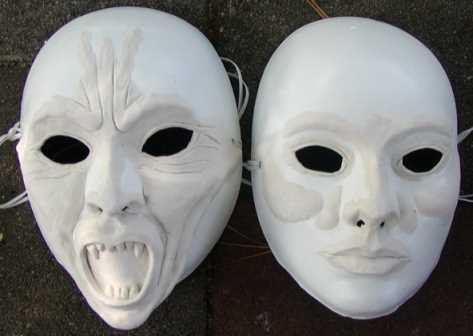
Mask Painting: The masks were painted using the same highlight and lowlight technique as the dress and wings, taking extra care with the facial details. The pantyhose lenses were glued in after painting to keep them clean during the painting process.
 Painted Weeping Angel Mask Detail
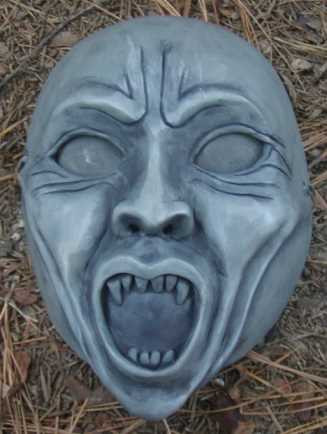 Finished Weeping Angel Mask
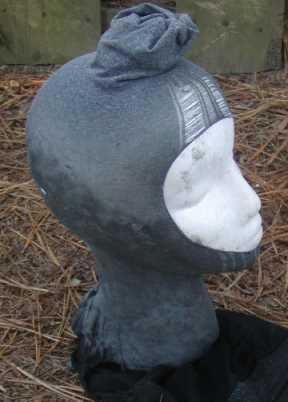
 -
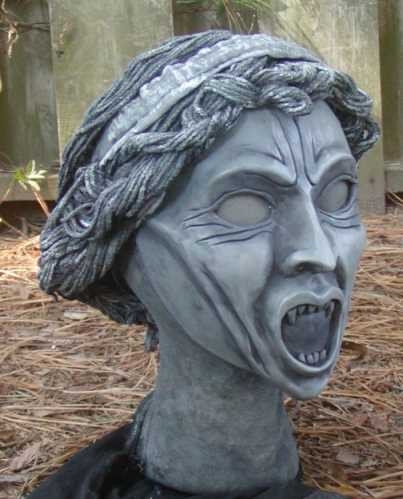
Mask Attachment: An elastic strap was used for simple mask attachment. Future plans include remaking the mask, as the current version is slightly too small. While it fits well on a mannequin head, a larger size would be more comfortable.
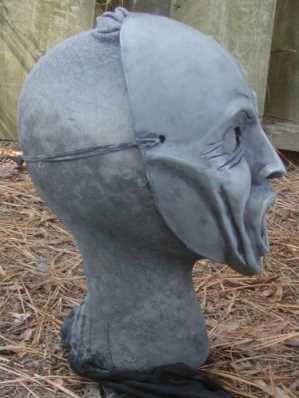 Weeping Angel Mask on Mannequin Head
Crafting the Weeping Angel Wig: Yarn and Pantyhose Transformation
The wig was a last-minute creation due to time constraints. Despite the rushed process, it effectively completes the Weeping Angel head silhouette.
Materials Used:
- Pantyhose
- Yarn
- Acrylic paint/fabric-medium
- Fabric
Construction Steps:
-
Wig Cap Base: Pantyhose legs were cut off and the remaining portion was sewn into a cap shape to form the base of the wig.
-
Yarn Styling: Yarn was stitched down the center seam of the pantyhose cap. This yarn was then styled and held in place using a significant amount of fabric glue (approximately 2.5 bottles). A fabric hairband was added for comfort and security.
-
Painting: The wig was painted with acrylic paint mixed with fabric medium to match the stone effect of the rest of the costume.
 Weeping Angel Wig Front View
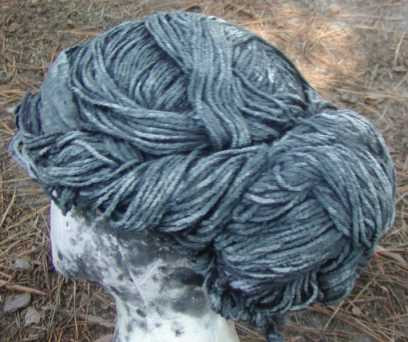 Weeping Angel Wig Side View
 -
Internal Construction: An image shows the internal structure of the wig, revealing the yarn attached to the pantyhose base.
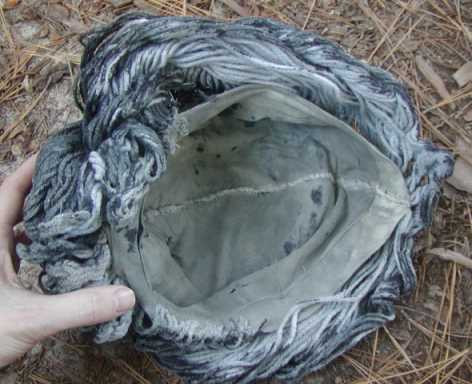 Internal Construction of Weeping Angel Wig
 -
Head Form Display: Images show the wig on a head form, illustrating the styled yarn and overall shape. Future plans include remaking the wig for better accuracy and fit, possibly experimenting with sculpting techniques.
 Weeping Angel Wig on Head Form Front
 Weeping Angel Wig on Head Form Side
Finishing Touches: Arms, Neck, and Feet as Stone
To complete the petrified Weeping Angel look from head to toe, attention was given to the arms, neck, and feet.
Materials Used:
- Opaque tights
- Acrylic paint/fabric-medium
- Nail polish
- Artificial nails
- Toe-socks
- Thrift-store sandals
Construction Steps:
-
Arm Gloves from Tights: Creating seamless arm coverings that resembled stone skin was achieved using opaque tights. Gloves were fashioned by cutting the crotch out of a pair of tights to create a neck opening. The tights were pulled on, with arms through each leg, and finger divisions were marked with pins.
 Tights Being Pinned for Weeping Angel Gloves
 -
Sewing Finger Seams: Following the pin markings, cuts were made, and finger seams were hand-sewn using a whipstitch. A small tuck was taken at the wrist to refine the glove’s fit and reduce wrinkles.
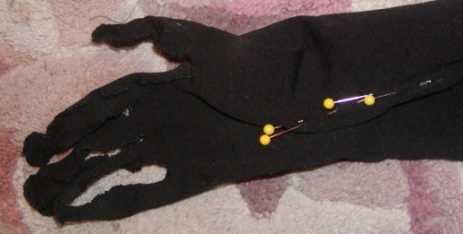 Sewing Finger Seams on Weeping Angel Gloves
 -
Seam Stabilization: Nail polish was dabbed along the seams immediately after sewing to prevent runs in the tights and reinforce the stitching. The gloves were then turned inside out, positioning the seams on the inside.
-
Artificial Nail Fingers: Artificial nails were glued to the glove fingertips while being worn to ensure correct placement and create the illusion of stone-like fingers. Lotion or oil was applied to fingertips beforehand to prevent glue from adhering to skin.
-
Glove Painting: The gloves were painted while being worn to prevent shrinkage and ensure a perfect fit. The same acrylic paint and fabric medium mixture was used. Silver nail polish was applied to the artificial nails prior to painting to prevent pink plastic from showing if the paint scratched.
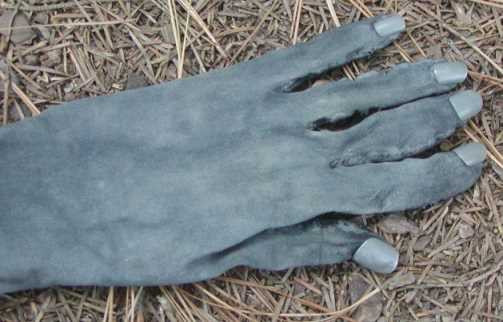 Unworn Weeping Angel Gloves Showing Finger Detail
 -
Convincing Illusion: Once worn, the gloves create a highly convincing stone-like arm and hand effect.
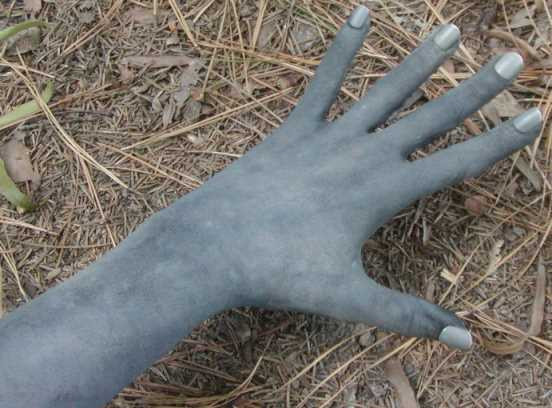 Worn Weeping Angel Gloves Illusion
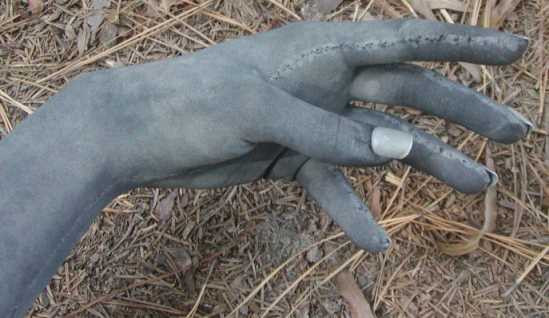 Close-up of Worn Weeping Angel Gloves
 -
Neck Covering: The neck area was covered using a sleeve cut from another pair of tights, with nail polish used to prevent runs, ensuring a seamless transition from the mask to the body.
 Weeping Angel Neck Covering Detail
 -
Stone Feet Detail: As a subtle detail, fake toenails were added to grey toe-socks. Thrift store sandals were painted grey to complete the stone foot look, ensuring no detail was overlooked, even if rarely seen.
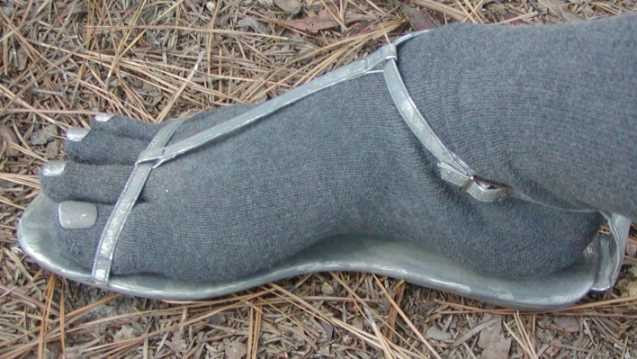 Weeping Angel Stone Feet Detail with Sandals and Toe Socks
This detailed guide offers a comprehensive look into crafting a Weeping Angel costume. While certain elements are slated for future refinement, the overall result was a successful and well-received costume, especially considering the time constraints of its creation. Ready to petrify your next event? Try building your own Weeping Angel costume and bring a terrifying piece of Doctor Who to life!