Doctor’s sausage, or doktorskaya kolbasa as it’s known in Russian, was more than just food in the Soviet Union; it was a symbol of quality and a coveted staple, especially for holiday feasts. Imagine a sausage so good, it makes regular bologna pale in comparison. That’s doctor’s sausage – a flavorful experience far beyond the ordinary, and surprisingly achievable to make in your own kitchen.
 Doctor
What Exactly is Doctor’s Sausage?
Doctor’s sausage is essentially a high-grade bologna-style sausage that originated and rose to immense popularity within the Soviet Union. Its appeal wasn’t just in its taste, but also in its composition. It was crafted from top-quality meat, deliberately avoiding cheap fillers and minimizing fat content. This commitment to quality positioned doctor’s sausage as a premium product, reflected in its higher price point.
Even today, long after the dissolution of the Soviet Union in 1991, doctor’s sausage endures. However, modern iterations often fall short of the rigorous standards of the original, failing to capture the authentic taste and quality that made it so iconic.
A Glimpse into History: The Story Behind Doctor’s Sausage
In the years following the 1917 Great October Socialist Revolution, the Soviet government embarked on a mission to standardize food production. This initiative led to the establishment of State Standards, first published in 1925. This system evolved into what became widely known as GOST (Государственный Стандарт), which translates to State Standard.
Remarkably, the detailed GOST standards, including recipes and production methods for beloved foods, were publicly accessible. This transparency allowed anyone to understand the specifics behind these culinary creations.
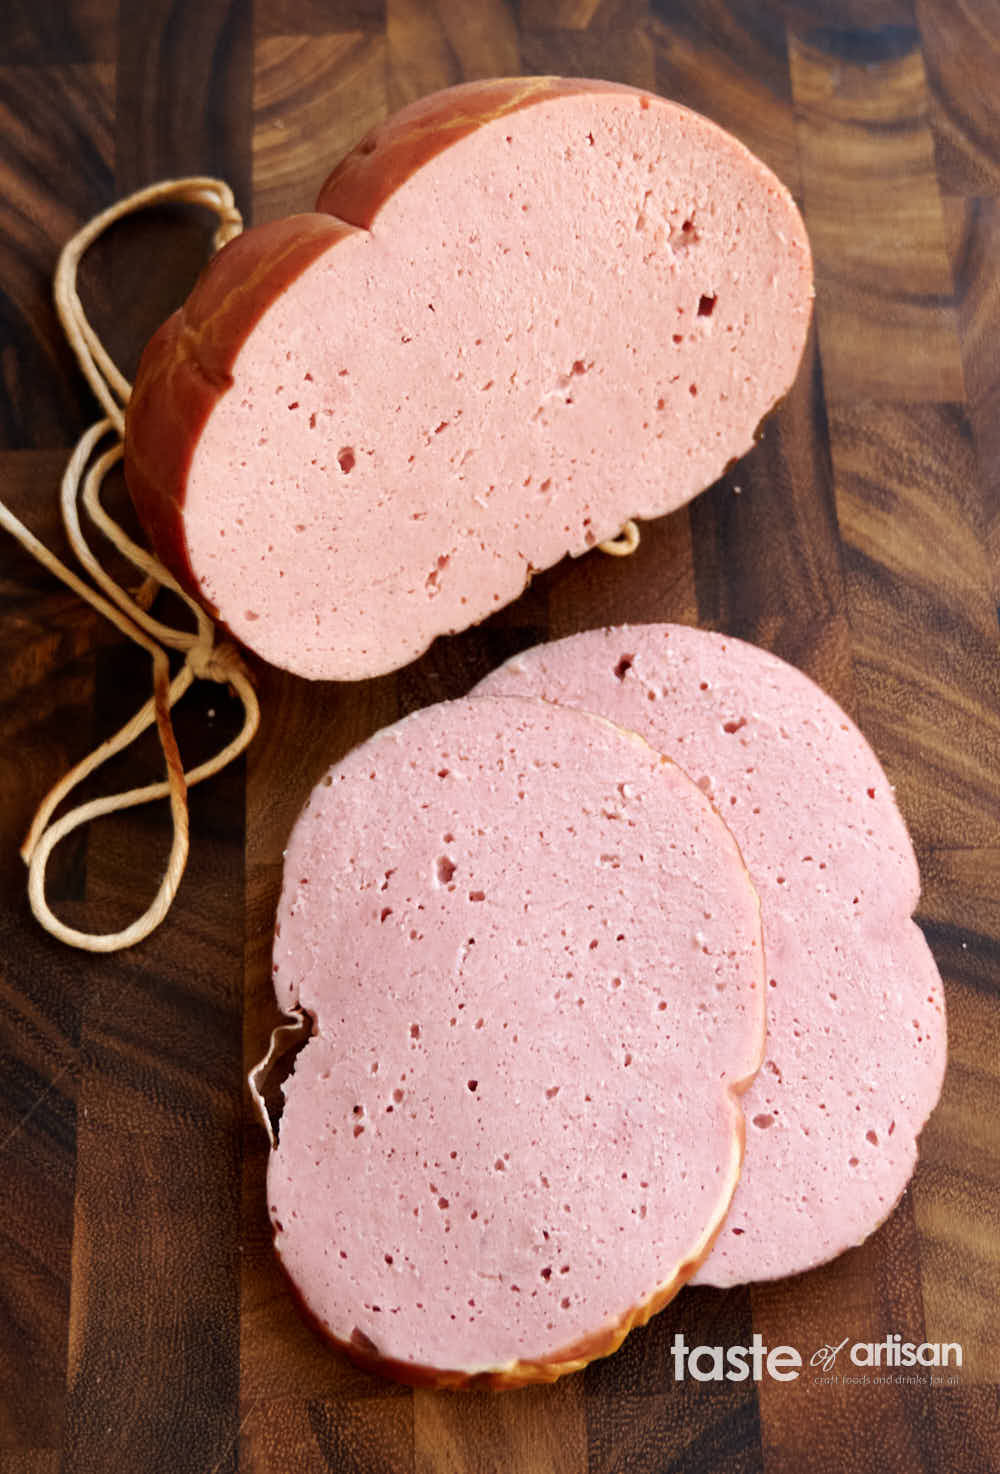
The inaugural recipe for doctor’s sausage emerged in 1938. Later, in 1979, a revised recipe was introduced under standard 23670-79. It is this 1979 formulation that most people recognize and cherish as the quintessential doctor’s sausage.
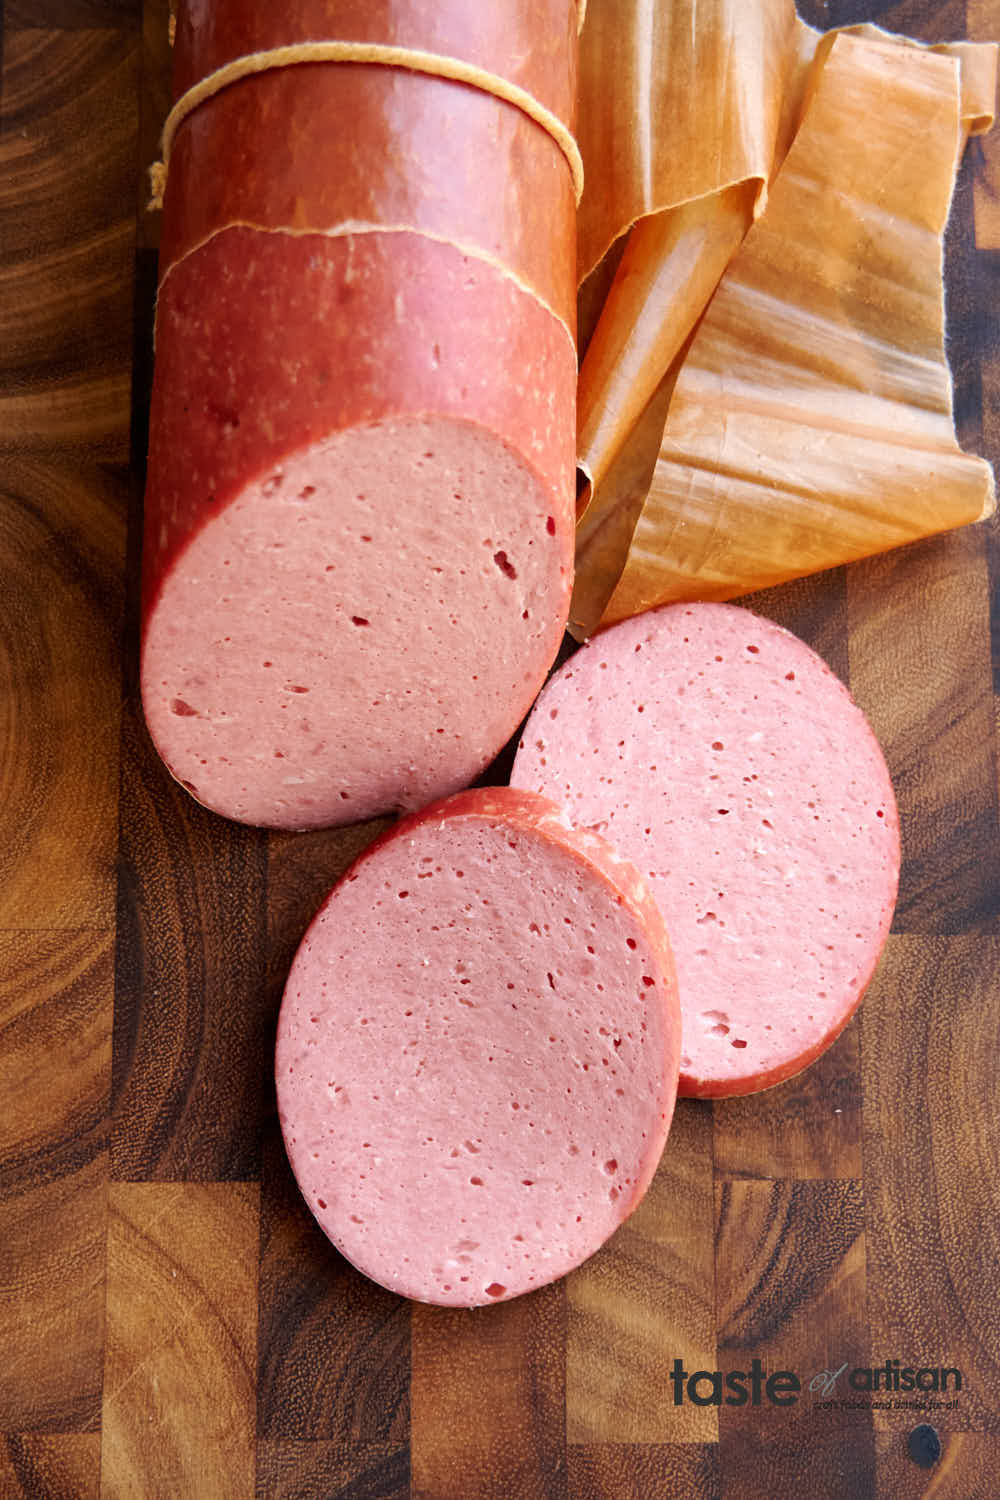
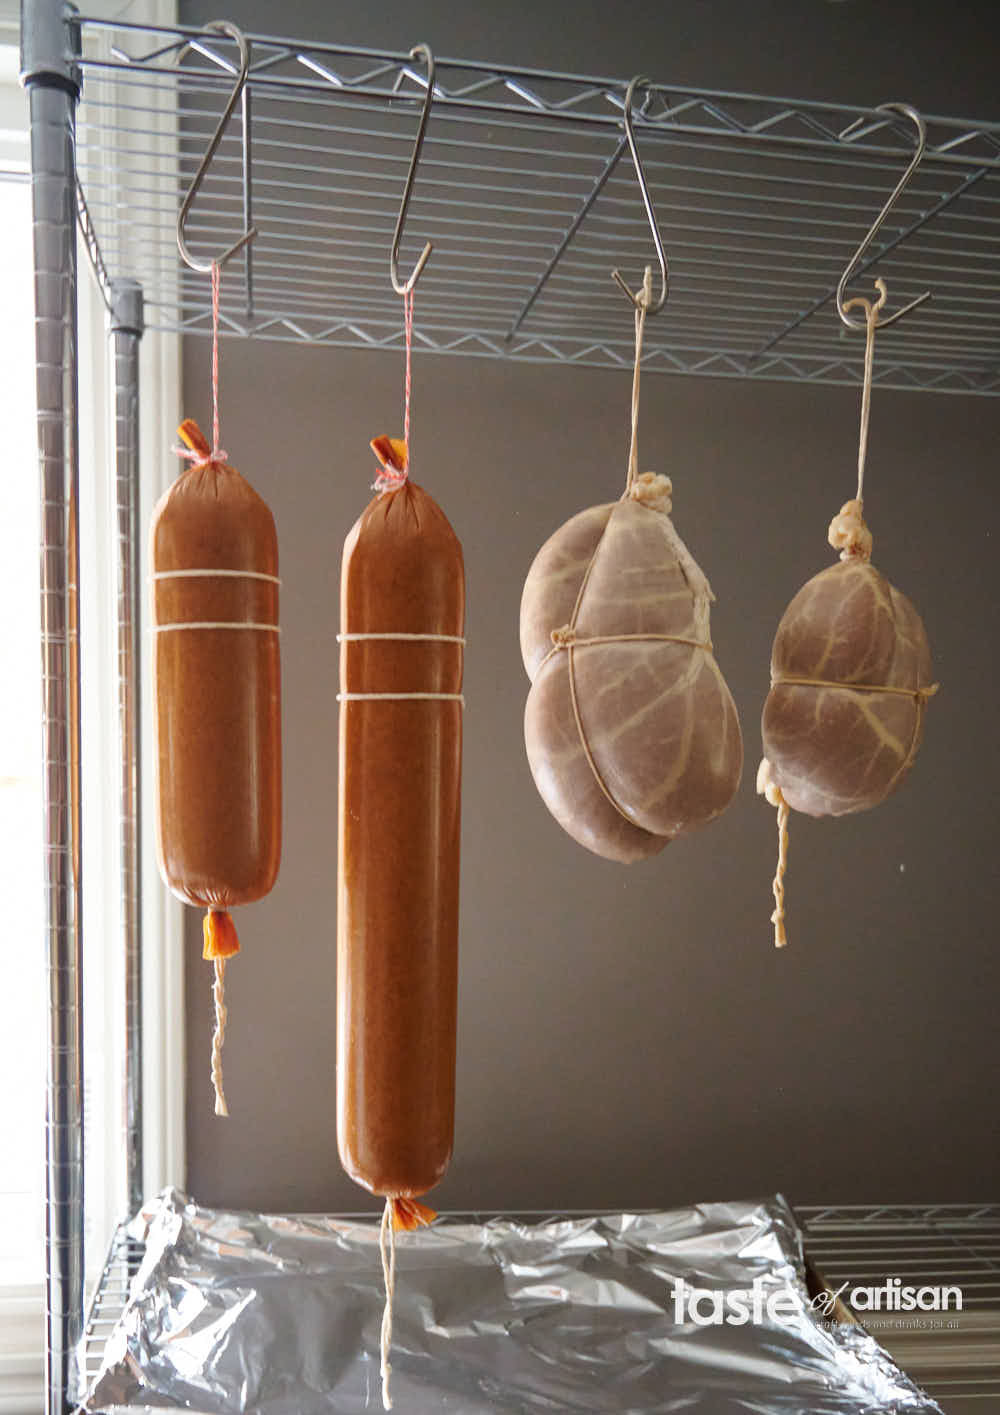
Within the diverse range of Soviet sausages, visual distinction was key. While some sausages might have appeared similar, each type had a unique tying pattern. This allowed for easy identification. Doctor’s sausage, for instance, when packaged in long, slender casings, was distinguished by two parallel strings at one end. Larger sausages in natural casings were tied with a distinctive cross pattern.
 Doctor
Finding Doctor’s Sausage Today
Outside of contemporary Russia and certain Eastern European nations with post-Soviet connections, doctor’s sausage is typically found in areas with significant Russian-speaking populations. If you’re seeking doktorskaya kolbasa, Russian grocery stores are your best bet. In North American cities like New York (check Brighton Bazaar), Toronto (visit Yummy Market), Chicago, and Dallas, among others, you’re likely to find this unique sausage.
Crafting Doctor’s Sausage: A Homemade Approach
Doctor’s sausage is traditionally made using high-quality, fresh meat, specifically from younger animals.
The process of making doctor’s sausage involves these primary stages:
- Meat Preparation: Begin by meticulously preparing the meat. Remove all connective tissue, fat, and sinew. Then, cut the meat into substantial pieces.
- Salting and Curing: The meat is then salted and cured for a period of 48 to 72 hours. This curing process is crucial for flavor and texture development.
- Grinding: After curing, the meat undergoes grinding through a fine 3mm (1/8″) grinder plate to achieve a smooth consistency.
- Emulsification: The ground meat is further processed and emulsified using bowl cutters, a key step in creating the sausage’s characteristic texture.
- Mixing and Seasoning: The emulsified meat is then combined with a precise blend of seasonings to achieve the signature doctor’s sausage flavor profile.
- Casing Stuffing: The seasoned meat mixture is carefully stuffed into casings, which can be either natural or artificial. Artificial casings typically range from 65 to 125 mm in diameter.
- Settling: The stuffed sausages are hung and allowed to settle in refrigerated conditions for 16 to 24 hours. This stage allows excess water to drain, further enhancing the sausage’s texture.
- “Frying” (Coloring): An initial cooking stage, often referred to as “frying,” involves cooking the sausages at temperatures between 140°F and 195°F with wood smoke for about 2 hours. This step is primarily for color development and imparting a smoky flavor.
- Poaching or Steam-Baking: Next, the sausages are either poached in water or steam-baked at around 167°F to 185°F for 1.5 to 2 hours, until the internal temperature reaches a safe 154°F. This is the primary cooking phase.
- Cooling and Refrigeration: Finally, the sausages are rapidly cooled in cold water for 30 minutes or hung in a cool environment (50°F-55°F) for 10-12 hours before being refrigerated.
Simplifying the Homemade Process
Creating doctor’s sausage at home can be streamlined. Certain steps can be adapted or even omitted without significantly compromising the final product.
For instance, the initial “frying” or smoking stage can be skipped, especially if using dark fibrous casings where color enhancement isn’t critical. Commercially, this color step was important for visual appeal. However, for home-made sausage, this is less of a concern. Yet, incorporating smoking, even at home, offers benefits beyond just color. It imparts a desirable smoky flavor and contributes to the sausage’s preservation. Smoked doctor’s sausage tends to have a longer refrigerator shelf life.
If possible, smoking is highly recommended. A smoker or a dedicated smokehouse capable of maintaining temperatures between 140°F and 195°F is necessary for this step.
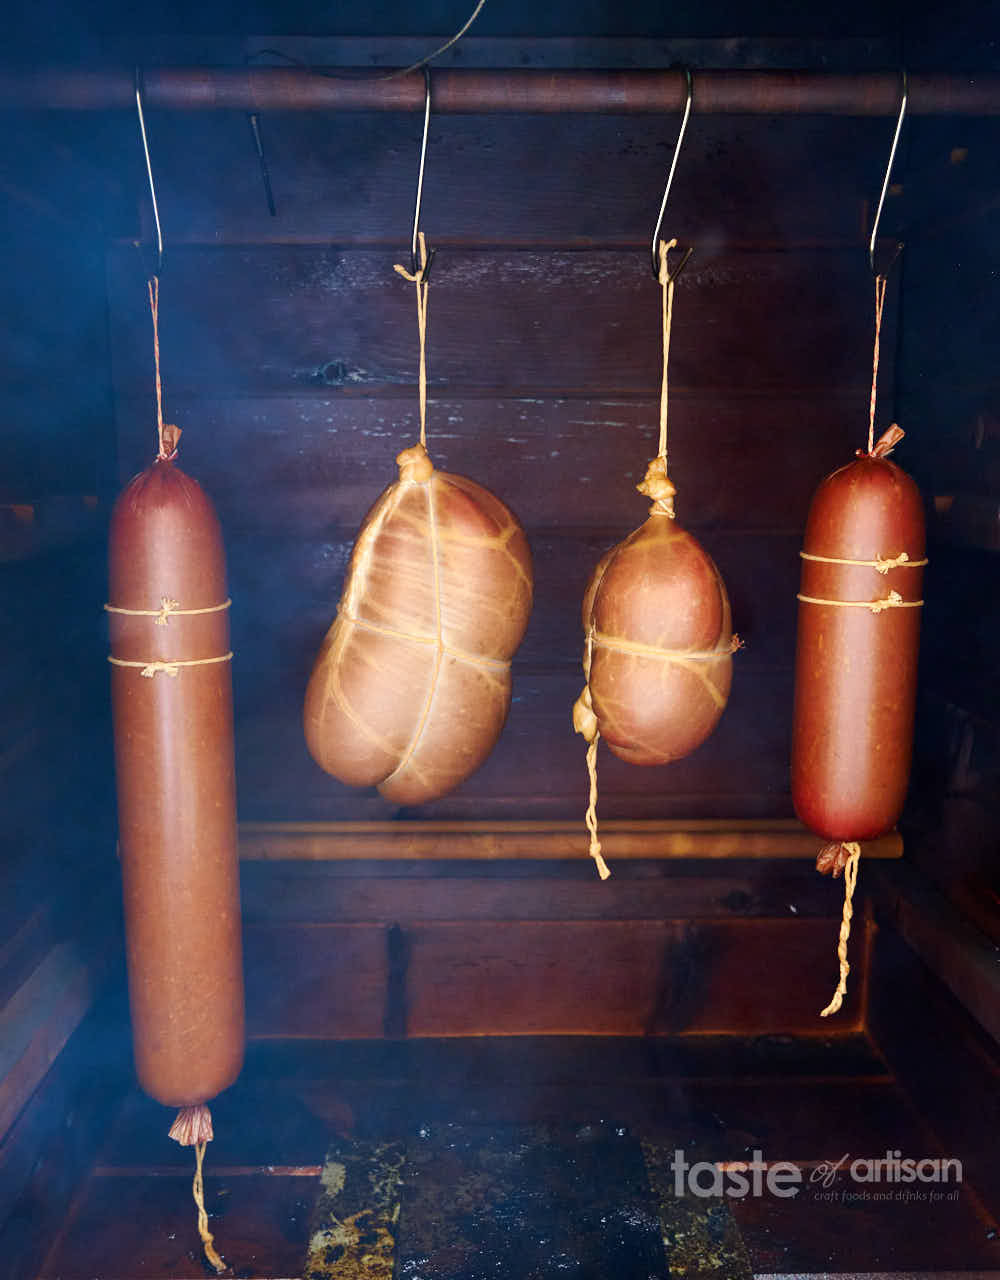 Smoking doctor
The 16-24 hour refrigeration settling period can be shortened by hanging the sausages at room temperature for 4-6 hours. In fact, allowing the sausages to warm up slightly at room temperature before smoking or cooking is generally advisable. Introducing cold sausages directly into a hot smoker or oven can lead to undesirable water or fat blisters forming beneath the casing.
Meat curing time can also be reduced to 24 hours by cutting the meat into smaller pieces, around 1-inch cubes.
Steam-baking at home can present some challenges. For thinner sausages (55mm diameter), it might take around 2 hours, while larger natural casing sausages could require up to 2 hours and 40 minutes. Maintaining consistent steam levels in a home oven can be tricky, often necessitating the addition of boiling water every 30 minutes or so.
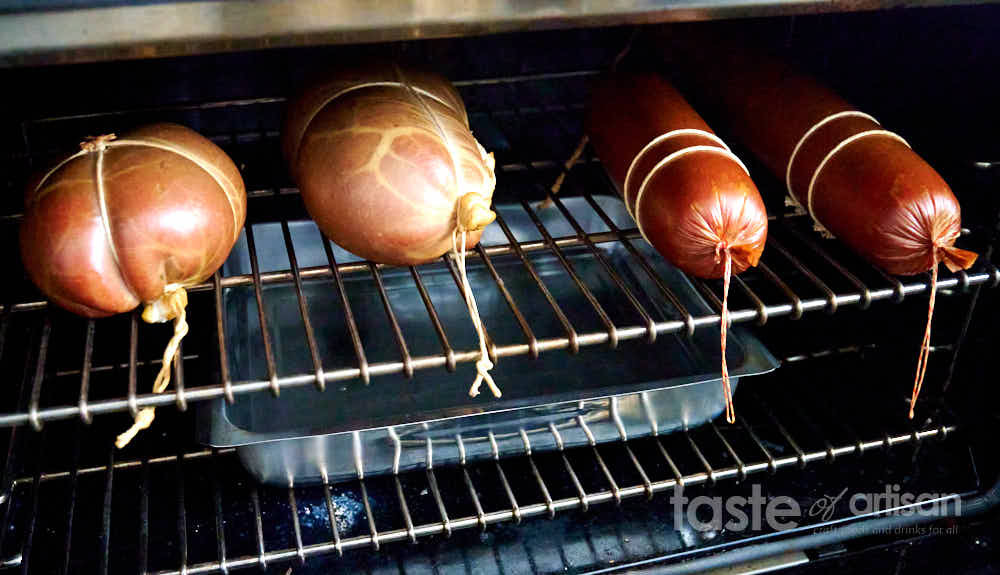 Steam baking doctor
Steam-baking can sometimes result in a slightly drier skin due to the difficulty in maintaining constant steam. While not a major issue, it can be noticeable. A large steamer would be ideal, but typical steamer temperatures are often too high, ranging from 214°F to 240°F. Poaching emerges as a quicker and more predictable alternative cooking method.
Finally, since most home cooks lack professional bowl cutters, a food processor becomes the practical substitute for emulsifying the meat. Process the meat in small batches, about 2-3 cups at a time, with approximately half a cup of ice water to maintain a cold temperature. This method works effectively.
While blenders and hand blenders can also be used, they tend to be less efficient and more cumbersome for achieving proper emulsification. Throughout the entire process, it’s crucial to keep the meat temperature below 50°F. Exceeding this temperature can also contribute to the formation of water or fat blisters under the sausage casing.
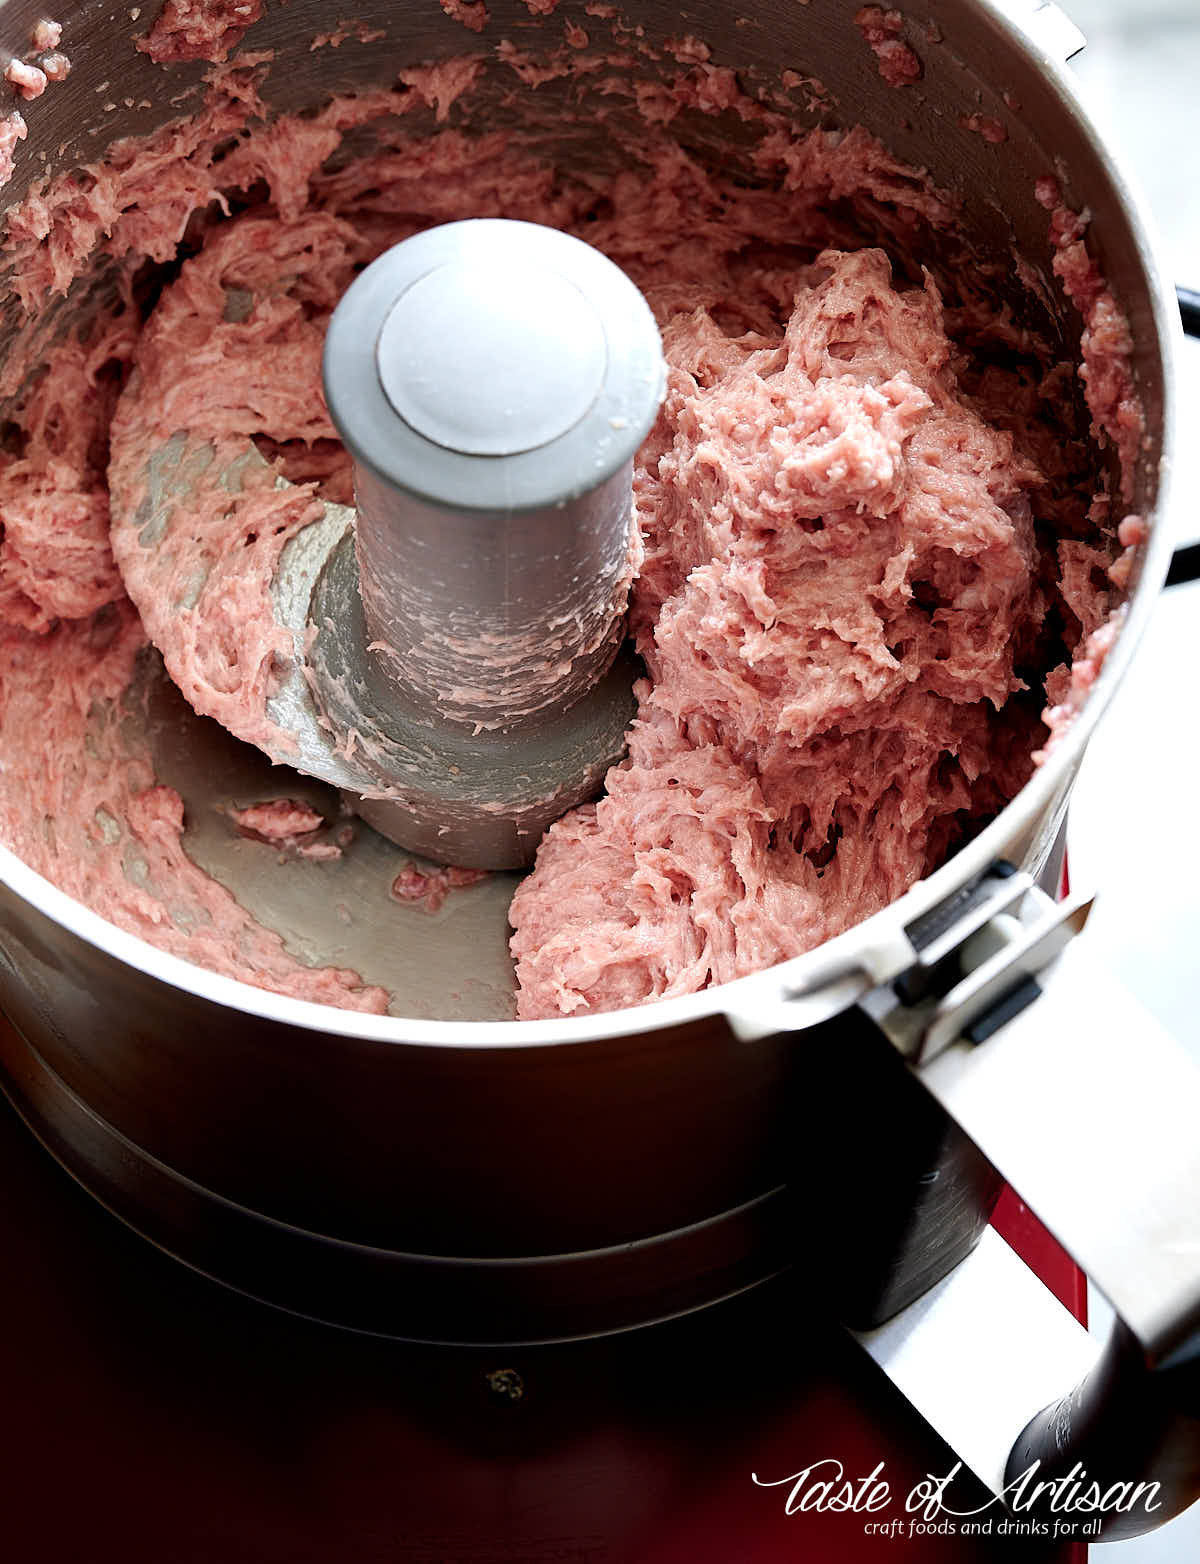 Emulsified meat inside Robot Coupe food processor.
Doctor’s Sausage: A Tale of Two Recipes – 1938 vs. 1979
The original 1938 doctor’s sausage recipe differed significantly from the later, more popular 1979 version. The 1938 sausage was considerably leaner and excluded binders. Its composition was 15% lean beef, 60% lean pork, and 25% fatty pork (with a minimum fat content of 50% in the fatty pork component).
While commercial versions of the 1938 doctor’s sausage are no longer available, homemade recreations reveal a sausage with a drier, crumblier texture compared to its successor. Although less smooth than the 1979 version, the 1938 sausage is still flavorful and enjoyable, especially when pan-fried with eggs for a hearty breakfast.
 1938 doctor
The 1979 iteration of doctor’s sausage brought about notable changes. It comprised 25% lean beef, 70% semi-lean pork, 3% eggs, and 2% dry milk. These additions significantly altered the sausage’s texture, resulting in a creamier and smoother mouthfeel. The 1979 recipe also featured a reduced salt content, which many found preferable. This 1979 version is widely considered the superior and more desirable doctor’s sausage.
Homemade Doktorskaya: Is It Worth the Effort?
Is making doctor’s sausage at home truly worthwhile? The answer is a resounding yes. The primary reason is authenticity. The genuine, original doctor’s sausage is simply no longer commercially available. Modern industrial versions have deviated from the original recipes, often prioritizing cost reduction and faster production over traditional quality. Even premium commercial options fail to replicate the distinctive taste of the original. However, a homemade version, crafted according to the authentic GOST standard, successfully captures that nostalgic flavor. While it demands time and effort, the reward is a taste experience that is undeniably worth it.
Doctor’s Sausage Recipe
4.75 from 4 votes
Print Recipe Pin Recipe Rate Recipe
Course: Appetizer, Dinner, Lunch
Cuisine: Eastern European
Keyword: doctor’s sausage, doktorskaya kolbasa
Prep Time: 3 hours
Cook Time: 4 hours
Resting time: 3 days 4 hours
Total Time: 3 days 11 hours
Servings: 20
Calories: 166kcal
Author: Victor
Ingredients
- 1 1/2 lbs lean beef
- 3 1/2 lbs semi-lean pork 25% – 30% fat
- 1 egg lightly beaten
- 1/3 cup dry milk heaping
- 2 Tbsp kosher salt see notes
- 1 tsp Cure #1 level
- 1 tsp sugar heaping
- 1/2 tsp nutmeg
Instructions
- Cut the meat into 1″ pieces, place in a large bowl, mix with salt/Cure #1 mixture. Cover and refrigerate for 24-48 hours.
- Grind the meat through a 1/8″ (3 mm) plate. Emulsify in a food processor, 2-3 cups at a time, adding up to 25% – 30% icy water or ice to keep the meat cold. The meat should never get warmer than 50F (10C).
- Add the egg, dry milk, sugar, and nutmeg and mix everything together.
- Stuff the meat into 2.5″ – 3″ (50 – 75 mm) synthetic fibrous casings or large natural casings. Stuff the casings firmly and tie with a butcher’s twine on both ends. Prick any visible air pockets with a needle.
- Refrigerate for 16-24 hours.
- Before cooking, hang the sausages in a drafty area and dry them at room temperature for about 4 hours.
- Optional step: Transfer to the smoker and further dry without smoke at around 130F for 30 minutes. Next, smoke over oak/beech wood for 2 hours at around 140F. The guidelines allow smoking this sausage between 140F and 195F.
- Poach at 167F – 185F (75-85C) or steam-bake in the oven with a pan of hot water underneath at 175F-185F (80-85C) for 1.5 – 2.5 hours or until the internal temperature reaches 154F (68C).
- Chill the sausage under a cold shower or in a cool room (50F – 55F / 10C-12C) for 10-12 hours or until the internal temperature reaches about 64F, then wrap in plain butcher’s paper and refrigerate.
- This sausage will keep in the fridge for about 2 weeks (poached, non-smoked) and 3+ weeks if smoked and steam-baked in the oven. Freezing is not recommended.
Notes
The original recipe calls for 3 Tbsp (47 g) of salt, including Cure #1. I find this too salty for my taste but you can bump the salt up if you wish.
Nutrition
Calories: 166kcal | Carbohydrates: 1g | Protein: 23g | Fat: 7g | Saturated Fat: 3g | Polyunsaturated Fat: 1g | Monounsaturated Fat: 3g | Trans Fat: 1g | Cholesterol: 79mg | Sodium: 899mg | Potassium: 419mg | Fiber: 1g | Sugar: 1g | Vitamin A: 32IU | Vitamin C: 1mg | Calcium: 35mg | Iron: 2mg
Previous Post
Next Post