
Are you brave enough to face the shadows? To truly terrify at your next Comic Con, look no further than the Vashta Nerada from Doctor Who. These creatures, famously known as the “shadows that melt the flesh,” are not only terrifying on screen but also make for a uniquely impressive and chilling cosplay. This guide will walk you through creating your own Vashta Nerada costume, inspired by a dedicated fan’s build, ensuring you stand out with a cosplay that’s both accurate and terrifyingly effective.
First, let’s delve into the darkness with a look at the original creator’s impressive work:
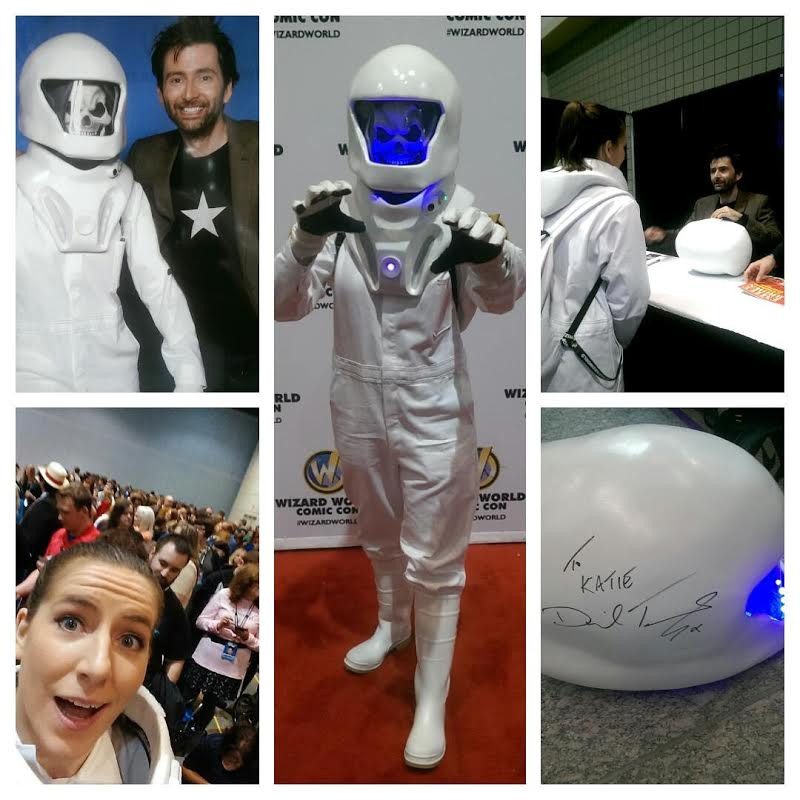
This tutorial is based on a build that took approximately a week and a half and around $400 in materials back in 2015. Costs and time may vary today, but the core methods remain incredibly effective for crafting a high-quality Vashta Nerada cosplay. The original creator wore this costume to Wizard World Comic Con Raleigh in honor of David Tennant, highlighting the enduring popularity of this Doctor Who monster.
This guide is heavily inspired by and expands upon this original tutorial. We highly recommend reviewing it for additional context and insights.
A Crucial Safety Disclaimer
Before we dive into the creation process, it’s paramount to understand the safety measures required for this project. Working with fiberglass, resins, and power tools necessitates a responsible approach.
- Ventilation is Key: This project must be undertaken in a well-ventilated outdoor space, far from children and pets. The fumes from resins and paints are toxic and should not be inhaled.
- Protective Gear is Non-Negotiable: Always wear appropriate safety gear. This includes latex and work gloves to protect your skin, particulate masks to avoid inhaling harmful particles, safety glasses and goggles to shield your eyes, and full-body work clothes to cover your skin completely.
- Handle with Care: Power tools and toxic materials can cause serious harm if mishandled. Prioritize safety at every step to prevent injury and illness.
Step 1: Assembling Your Arsenal – Materials Gathering
To embark on your Vashta Nerada transformation, you’ll need to gather a specific list of materials. Here’s a comprehensive breakdown to ensure you’re fully equipped:
-
The Base Suit:
- Men’s White Coverall: When selecting your size, prioritize your chest measurement to ensure a comfortable fit over the pepakura chest piece.
- Women’s White Gloves: These gloves tend to run small, so it’s advisable to order one size larger than your usual size for comfortable wear throughout your cosplay event.
- Women’s White Rainboots: Essential for completing the uniform look from head to toe in white.
- White Backpack: A plain white backpack serves as a base for the costume’s back detailing and utility.
-
Mask and Detailing:
- Skeleton Mask: A crucial element for the Vashta Nerada’s eerie visage. While the original creator found one at Goodwill, the linked option is a suitable alternative if you need to purchase one new.
- Card-stock paper (35 pages): Used for creating the Pepakura models that form the base of the helmet and chest piece.
- Hot glue gun and extra glue sticks: For assembling the Pepakura models quickly and effectively.
- Scissors: For precise cutting of the Pepakura templates and fiberglass mat.
-
Crafting and Molding:
- Large garbage bags (1 box): Dollar store varieties are perfect for both trash disposal during messy crafting and for use as cheap tarps to protect your workspace.
- Small plastic cups (1 large bag): For mixing resins and fillers in disposable containers.
- Plastic spoons (1 large bag): Ideal for stirring and applying resins and fillers, and easily disposable.
- Foam paint brushes (5 large bags): Essential for applying fiberglass resin smoothly and evenly.
- Card table: Provides a stable and portable work surface, especially useful for outdoor crafting.
- Latex Gloves (1 box): For hand protection when working with resins, fillers, and paints.
- Bondo Fiberglass Mat (3 packages): Provides structural strength and rigidity to the Pepakura models.
- Bondo Fiberglass Resin with Hardener (2 quarts): The liquid component that, when mixed with the hardener, creates a hard, durable layer over the Pepakura.
- Bondo Body Filler with Hardener (4 cans): Used to smooth out imperfections and refine the shape of the helmet and chest piece after fiberglassing.
- Bondo Spreaders (1 pack): For applying body filler smoothly and evenly.
- Elmer’s Wood Filler (1 quart): For filling in minor imperfections and achieving a super smooth finish before painting.
- 80 Grit Sandpaper (2 packs): Coarse sandpaper for initial shaping and removing larger imperfections in the Bondo.
- 120 Grit Sandpaper (1 pack): Finer sandpaper for smoothing surfaces after using 80 grit, preparing for primer and paint.
- Blue painter’s tape: For masking areas during painting to achieve clean lines and protect sections from overspray.
-
Paints and Finishes:
- Rust-Oleum 2 in 1 Filler and Sandable Grey Primer Spray Paint (3 cans): Provides a base layer that fills minor scratches and is sandable, ensuring a smooth paint finish.
- Krylon Flat Black Spray Paint (1 can): For painting interior sections of the helmet and chest piece black, adding depth and shadow.
- Krylon Gloss White Spray Paint (3 cans): The primary color for the exterior, requiring multiple light coats for a smooth, glossy white finish.
- Rust-Oleum Clear Enamel Spray Paint (2 cans): Protective top coat to seal the paint and provide durability, preventing scratches and wear.
- Americana Grey Acrylic Paint (1 bottle): For hand-painting grey details on the chest piece and communicator.
- Americana Black Acrylic Paint (1 bottle): For adding black accents and details, enhancing the costume’s visual depth.
- Medium-sized paint brushes: For applying acrylic paints with precision.
-
Electronics and Lighting:
- EPS (expanded polystyrene) foam (Styrofoam) (about a foot): For sculpting the 3D decals, such as the chest circle and communicator housing.
- Battery Operated Fan: Crucial for comfort inside the helmet, preventing overheating.
- AA batteries (12): Powering both the helmet lights (8) and the fan (4).
- AA battery holder: To neatly organize and connect the AA batteries for the helmet lights.
- D batteries (4): Power source for the chest piece lights.
- D battery holder: To hold the D batteries securely for the chest lights.
- 9V battery connectors: For connecting power to the LED strips.
- XKTTSUEERCRR RGB LEDs (1 roll): For creating the distinct blue and green lights on the chest and helmet.
- LED strip connectors: Simplifies connecting sections of LED strips without soldering.
- 18 gauge wire (1 roll): For wiring the LEDs and battery packs together.
- Hook up wire: Smaller gauge wire for delicate connections, especially with LEDs.
- Pack of resistors: Essential for regulating current to the LEDs to prevent burnout.
- Sliding Bar Report Covers: For creating the visor and diffusing light for the 3D decals.
-
Adhesives and Fasteners:
- Gorilla Super Glue (1 bottle): For strong, permanent bonds in various assembly steps.
- Black Gorilla tape (1 roll): Heavy-duty tape for securing batteries and reinforcing connections.
- 3/4″ White, Sewable Velcro (1 box): For attaching the helmet securely to the chest piece while allowing for easy removal.
- Optional: Ultra fine tip Sharpie: For adding black seam details to the coverall if desired.
Step 2: Tooling Up – Essential Instruments for Cosplay Crafting
Having the right tools is just as crucial as gathering the materials. Here’s a list of tools you’ll need to bring your Vashta Nerada cosplay to life:
- Seam ripper: For carefully removing pockets and logos from the coverall and backpack without damaging the fabric.
- Dremel: A versatile rotary tool essential for cutting, shaping, and refining fiberglass and Bondo.
- Power sander: A power sander is invaluable for efficiently smoothing large areas of Bondo, saving significant time and effort.
- Sanding block: For detailed sanding and reaching corners and curves that the power sander might miss. A piece of EPS foam works great as a comfortable sanding block.
- Soldering iron and solder: Necessary for creating reliable electrical connections for the LED lights.
- Helping hands: These tools are incredibly helpful for holding small components steady while soldering, making intricate electrical work easier and safer.
Step 3: Tailoring the Coverall – Adjusting Your Base Garment
The white coverall is your canvas. Let’s prepare it:
- Pocket Removal: Use your seam ripper to carefully remove the butt pockets and at least one of the chest pockets. The original creator kept one chest pocket for phone storage, a practical touch for conventions. If you prefer complete accuracy, remove both.
- Undergarments: Plan to wear nude-colored undergarments to maintain the seamless white look of the costume.
- Optional Seam Detailing: For enhanced accuracy, consider using a fine-tip black Sharpie to color in the seams of the coverall, particularly around the waist and other prominent areas, mirroring the on-screen costumes. This step, while optional, can add a noticeable level of detail.
Step 4: Backpack Transformation – Logo Be Gone
- Logo Removal: Simply use the seam ripper to remove any visible logos from the white backpack. This ensures a uniform, unbranded look that fits the Vashta Nerada aesthetic.
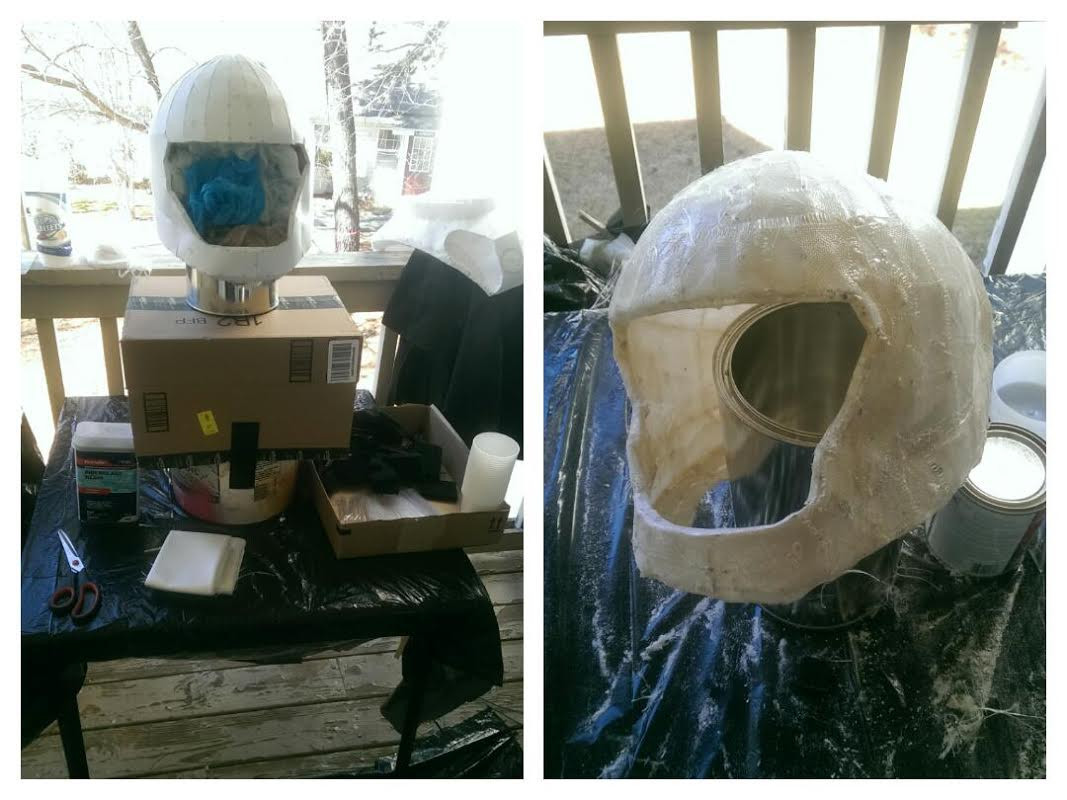
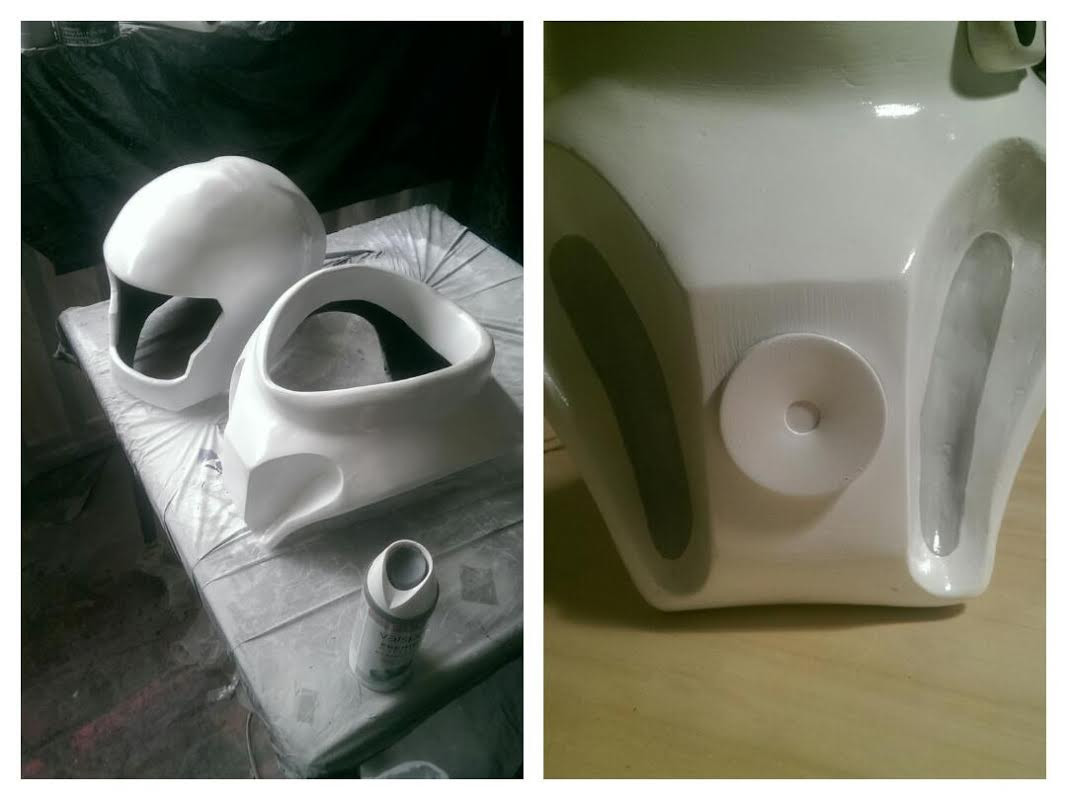
Step 5: Pepakura Armor – Crafting the Helmet and Chest Foundation
Pepakura is crucial for shaping the helmet and chest piece.
-
 Pepakura model piece example 1
 -
Download and Print: Obtain the Vashta Nerada Pepakura PDF. Print it on card-stock paper for durability.
-
Cutting the Templates: Using scissors, meticulously cut out all the Pepakura pieces. This is a time-consuming but essential step, often taking around five hours of focused work.
-
Organization: Most shapes will have pairs. Organize them on a flat surface to keep track of everything.
-
Assembly with Hot Glue: Pepakura assembly involves matching numbered edges and hot-gluing them together. Align matching numbers (e.g., 342 to 342, 340 to 340). This gluing process can take about eight hours.
-
 Pepakura model piece example 2
 -
Folding and Shaping: Pepakura can be tricky. Refer to reference images from Doctor Who and the finished Pepakura model to understand fold directions (up/down, convex/concave).
-
Perfection is Not the Goal: The Pepakura model is a base for fiberglass and Bondo. Minor imperfections are acceptable as fine-tuning happens later. Focus on getting the basic shapes right.
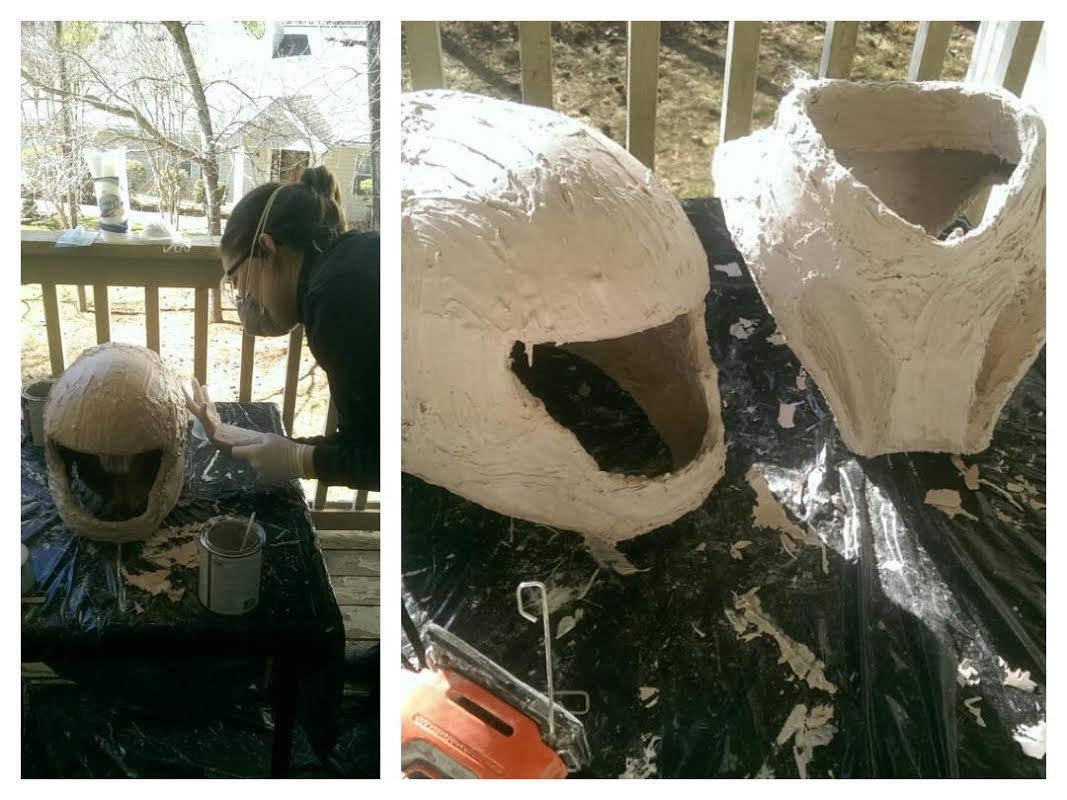
Step 6: Fiberglass Fortification – Hardening the Armor Shell
Fiberglassing strengthens the Pepakura and creates a rigid shell.
 Fiberglass application process
- Workspace Setup: Elevate the helmet to eye level, stuffing it with plastic bags to prevent collapse. Ensure it’s suspended to avoid sticking to surfaces. Fiberglass the outside first, then the inside.
- Fiberglass Mat Preparation: Cut the fiberglass mat into various sizes of rectangles and squares for easier application on curved surfaces.
- Resin Mixing and Application: Fiberglass resin is a two-part mixture. Follow the resin-to-hardener ratio instructions precisely (e.g., resin to the fourth line on a cup : ten drops of hardener). Mix and apply within about ten minutes before it starts to harden. Keep a trash bag nearby for disposal of used mixing supplies.
- Layering Fiberglass: Apply a generous coat of resin mixture to a section of the Pepakura model using a foam brush. Place a piece of fiberglass mat on the resin, then saturate it with more resin mixture using a dabbing motion with the brush. Overlap fiberglass pieces slightly, like paper mache, to ensure full coverage and structural integrity.
- Curing and Trimming: One layer of fiberglass inside and outside is sufficient. Let it cure fully overnight. Once cured, use a Dremel to trim any excess fiberglass overhang.
Step 7: Bondo Sculpting – Refining and Smoothing the Surface
Bondo body filler creates a smooth surface for painting.
 Bondo filler application
- Mixing Bondo: Scoop a golf ball-sized amount of Bondo filler onto the plastic lid. Add a line of red hardener about two inches long. Mix thoroughly with a spreader.
- Application Technique: Apply Bondo in thin coats. Thick coats make sanding extremely difficult. Work quickly as Bondo hardens in about three minutes.
- Curing Time: Allow Bondo to cure for about two hours before sanding.
Step 8: Sanding to Perfection – Achieving a Flawless Finish
Sanding is labor-intensive but crucial for a professional look.
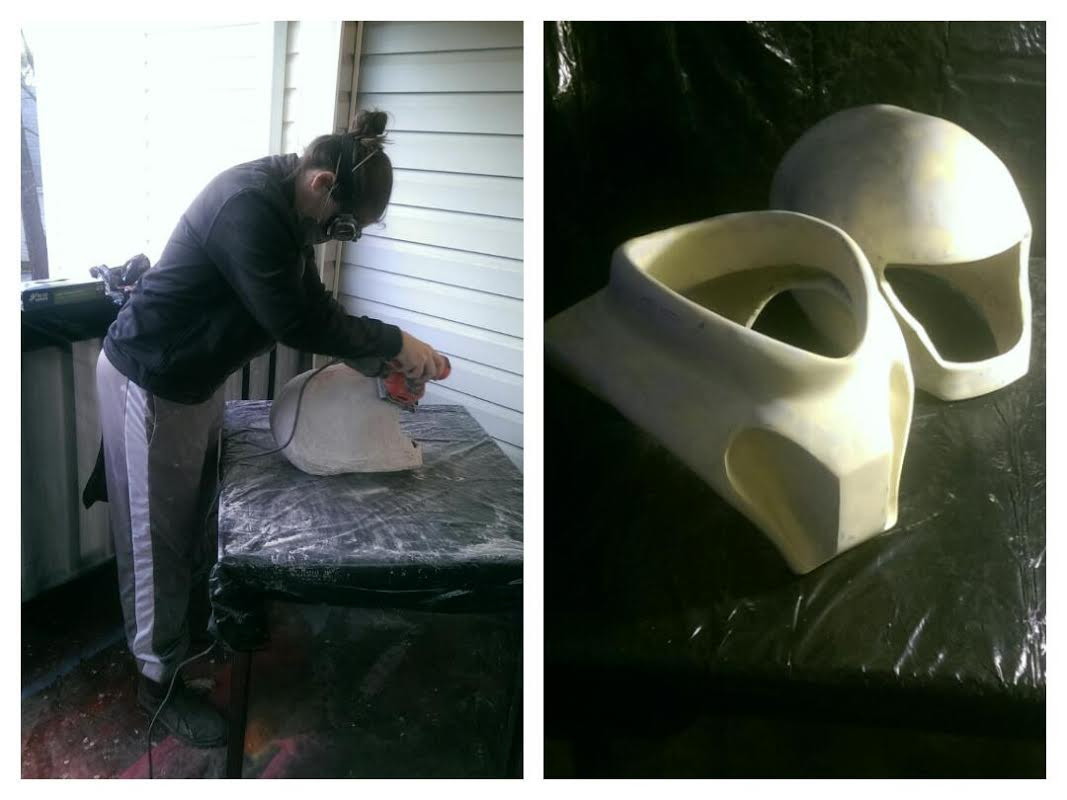 Sanding process example
- Power Sanding: Use a power sander with 80 grit sandpaper for the initial, rough sanding. Follow with 120 grit to smooth it further.
- Hand Sanding: Switch to a sanding block (EPS foam wrapped in 120 grit sandpaper) for detailed work and hard-to-reach areas.
- Addressing Imperfections: Fill any remaining imperfections with wood filler. Let it dry for about an hour, then sand smooth. Repeat filler and sanding as needed.
- Time Investment: Sanding is where you refine details. Plan to spend several days on this step to achieve a smooth, paint-ready surface.
Step 9: Painting and Priming – Bringing Color to the Shadows
Painting brings your Vashta Nerada cosplay to life.
 Priming and painting stages
- Priming: Apply multiple coats of sandable grey primer inside and out. Sand down any imperfections that primer reveals, then prime again. This stage is critical for catching flaws before color coats.
- Masking for Black Areas: Mask off areas that will remain white. Spray paint the helmet and chest piece interiors black. Two coats should suffice. Let dry overnight.
- Masking for White Areas: Mask off the black areas. Apply dozens of very light coats of gloss white spray paint to the exteriors. Patience is key here; light coats prevent drips and ensure a smooth finish. Let dry completely overnight.
- Grey Chest Detail: Create a paper stencil for the grey chest detail. Trace it onto the chest piece indentations and fill in with grey acrylic paint. Let dry overnight.
- Clear Enamel Coating: Apply several very light coats of clear enamel over all white areas to protect the paint job from damage. Let dry overnight.
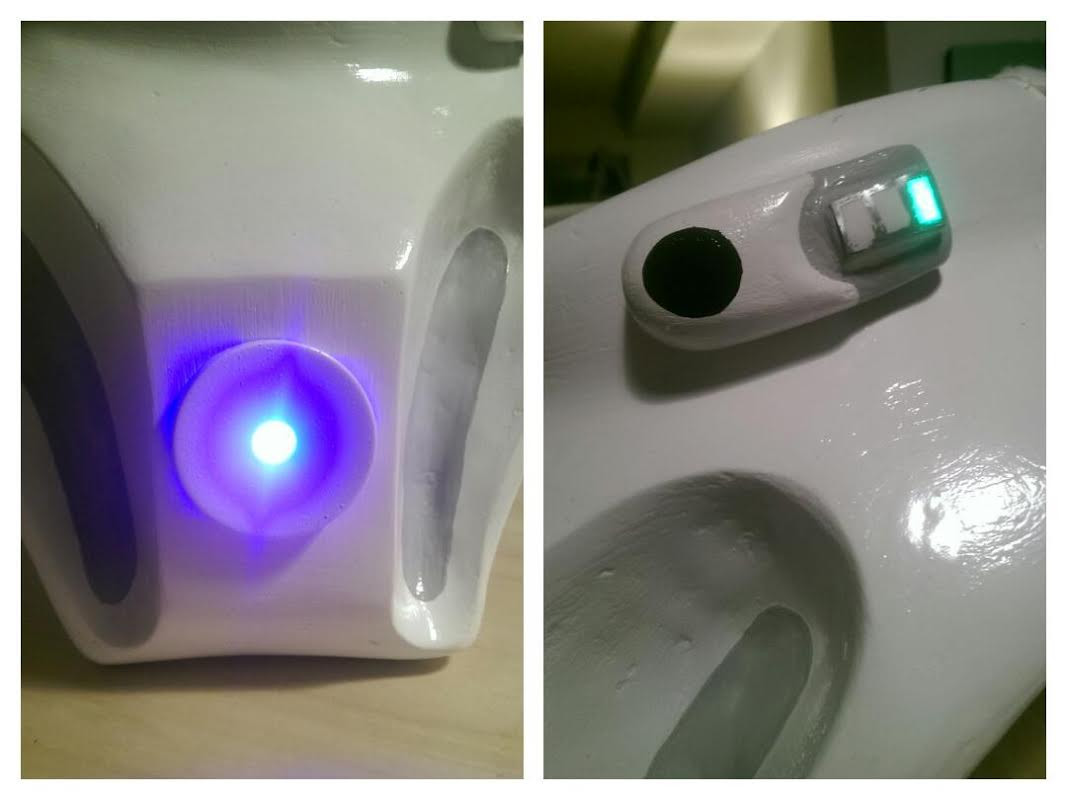
Step 10: 3D Decals and Light Housings – Adding Dimension and Glow
Create the 3D elements and light housings while paint dries.
 3D decal construction
- Chest Circle: The original creator used a metal disk, spray-painted white. You can sculpt one from EPS foam as an alternative.
- Communicator: Sculpt the neck communicator from EPS foam. Hollow it out to house an LED. Cover it with wood filler, sand it smooth, and paint it white. Add grey and black acrylic details after the white base coat dries.
- Light Diffusion: Cut squares (for chest) and rectangles (for communicator) from report cover plastic. Spray one side of each piece white for diffusion. Super glue the square inside the chest piece and the rectangle onto the communicator.
- Communicator Lines: Use grey paint or a silver Sharpie to draw lines over the plastic rectangle on the communicator, adding detail.
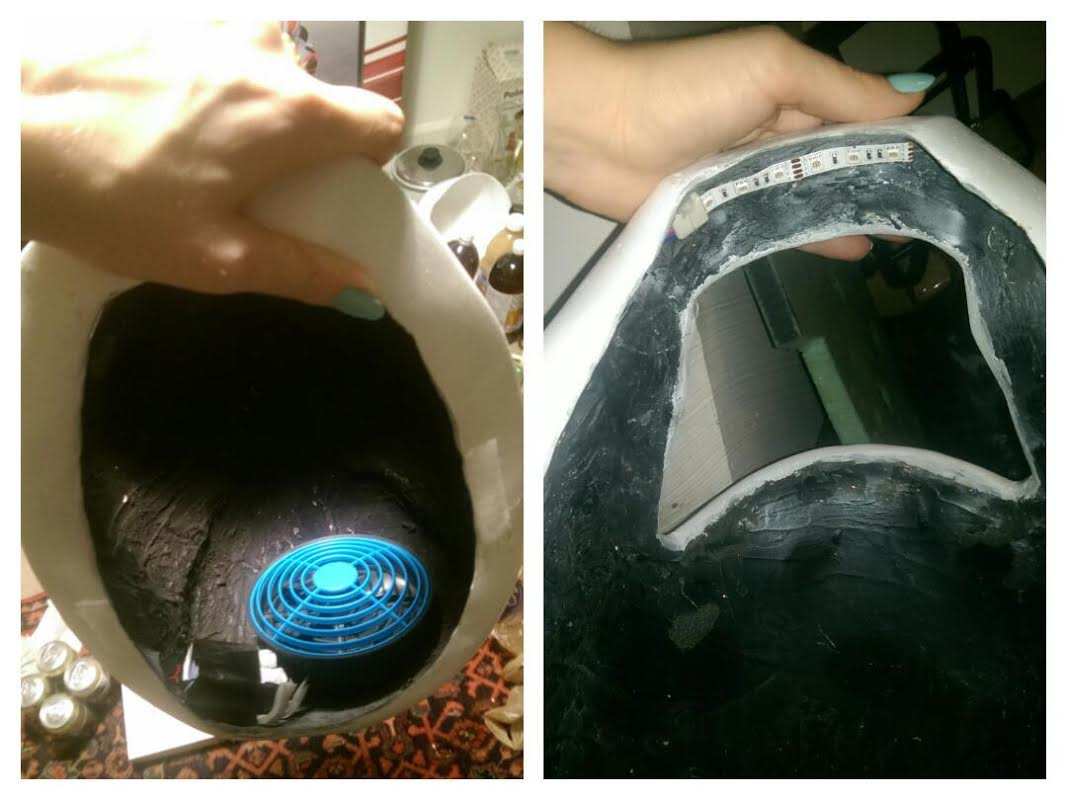
Step 11: Electronic Integration – Wiring the Lights and Fan
Electronics bring the Vashta Nerada to life with lights and ventilation.
 LED and fan wiring example
- Helmet Fan and Lights: Hot glue the fan and AA battery holder (with batteries) inside the back of the helmet.
- Helmet LED Wiring: Cut a nine-LED strip, attach an LED connector, and splice wires to reach the battery pack at the helmet’s back.
- Chest Battery Pack: Hot glue the D battery holder to the center back of the chest piece.
- Battery Security: Use black Gorilla tape to secure all battery packs firmly in place.
- Chest Lights Wiring: For the blue and green chest lights, use individual RGB LEDs cut from a strip. Cut as close to the LED housing as possible, keeping solder joints. Determine positive and negative leads (testing with ~2V is recommended to avoid LED damage). Use resistors (220 ohms is a good starting point) in the circuit to protect LEDs. Use an online LED resistor calculator for precise resistor values based on your LEDs and power source.
- Parallel Wiring: Wire the blue and green LEDs in parallel, each with its own resistor appropriate for its color’s voltage and current requirements. Solder hookup wire to LED leads, then 18G wire for longer runs to the battery pack. Bend hookup wires sharply to fit LEDs through chest piece holes.
Step 12: Final Assembly and Details – Completing the Transformation
Final steps to bring everything together.
- LED Installation: Drill holes in the chest center for the blue LED and in the neck for the green LED. Insert LEDs and glue the circular chest housing and communicator over their respective lights, ensuring centered placement.
- Visor Creation: Cut a report cover in half and hot glue it inside the helmet to create the visor.
- Helmet Attachment: Use white Velcro to attach the helmet to the chest piece for stability and easy wear. Test fit the helmet and chest piece, mark contact points, and then glue Velcro to these marked areas.
Optional Enhancements – Going the Extra Mile
- Seam Detailing: If you skipped it earlier, use a black Sharpie to detail the seams of the coverall now.
- Sound Effects: Create a playlist of “Hey! Who turned out the lights?!” sound files.
- Access sound files: Audio files – Hey! Who turned out the lights
- Download to your smartphone, create a shuffled, repeating playlist.
- Play it loudly from your chest pocket for an immersive and unsettling effect!
35.779590 -78.638179
Downtown, Raleigh, NC, USA