
Are you ready to terrify your friends and fellow convention-goers? This comprehensive Weeping Angel Costume Tutorial will guide you through creating your own stunning and spooky Doctor Who inspired cosplay.
Originally published on Celebration Generation on June 6, 2013. Updated and moved over to this blog – comments and all – on 9/15/2021
After our Weeping Angel costumes clinched “Best in Show” at the BritCon costume contest (a thrilling first masquerade entry!), we promised a detailed “How We Did It” guide. And here it is!
Prepare for an in-depth breakdown, packed with photos and all the information you need to construct your own Weeping Angel cosplay.
While some sewing and crafting experience will be beneficial, these instructions are designed to be clear and manageable. Creating these costumes demanded a significant time investment – and perhaps a few brain cells sacrificed to spray paint fumes due to less-than-ideal weather! – but the final result was absolutely worth it.
Even at smaller conventions like BritCon, our Weeping Angel costumes were a sensation!
We arrived early on Saturday, fully costumed, and had a blast giving unsuspecting, just-woke-up attendees in the hallways a delightful fright.
Posing for photos became a surreal experience. As someone who usually dislikes being photographed, the anonymity of the Weeping Angel mask was surprisingly liberating.
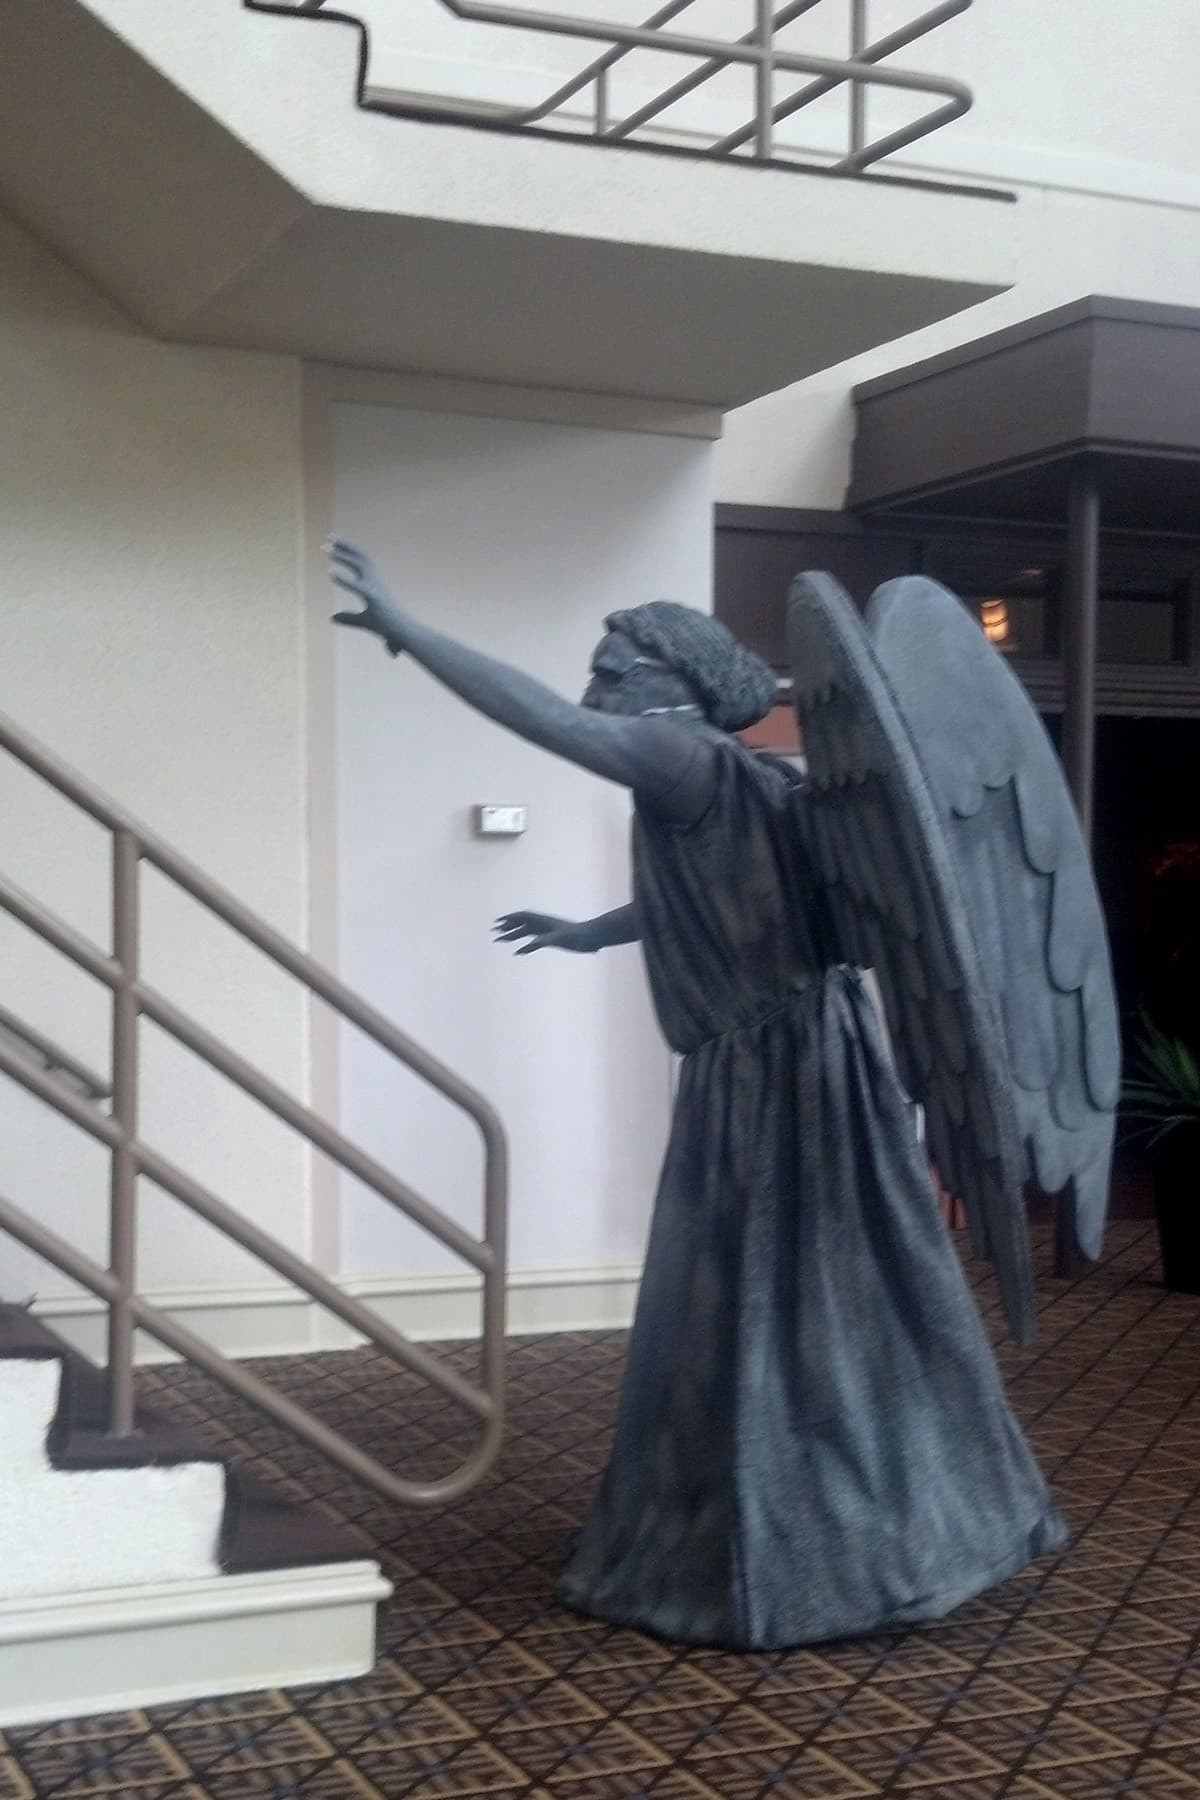 A cosplayer embodying a Weeping Angel, strikes a pose at the staircase's base. A Weeping Angel costume designed to startle convention attendees.
And as Convergence approaches, we’re already anticipating the epic photo-bombing opportunities ahead. Muahahhaa!
Let’s delve into the tutorial.
Crafting Weeping Angel Masks: Don’t Blink!
Mask creation was our initial hurdle, the most daunting aspect of the entire Weeping Angel costume. Mask-making was uncharted territory for me!
Even the expansive wings seemed less intimidating, relying on familiar principles of geometry and physics.
While cake sculpting is within my skillset, plaster casting and paper clay were entirely new mediums. Nerves were definitely a factor!
Materials for Your Weeping Angel Mask
- Vaseline
- Plaster Bandages
- Paper Clay
- Grey Acrylic Paints – light, medium, and dark shades
- Granite Texture Spray
- Opaque Black Pantyhose or Knee Highs
- Hot Glue Gun & Glue Sticks
- Clear Elastic or Grey Elastic
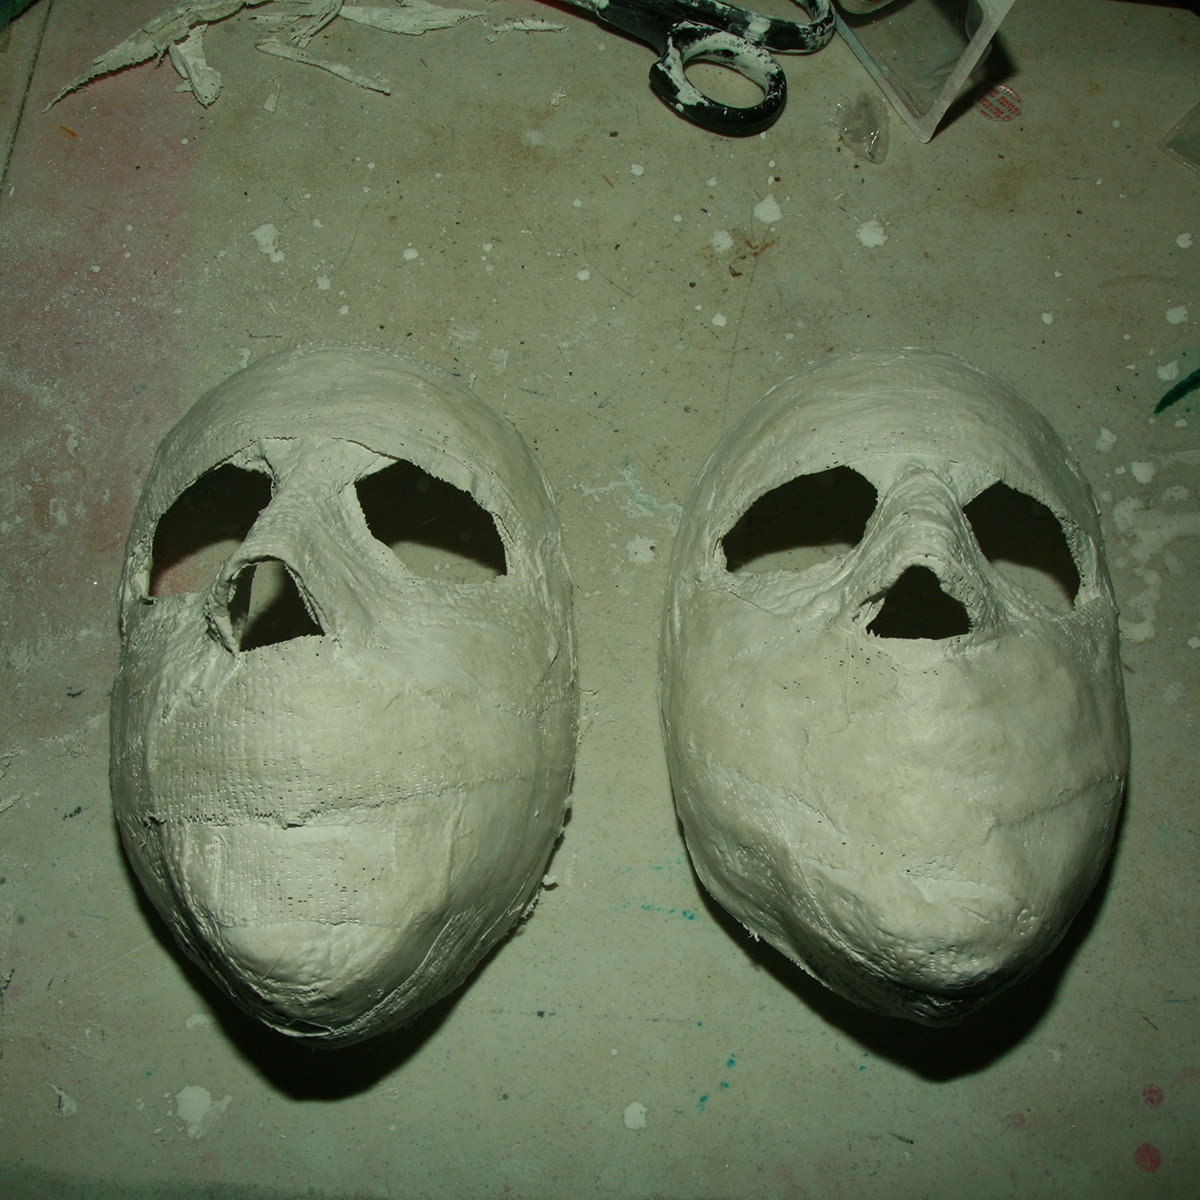 Two unadorned plastic face masks placed on a crafting table. Basic plastic masks serve as the foundation for Weeping Angel masks.
Sculpting the Mask Base with Plaster
To begin, I employed Plaster Bandages directly on Porter’s face to mold the initial mask shape. We created two bases using this method.
Fortunately, our facial dimensions are similar enough that both finished masks provided a comfortable fit.
Preparation involved securing Porter’s hair back and liberally applying Vaseline to his face as a release agent. I layered approximately three layers of plaster bandage across the entire face, reinforcing the nose area with a couple of additional layers.
Recognizing the Weeping Angel’s elongated scream, I formed a ball of plaster bandage and affixed it beneath Porter’s chin. Longer strips of plaster bandage secured this extension, extending upwards on either side of his face.
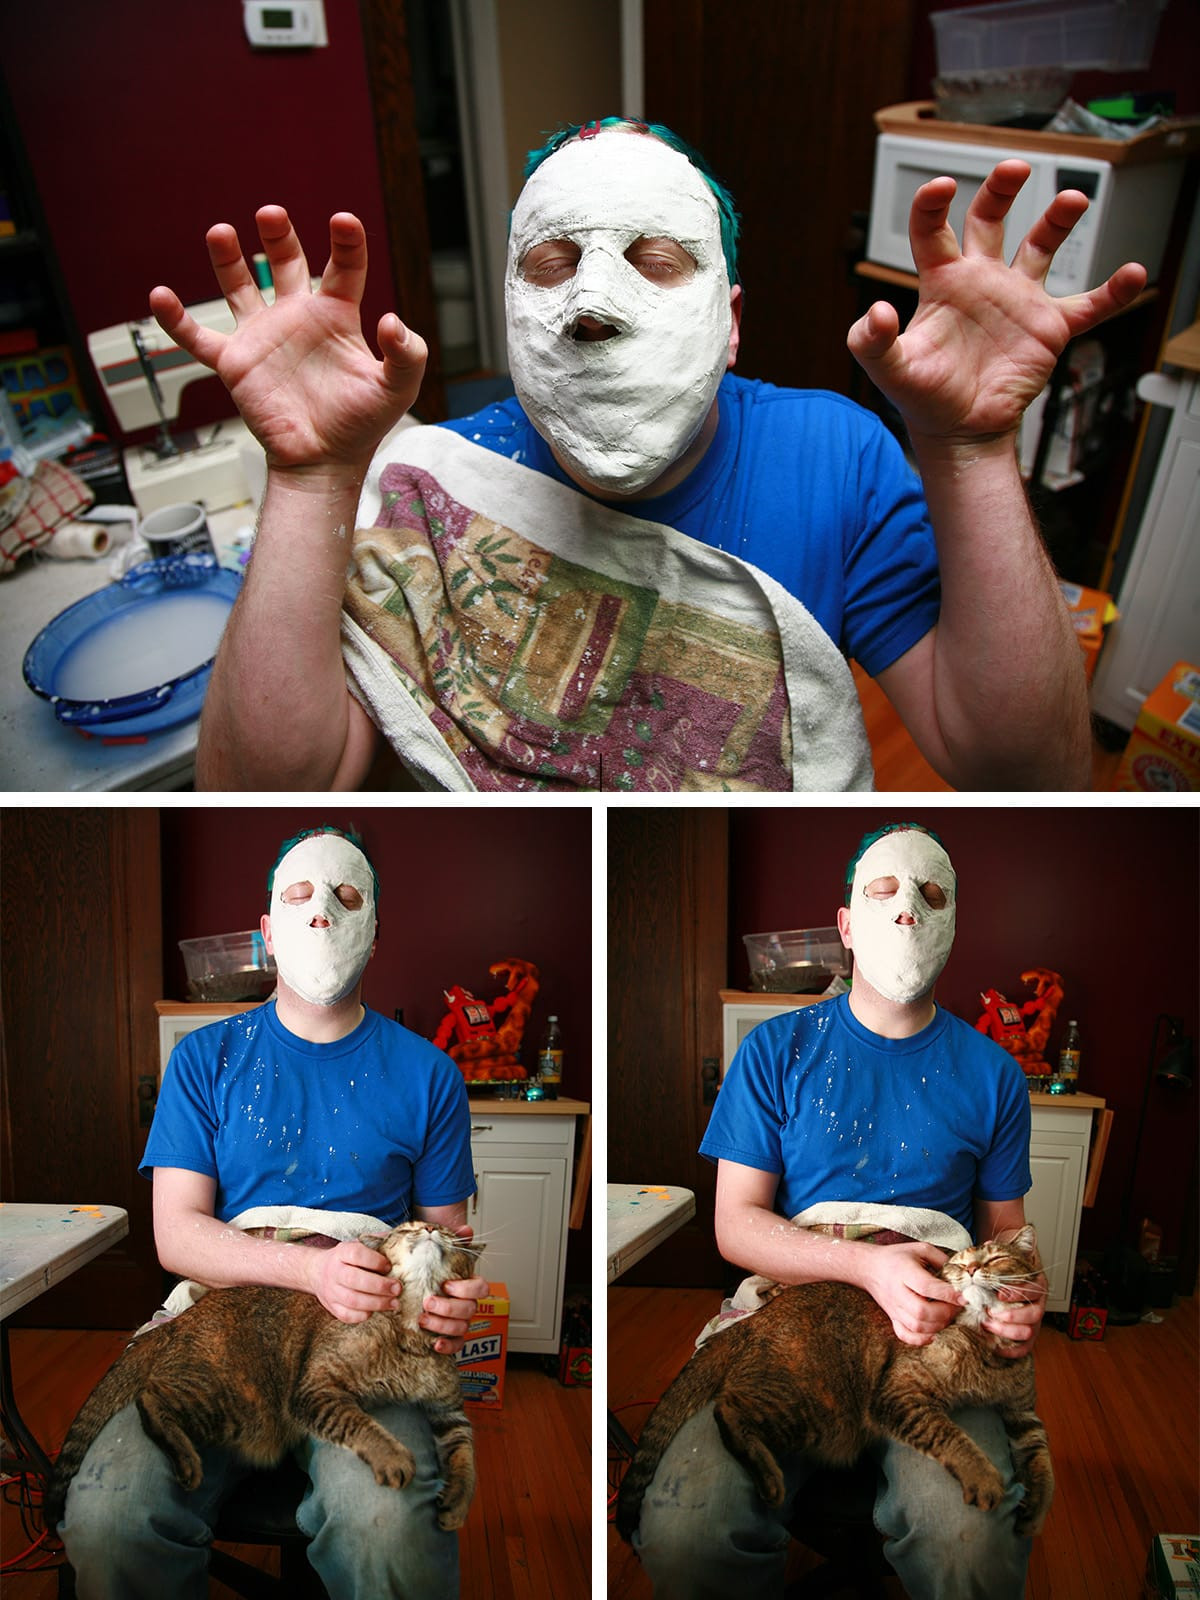 A three-panel image showing a person with a plaster-covered face, cradling a tabby cat. A plaster face mold being created for a Weeping Angel mask, with feline supervision.
Adding Facial Features with Paper Clay
Once the plaster base fully dried and hardened, I used Paper Clay to sculpt the distinctive Weeping Angel facial features.
This sculpting process was freehand, guided by reference images of Weeping Angels sourced online.
Painting Your Stone-like Weeping Angel Mask
After the paper clay sculpting was completely dry, I applied a base coat of grey acrylic paint to the entire mask.
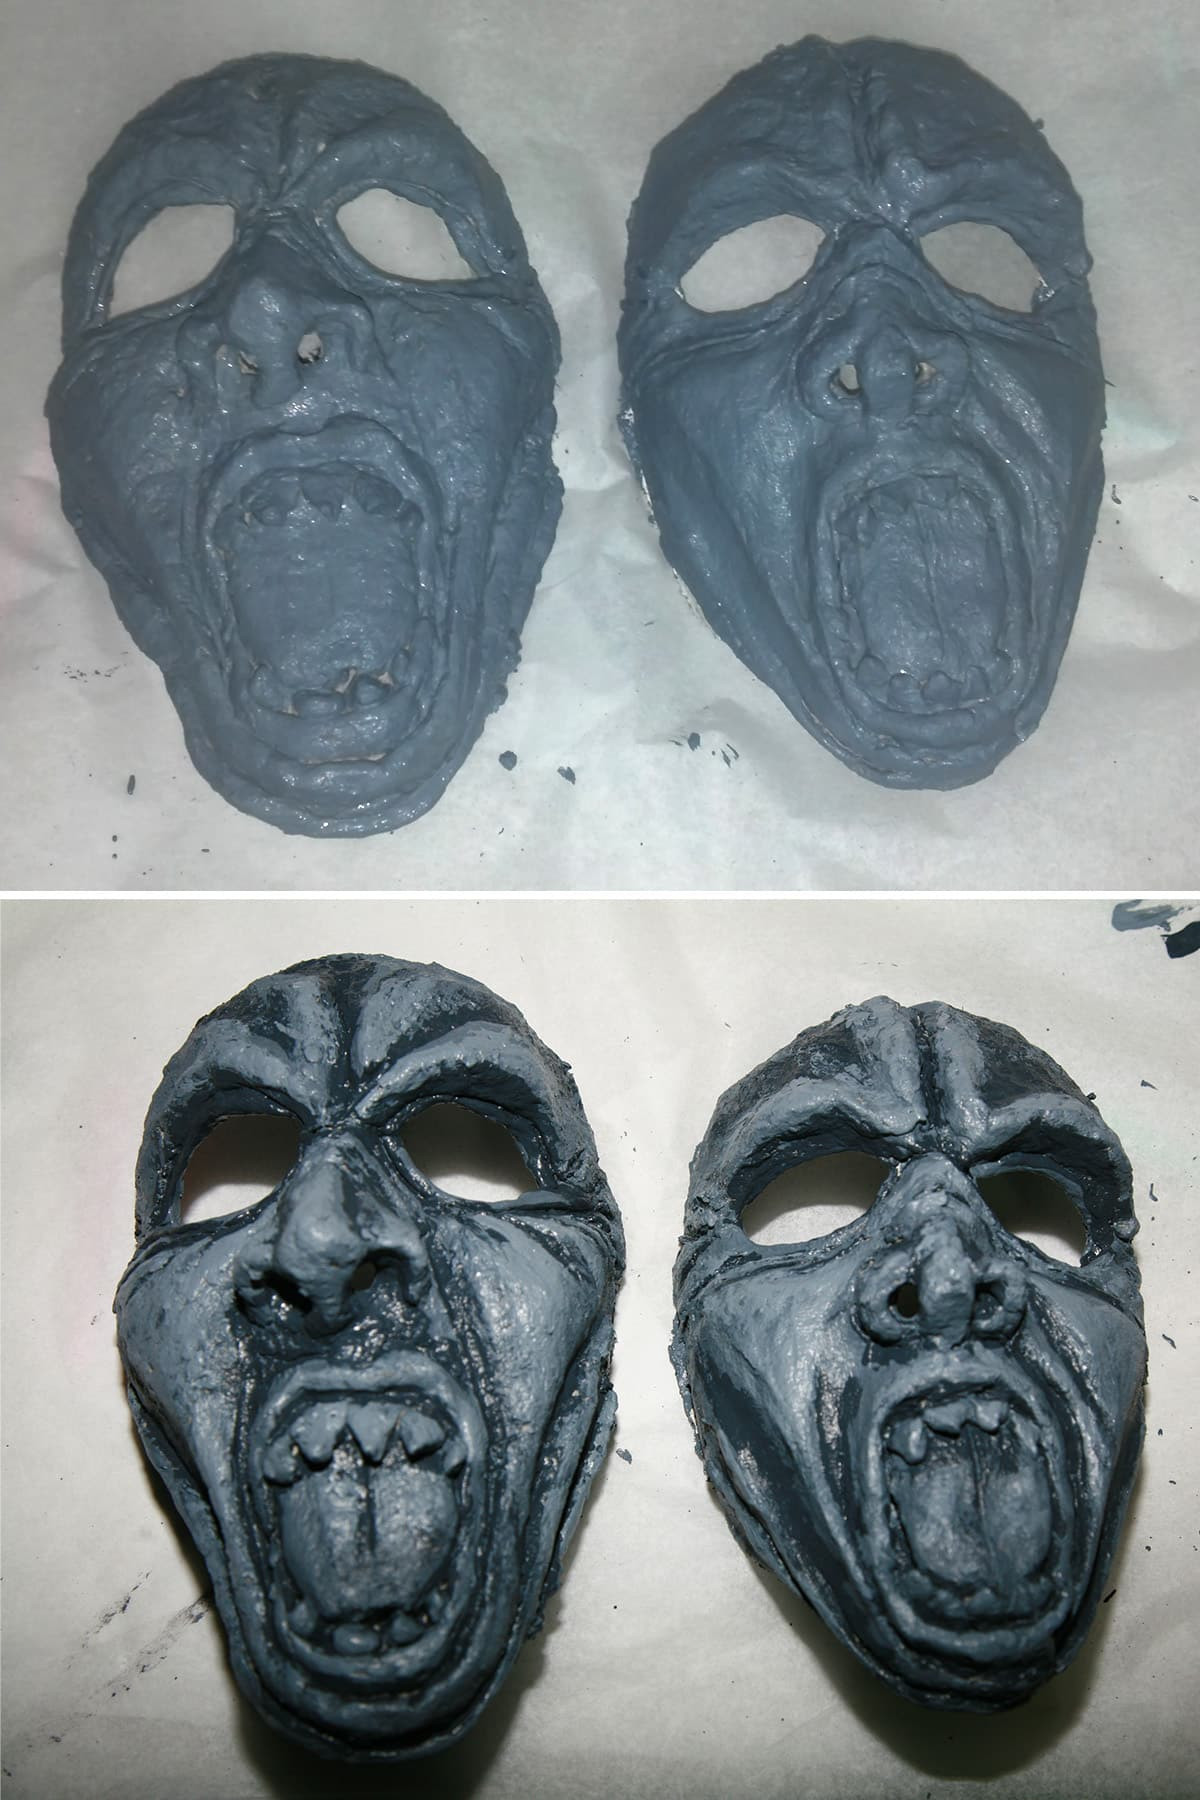 A diptych showcasing two grey-painted face masks, with the right image highlighting darker grey detailing. Grey paint layers and texture spray enhance the stone-like appearance of Weeping Angel masks.
Once the base coat was dry, I used varying shades of grey paint – dark and light – to create depth and dimension. Darker shades emphasized wrinkles and crevices, while lighter shades highlighted raised areas and ridges.
Following the paint detailing, I generously sprayed the masks with Granite Texture Spray and allowed them to cure thoroughly, achieving the desired stone-like texture for our Weeping Angel masks.
Creating Ominous Weeping Angel Eyes
The eyes presented a unique challenge.
Our initial plan involved modifying inexpensive sunglasses from a dollar store. We intended to cover the lenses with black or grey pantyhose material and then apply texture spray to blend them seamlessly into the mask.
However, the snug fit of our masks revealed that the edges of sunglass lenses would likely be uncomfortable and distracting.
Our ultimate solution proved to be both comfortable and visually effective, providing decent vision while maintaining the eerie Weeping Angel aesthetic!
I purchased sheer black tights and cut four squares of fabric.
Without stretching the material, I sprayed each square liberally with texture spray and allowed them to dry completely. Once dried, I gently stretched the textured fabric squares.
I applied a thick bead of hot glue around the inside perimeter of each eyehole on the masks. Then, I carefully positioned and adhered a textured fabric square to the inside of each mask eyehole, ensuring the textured side faced outwards.
After the glue set, I added another bead of hot glue to the exterior side of the mask, just inside the edge of the eyeholes, mimicking eyeliner application.
Carefully, I pressed the fabric into this fresh glue line from the backside of the mask.
This technique achieved a more natural, less recessed eye appearance. It also created a slight gap, preventing eyelashes from constantly brushing against the eye covering, enhancing wearer comfort.
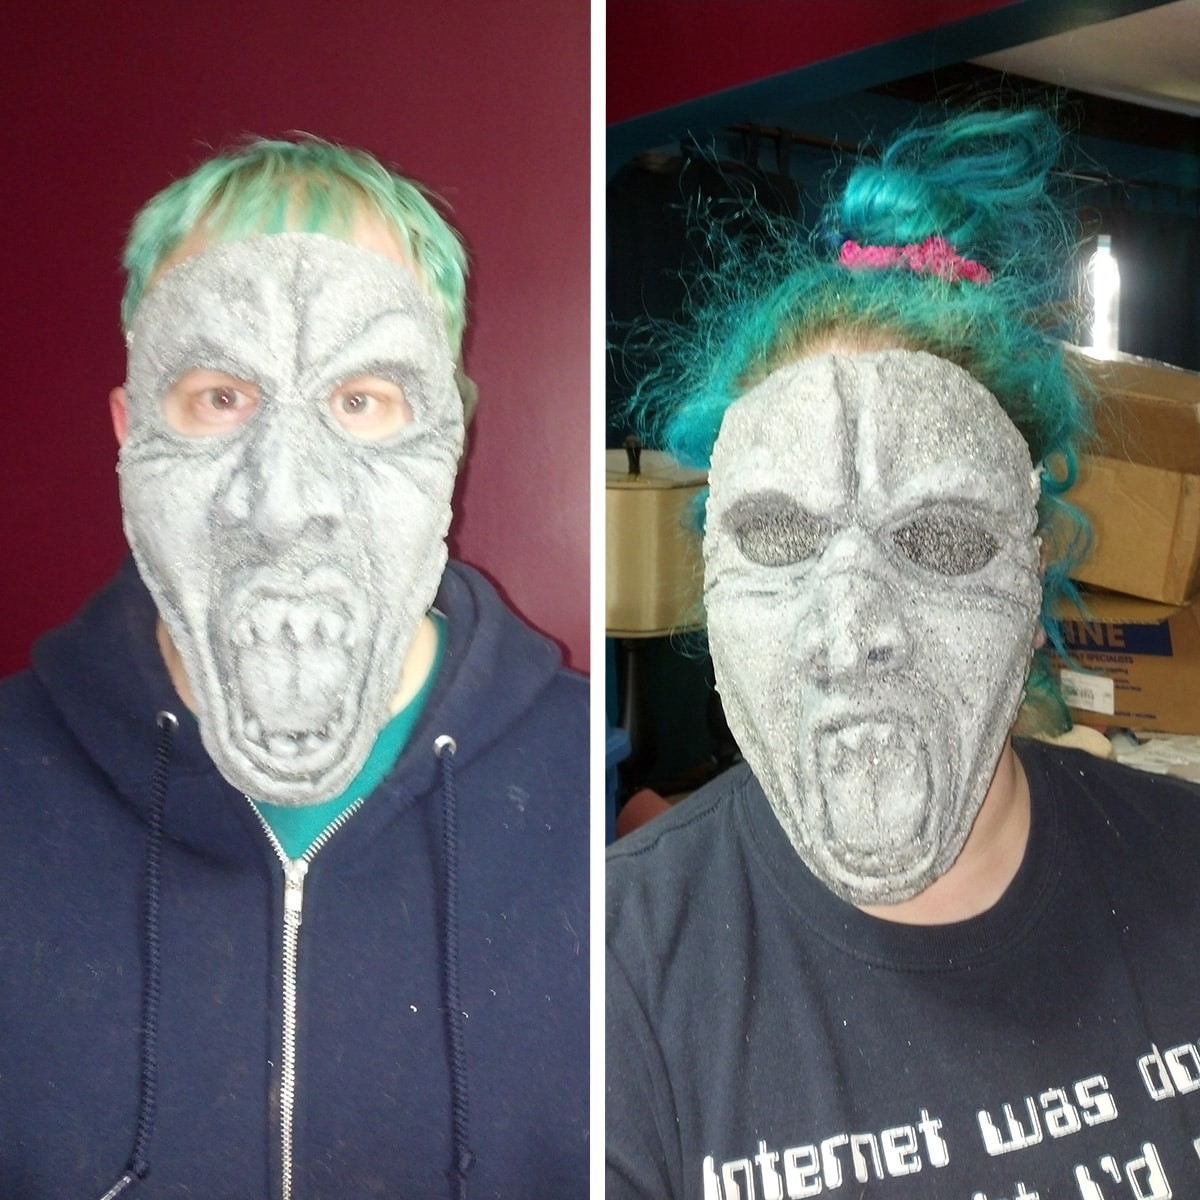 A before-and-after image showcasing a person wearing a Weeping Angel mask, with and without eye coverings. Eye coverings added to Weeping Angel masks for a more complete and eerie look.
Final Mask Assembly
Once all components were dry and set, we made small, narrow slits on each side of the masks – one set near the temples and another near the jawbone’s back. We then threaded regular elastic through these slits to create the mask straps.
While standard elastic was used for initial photos, we later replaced it with Thick, Clear Swimwear Elastic before competing in the costume contest. This clear elastic is less visible and blends seamlessly with the mask.
Alternatively, Grey Elastic can be used if available, or white or cream-colored elastic can be painted or dyed grey to match the mask.
Crafting Weeping Angel Wigs: Stone Hair, Don’t Care
I regret not documenting the wig-making process more thoroughly with photos. I hope this detailed description will suffice!
Materials for Weeping Angel Wigs
- A Well-Fitting Costume Wig or Wig Base
- Seam Ripper
- 1-2 Balls of Yarn](https://amzn.to/3vmsJaC) (Grey yarn is ideal)
- Scrap Fabric Headband
- Yarn Needle
- Scissors
- Grey Acrylic Paints – light, medium, and dark shades
- Granite Texture Spray
Constructing the Wig Base
I began by purchasing two inexpensive costume wigs. Using a seam ripper, I carefully removed all the original wig hair, leaving only the wig base cap.
I selected three balls of yarn – grey, white, and black (to prevent any color peeking through). I cut the yarn into long strands, approximately twice the desired final length, to allow for folding and creating a secure center seam.
Next, I cut a strip of non-stretch fabric, about half the length of the wig cap’s center seam and roughly ½-¾” wide. I centered the yarn over this fabric strip and stitched it down using a very tight zigzag stitch, effectively creating yarn wefts.
From there, I sewed this yarn weft strip directly onto the top portion of the wig cap, forming the base for styling.
Styling the Stone-Effect Wig
With the yarn wefts attached, I proceeded to style both wigs. Porter served as a remarkably patient model throughout this process!
First, I separated enough yarn at the front to create a double twist along each side of the face, framing it. Just behind these face-framing twists, I positioned a “headband” made from a tube of light blue spandex scrap fabric.
To be honest, I was improvising the styling. Lacking formal wig-styling experience, I manipulated, pulled, and twisted the yarn until it achieved a passable Weeping Angel hairstyle.
Hair styling is definitely not my area of expertise!
During the styling process, I used long lengths of yarn and a yarn needle to secure the style. Twists and braids were not only secured to themselves but also stitched down to the wig cap for maximum stability.
The primary goal was to create a sculpted style that would remain fixed and immobile once the wig was removed from Porter’s head.
Upon finalizing the styling, I tucked any remaining yarn ends underneath the styled sections and sewed them securely in place.
Painting and Texturing the Wig
To prepare for painting, I stuffed the wig caps with newspaper to maintain a head-like shape and facilitate even paint application. I then painted the styled wigs with grey acrylic paint.
This process required several coats of paint and extended drying time – spanning several days – as I ensured thorough saturation.
My intention was for the paint to act as a binding agent, effectively “gluing” the yarn fibers together and solidifying the sculpted style.
Once the painted wigs were completely dry and rigid, I sprayed them generously with granite texture spray paint, mirroring the mask texturing to create a cohesive stone-like aesthetic for the entire Weeping Angel costume.
Sewing Weeping Angel Dresses: Flowing Stone Robes
The dresses require more visual explanation than words can easily convey. Diagrams and photographs would be ideal, but unfortunately, I didn’t capture process photos during construction. I hope this detailed written description will be sufficient.
Materials for Weeping Angel Dresses
- 9 Gauge Galvanized Wire
- Medium Weight, Dark Grey Fabric
- STRONG Drawstring
- Sewing Machine, Thread, and essential sewing supplies
- Scissors
- Granite Texture Spray
Dress Construction: Liner, Skirt, and Bodice
We first determined the desired circumference for the dress hem hoop, settling on a 30-inch diameter. We used lengths of 9-gauge wire to form two rings, one for each dress.
With the hoops prepared, I began designing and constructing the Weeping Angel dresses, each composed of three primary components: a liner, an outer skirt, and an outer bodice.
Liner Dress
The liner is a floor-length, relatively fitted underdress. Gores, triangular fabric panels, were inserted on each side seam at the lower hem and into the center back seam.
These gores provide added fullness at the hem, ensuring the liner comfortably accommodates the wire hoop inserted later.
The center back seam of the liner’s bodice section was intentionally left open (but neatly finished) from just below the neckline down to the waistline.
This opening serves as access for the wing apparatus, allowing for easier dressing and wing attachment.
Outer Skirt
The outer skirt was constructed from two lengths of 60-inch wide fabric. Each piece was cut to a length sufficient to extend from the waist to the floor, plus a few extra inches for hemming, and additional inches to create a slight “pooling” effect around the hemline.
Functionally, long, concealed pockets were sewn into the upper portion of each side seam – spacious enough to discreetly hold wallets, water bottles, or other convention essentials.
Outer Bodice
The outer bodice design required careful planning to effectively conceal the wing apparatus while maintaining relatively easy access for putting the wings on and taking them off.
The outer bodice pattern consists of six pieces: a front yoke, a back yoke, a gathered front main bodice panel, two back main bodice panels, and a back “flap” designed to further conceal the wing apparatus.
The front main bodice panel was gathered along its upper edge and sewn to the front yoke – a straightforward step.
The back bodice construction was slightly more complex. The back flap piece was finished along both of its long edges. It was then sewn, right side down, to the center of the back yoke piece.
The two main back bodice panels were finished along their center back edges. These panels were sewn down over the flap seam, overlapping the flap by approximately two inches.
The remaining top edge of each back bodice panel was gathered and stitched to the bottom edge of the back yoke.
When this back bodice seam is flipped open to the right side, the fabric flap effectively covers the center back opening created for wing access. The two-inch overlap of the back bodice panels further minimizes this opening.
At the lower edge of the main back bodice panels, the two pieces are overlapped in the same manner as at the top edge and stitched down, creating a finished and enclosed seam.
From there, the side seams of the bodice are sewn. All horizontal seams (shoulders, bottom edges of yokes) are then reinforced with bias tape to completely enclose and strengthen the seams.
Finally, the bottom edge of the bodice is gathered.
I intentionally aimed for a relatively generous waist circumference in the bodice, anticipating the use of a drawstring to cinch it in and customize the fit later on.
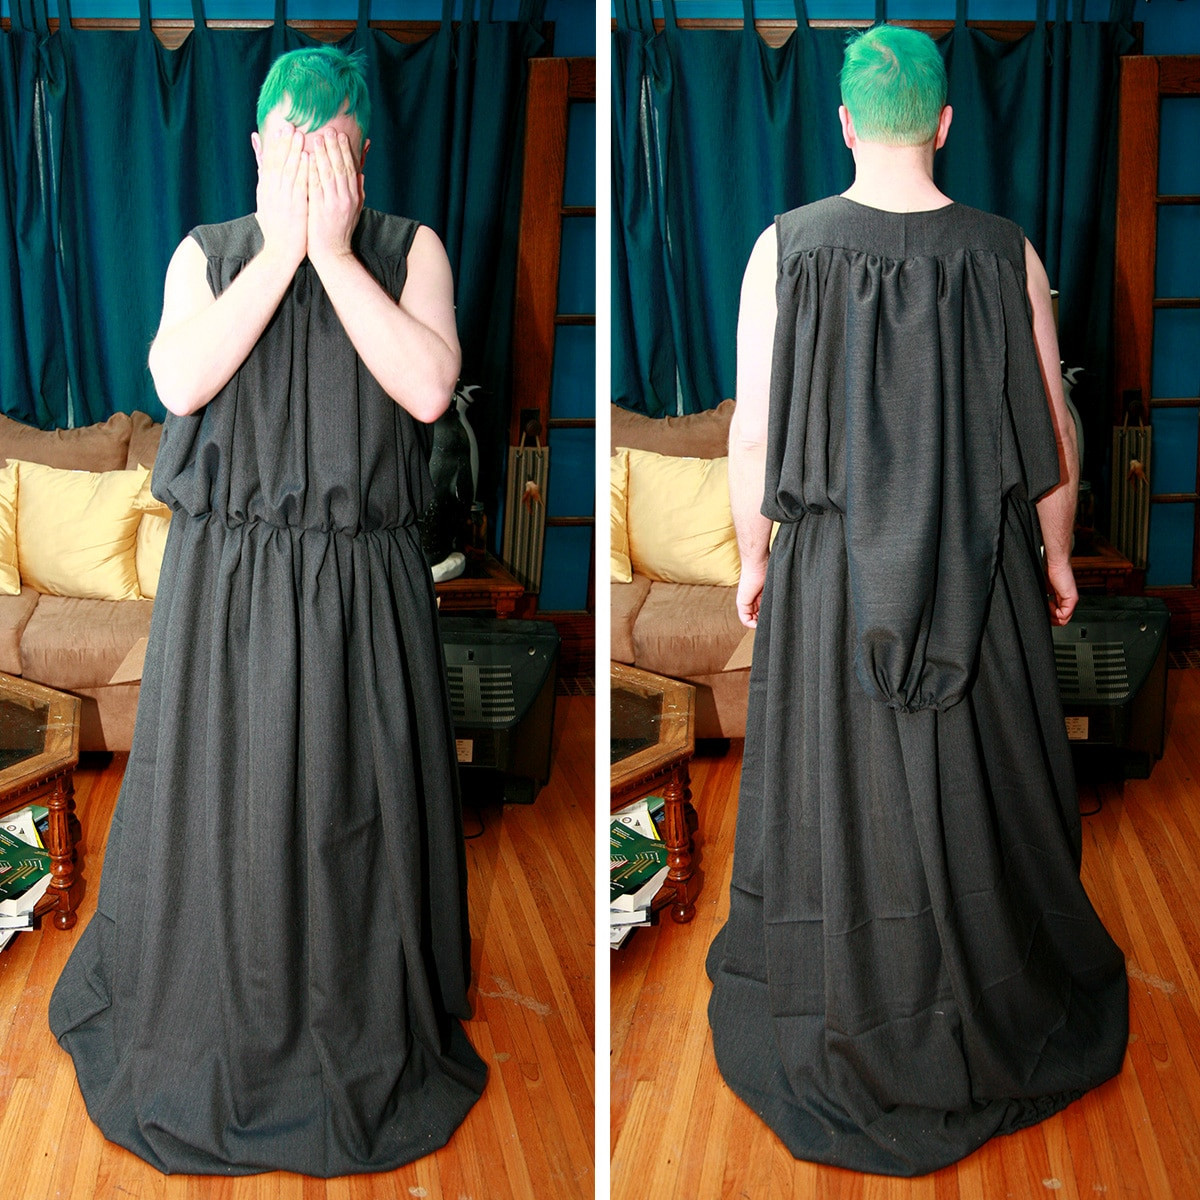 A diptych showing front and back views of a person in a flowing, grey Weeping Angel dress. A flowing grey dress with a back flap designed for Weeping Angel cosplay.
Assembling the Weeping Angel Dress
-
With right sides of fabric together, I sewed the neckline seam, joining the liner and outer bodice at the neck. I then flipped the seam right side out and topstitched around the neckline from the exterior, creating a flatter, more durable neckline finish.
-
I serged the armhole edges of the liner and outer bodice together, flipped the serged edge inwards, and stitched it down, creating a clean and finished armhole.
-
I attached the outer bodice to the outer skirt, gathering the skirt’s waist edge slightly as I sewed to achieve the desired fullness.
I aimed for a waist circumference slightly larger than our actual waist measurements to accommodate the drawstring waist later.
Ensuring that side seams, center back, and center front points aligned correctly, I joined the bodice and skirt. This waist seam was then finished by enclosing it in bias tape for added durability and a clean interior finish.
-
A long drawstring was added, positioned to exit at the center back of the dress waistline.
This drawstring is accessed through the center back opening of the bodice. The drawstring ends are designed to be tied tightly around the wearer’s waist and then tucked back into the bodice opening for a concealed and adjustable fit.
Given the time and material investment in these costumes, I incorporated this adjustable drawstring waist to ensure the dresses could accommodate potential weight fluctuations over time!
-
Ensuring all seams and edges were aligned, I pinned the lower edge of the outer skirt to the lower edge of the liner, matching side seams, center back, and center front points.
Because the outer skirt was designed to be fuller than the liner, I evenly gathered the outer skirt fabric along the hem edge to match the liner’s hem circumference as I sewed the two layers together around the entire bottom edge.
-
To finish the hem, I folded the bottom edge of the combined skirt and liner layers towards the underside of the dress. Very carefully and patiently, I sewed the entire bottom hem edge to one of the pre-formed wire hoops.
This step, while somewhat tedious, is not overly complex. Once the entire wire hoop is enclosed within the hem, evenly distribute the gathered fabric mass along the hoop’s circumference to create a balanced and flowing hem shape.
Painting the Stone Texture on the Dress
Once the dresses were completely sewn and assembled, the next crucial step was painting them to achieve the stone-like texture.
This process consumed a significant amount of granite texture spray paint, but the resulting transformation was dramatic and impactful.
We focused on applying the texture spray not only to the outer surfaces but also aiming to get paint in between fabric folds and creases. The varying degrees of texture coverage created by this technique produced an amazing visual effect, mimicking natural stone shadows and variations in tone, enhancing the realism of the Weeping Angel costume dresses.
Crafting the Weeping Angel Bodysuit: Seamless Stone Skin
Materials for the Bodysuit
- Grey Spandex fabric
- ¾-1″ Wide Grey Velcro
- Cardboard
- Fake Nails
- Granite Texture Spray
Considering our sensitivities to textures and tactile experiences, particularly with autistic sensory concerns, we immediately ruled out traditional makeup or body paint for achieving the Weeping Angel’s stone-like skin. The feel of makeup on our skin was simply not an option.
Therefore, I designed and created custom bodysuits tailored to our specific needs and sensitivities. I selected a lightly textured grey nylon lycra fabric for these bodysuits.
The resulting garment is a full-coverage, relatively form-fitting spandex shirt with long sleeves, integrated gloves, and an attached hood designed to cover most of the face, leaving only the central facial area exposed for the mask.
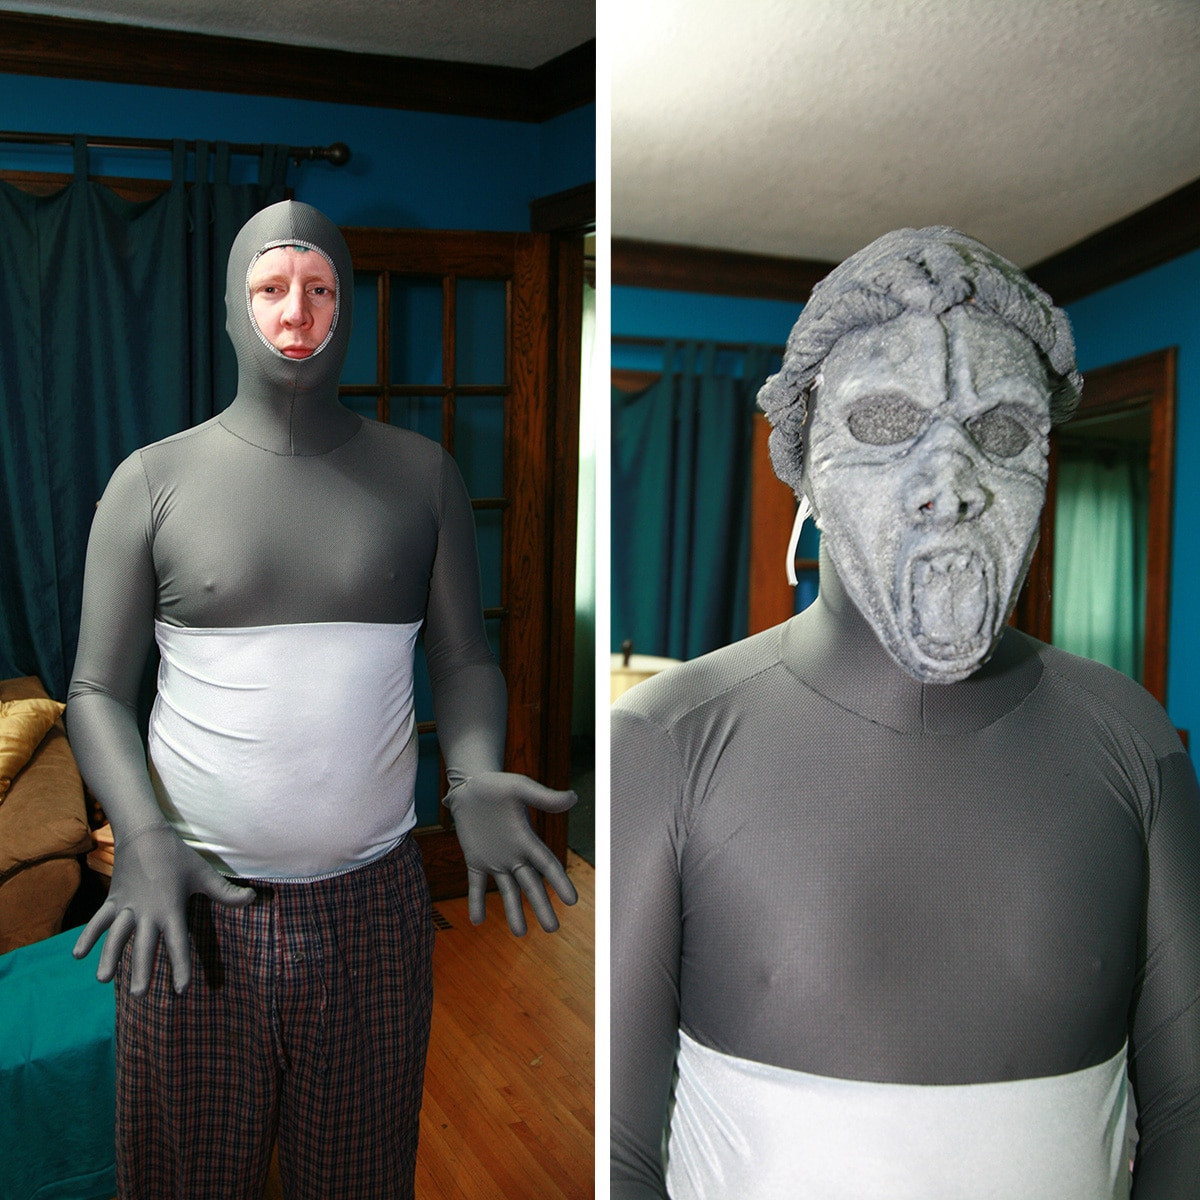 A person wearing a grey bodysuit that exposes only the face, followed by the same person with a Weeping Angel mask and wig. A grey spandex bodysuit provides a base layer for Weeping Angel cosplay.
Although not visible in this particular image, a strip of Velcro is incorporated into the back of the neck and head area. This Velcro closure facilitates easier entry into the bodysuit while ensuring a snug and streamlined fit once fastened.
One functional design feature I incorporated was partially attached gloves. The gloves are sewn to the sleeves only along the top and sides of the wrists, not along the underside of the wrist.
The glove section on the underside of the wrist features an attached fabric flap. This flap is designed to tuck underneath the wrist of the sleeve, effectively concealing the wrist opening and creating a seamless appearance.
This design innovation was implemented to significantly simplify restroom accessibility while in costume!
While I didn’t capture specific photos of this feature on the Weeping Angel bodysuit during this project, I’m including reference photos from another costume I constructed using the same wrist flap technique to illustrate the design detail.
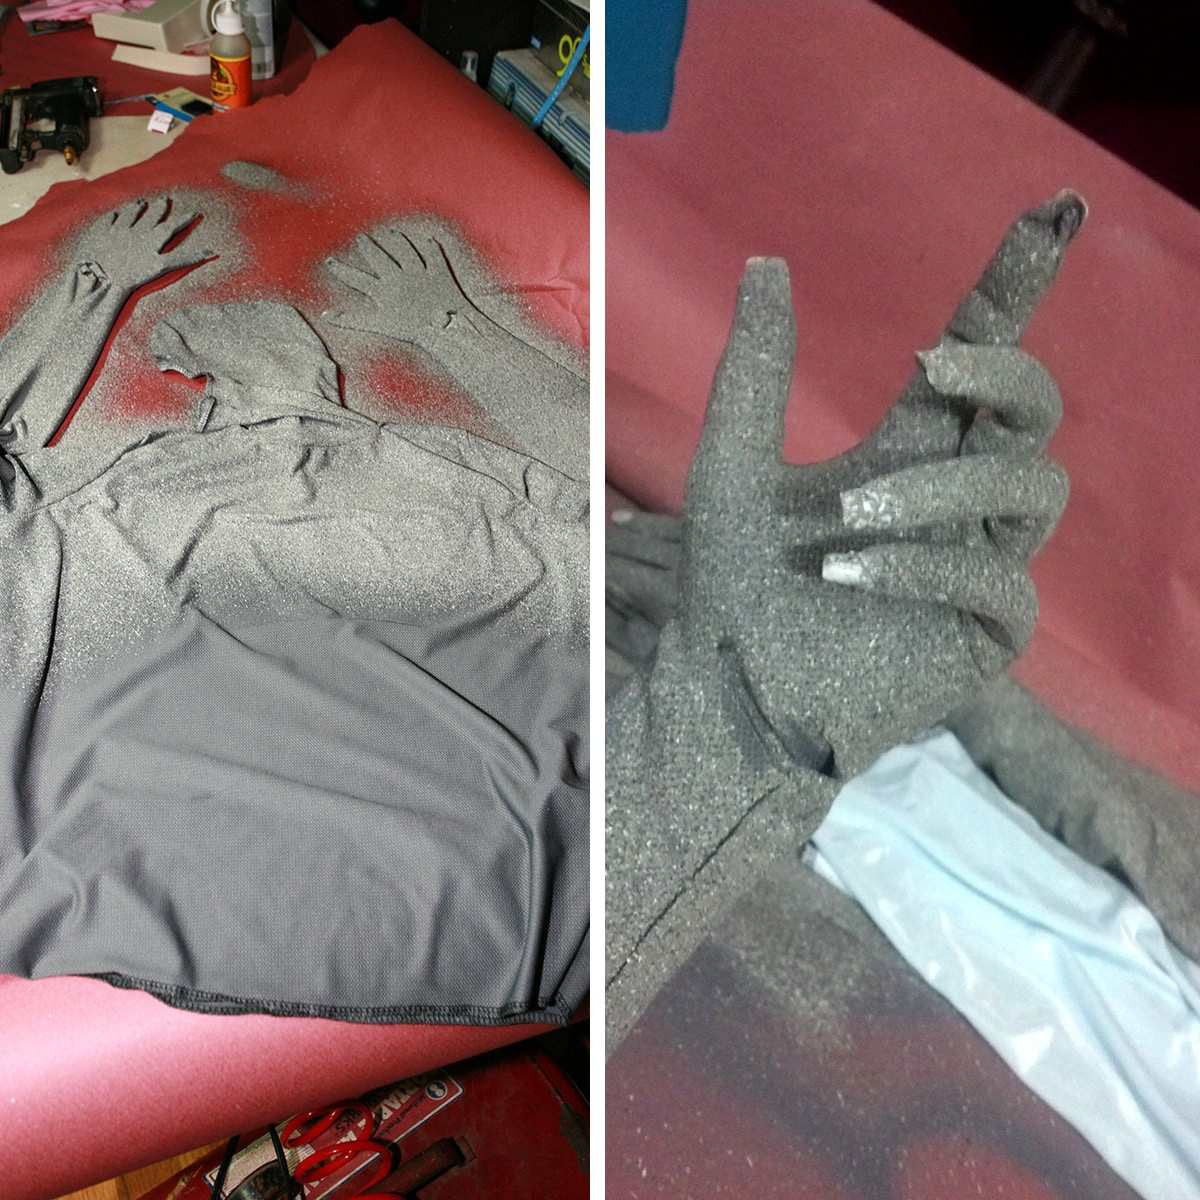
 A three-panel image demonstrating a black glove with a wrist flap being tucked into a sleeve. A wrist flap design for easy glove removal in cosplay bodysuits.
Adding Stone Details to the Bodysuit
Once the bodysuit was completely sewn and I was satisfied with the fit, the next step was enhancing its realism with stone-like detailing.
I began by tracing the outlines of both of our hands and arms onto cardboard to create custom stretch forms.
These cardboard forms were inserted inside the sleeves and gloves of the bodysuit to provide a stable surface for attaching the fake nails. Using super glue, I adhered a set of fake nails to the glove fingertips. Prior to gluing, I had sized and shaped the fake nails to ensure they were proportionally appropriate for our hand size and shape.
Once the glue was fully dried, I applied a coat of matte white nail polish over the fake nails.
In retrospect, if I were to repeat this step, I would opt for black or grey nail polish instead of white. However, white was the only matte polish I had readily available at the time, and I prioritized expediency in the crafting process!
This image shows the bodysuit after a single coat of texture spray had been applied. (During a subsequent coat of texture spray application, I ensured the wrist flap was pulled out and sprayed as well. This detail significantly improved the visual blending and seamlessness of the wrist area.)
Once the nail polish was completely dry, I used granite texture spray paint to apply the stone-like texture to the entire hood, arms, and shoulders of the bodysuit, as well as the upper chest and back areas that would be visible above the dress neckline.
 A grey bodysuit being textured with stone-look spray paint, and a close-up of a hand wearing the textured bodysuit. Texture spray applied to a grey bodysuit to mimic stone skin for Weeping Angel cosplay.
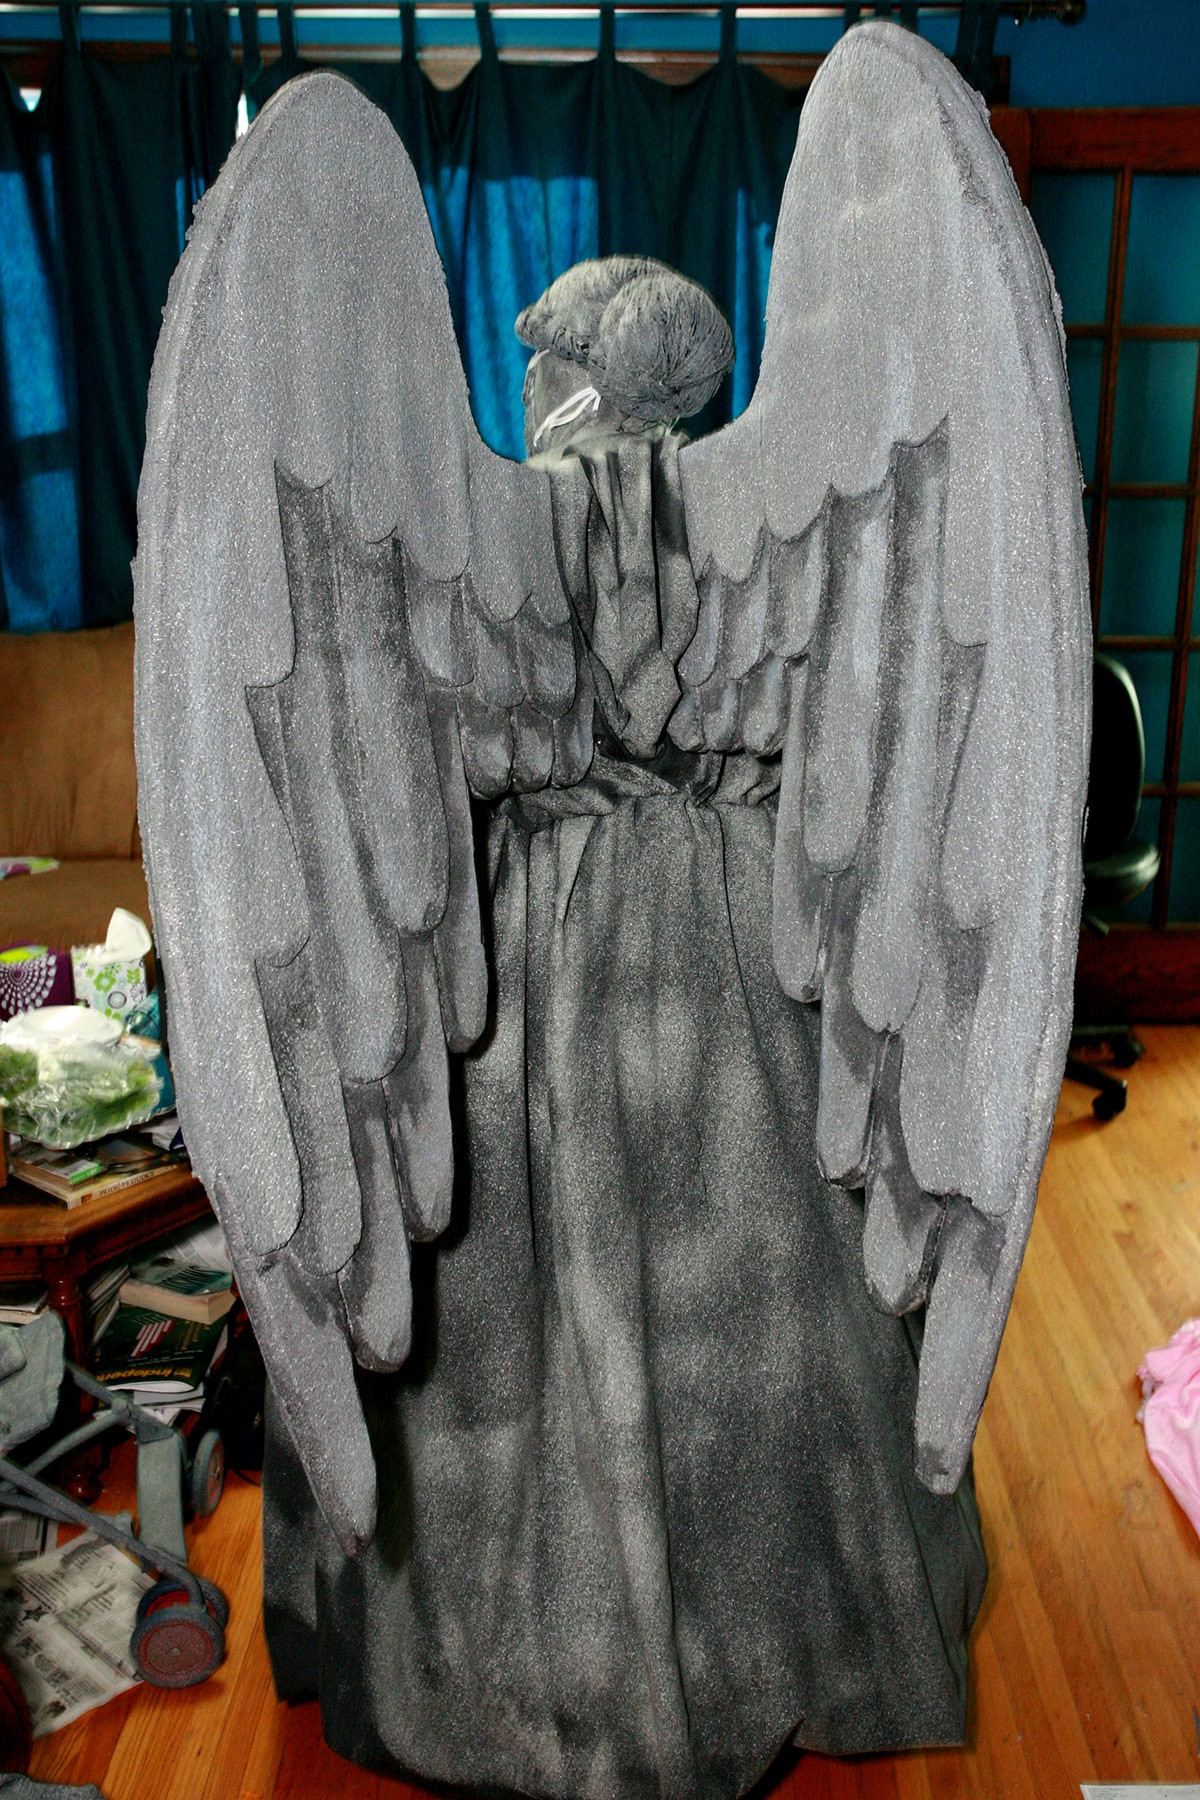
Constructing Weeping Angel Wings: Spreading Stone
The wings presented the most significant design and construction challenge throughout this entire Weeping Angel costume project.
Our online research for pre-existing wing designs yielded nothing that appeared comfortable or met our aesthetic vision. Therefore, we made the decision to – pardon the pun – wing it and develop our own unique wing structure and construction method.
Materials for Weeping Angel Wings
- Rosin Paper
- ½” Foam Insulation Sheets
- Jig Saw (ideal for cutting curves) or a utility knife
- Sill Plate Insulation (thinner foam for feathers)
- Scissors
- ¾” Thick Hardwood
- Drill
- Tube-Style Cable Mounts – sized to fit the 9-gauge wire
- 9 Gauge Galvanized Wire
- Woven Nylon Strapping
- D Rings
- Gorilla Glue
- Staple Gun
- Foam Insulation Adhesive
- Caulking
- Grey Primer Spray Paint
- Granite Texture Spray
- Grey Acrylic Paints – light and dark shades
Wing Patterning and Foam Cutting
After carefully studying the Weeping Angels in the Doctor Who episode “Blink,” noting wing length, height, and overall proportions, we estimated the desired wing size for our costumes. I then sketched out a wing pattern onto rosin paper.
Using my custom rosin paper pattern as a template, my husband, Porter, cut out eight wing pieces from ½-inch thick foam insulation sheets.
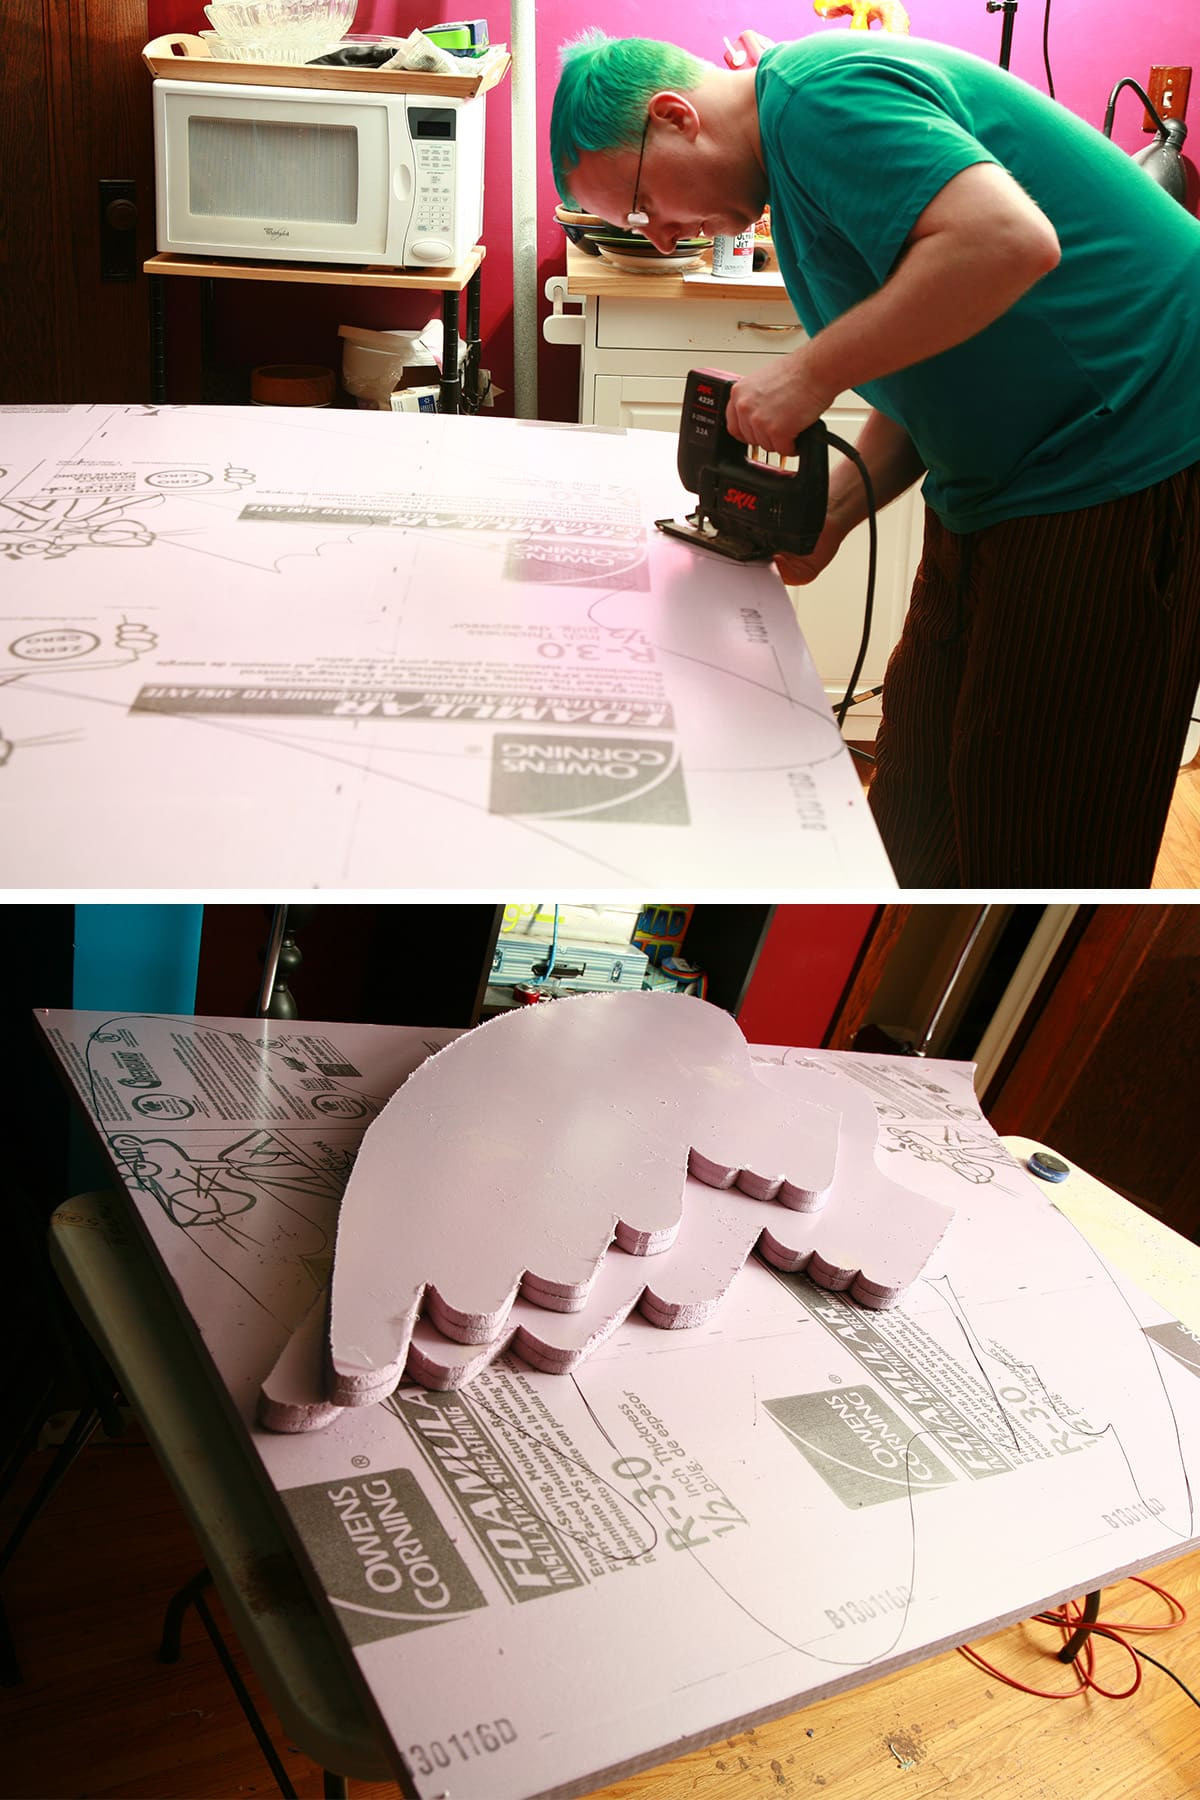 A person uses a jigsaw to cut large wing shapes from pink foam insulation sheets. Pink foam insulation being cut into wing shapes for Weeping Angel cosplay.
Each finished wing assembly would consist of one front foam piece and one back foam piece, layered together for dimension and durability.
We then cut feather shapes from thinner sill plate insulation foam. These individual foam feathers were glued onto the larger wing forms using foam adhesive and further secured with staples for a robust attachment.
Designing and Building the Wing Apparatus
We designed our wing apparatus to be centered around a ¾-inch thick piece of hardwood. This wood base provides structural stability and a mounting point for the wings.
Four holes were drilled along the top edge of the wood piece, extending approximately 6 inches deep into the wood. These holes are designed to receive and securely hold wire support rods extending from the wings.
Each wing is engineered to have four wire extensions protruding from its base. Two of these wire extensions are bent into shapes that will rest within the drilled holes on the top edge of the wood apparatus. The remaining two wire extensions are designed to slip into black plastic tube-style cable mounts. These cable mounts are positioned on the outer surface of the wood piece and screwed down, providing additional securement points for the wings.
Porter meticulously ensured that both sides of each wing apparatus were symmetrical and that the wire placement points on the wings corresponded precisely with the mounting points on the wood apparatus.
With a detailed diagram and measurements finalized, Porter proceeded to bend 9-gauge galvanized wire to create the wing support structures. (Using two pairs of pliers can be helpful for achieving sharp corners when bending the wire, but be prepared for some hand soreness after working with heavy-gauge wire!)
 Thick wire being bent into loops, and a person marking a wooden rectangle. Wire bending and wood apparatus preparation for Weeping Angel wings.
Each individual wing assembly ultimately utilized two separate wire pieces – one upper wire piece designed to insert into the top holes of the wood apparatus, and one lower wire piece intended to rest within the black cable tie mounts.
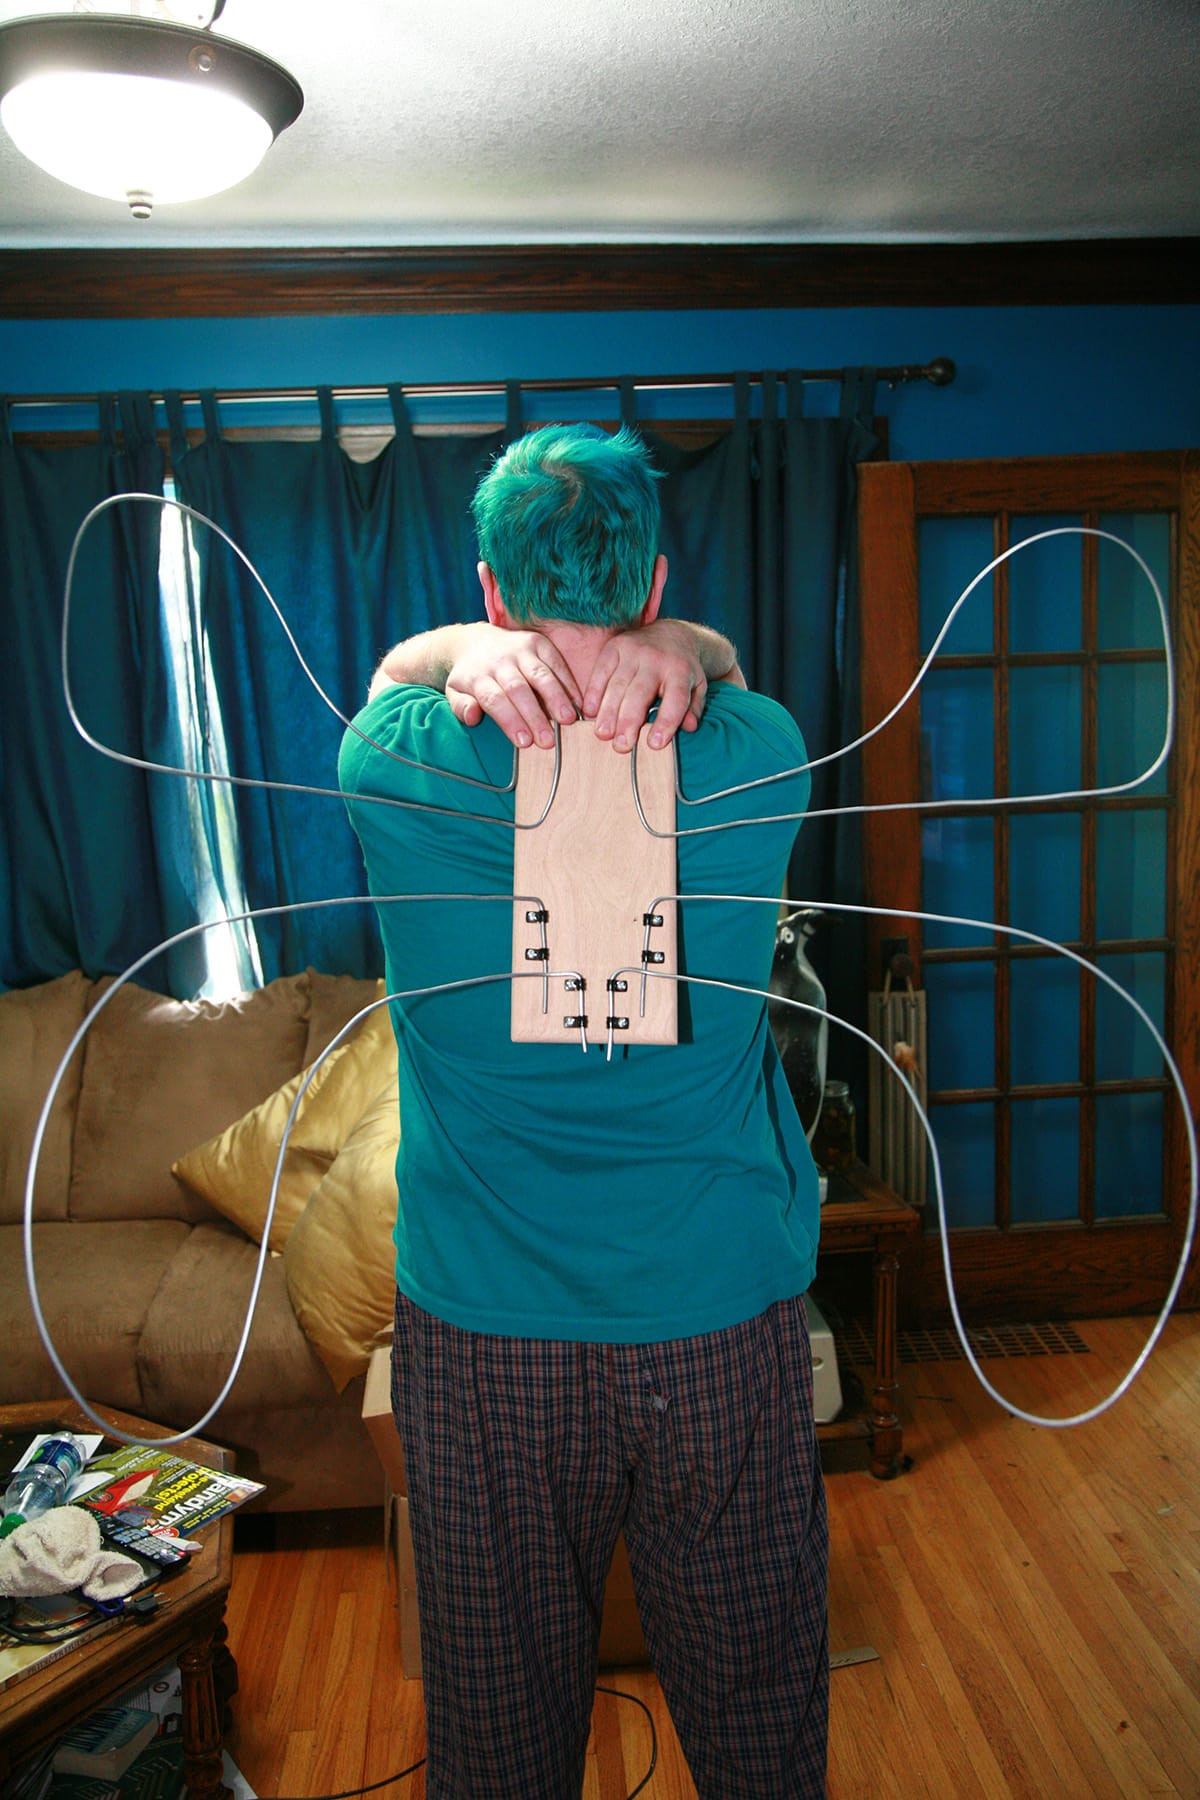 The back of a person holding a wooden rectangle against their upper back, with wire loops resembling butterfly wings. Wire wing framework being tested for fit on a wooden back apparatus.
Once all wire components were bent, fitted, and we were completely confident in the alignment and functionality of the wing apparatus, we finalized the harness system.
We used woven nylon strapping and attached it to the back (outer) surface of the wood apparatus using a combination of Gorilla Glue and staples for maximum hold. Each strap end was then sewn to adjustable strap fasteners, allowing for customized fit and comfortable wear.
Important Note: Exercise caution when stapling! Avoid stapling into the pre-drilled holes on the wood apparatus. If staples inadvertently obstruct these holes, you will need to re-drill or ream them out to ensure the wing support wires can be inserted later – a lesson we learned through experience!
D-rings were incorporated into the strapping system to facilitate secure closure and easy adjustment of the harness when worn.
Wing Assembly and Finishing Touches
The wire support structures were attached to one side of the foam wing pieces using 1-inch narrow crown staples. Staples were angled downwards into the foam for enhanced grip.
After encountering initial frustration with staples pulling out of the foam, we discovered that using two staples at each attachment point, oriented in opposing directions, effectively resolved this issue and provided a much more secure hold. Problem solved!
Once the wire structures were completely stapled to one side of the foam wing pieces, the front and back foam wing halves were glued together using foam insulation adhesive. The assembled wings were then weighted down to dry, ensuring a strong and even bond. We repurposed leftover bathroom tiles as weights for this step.
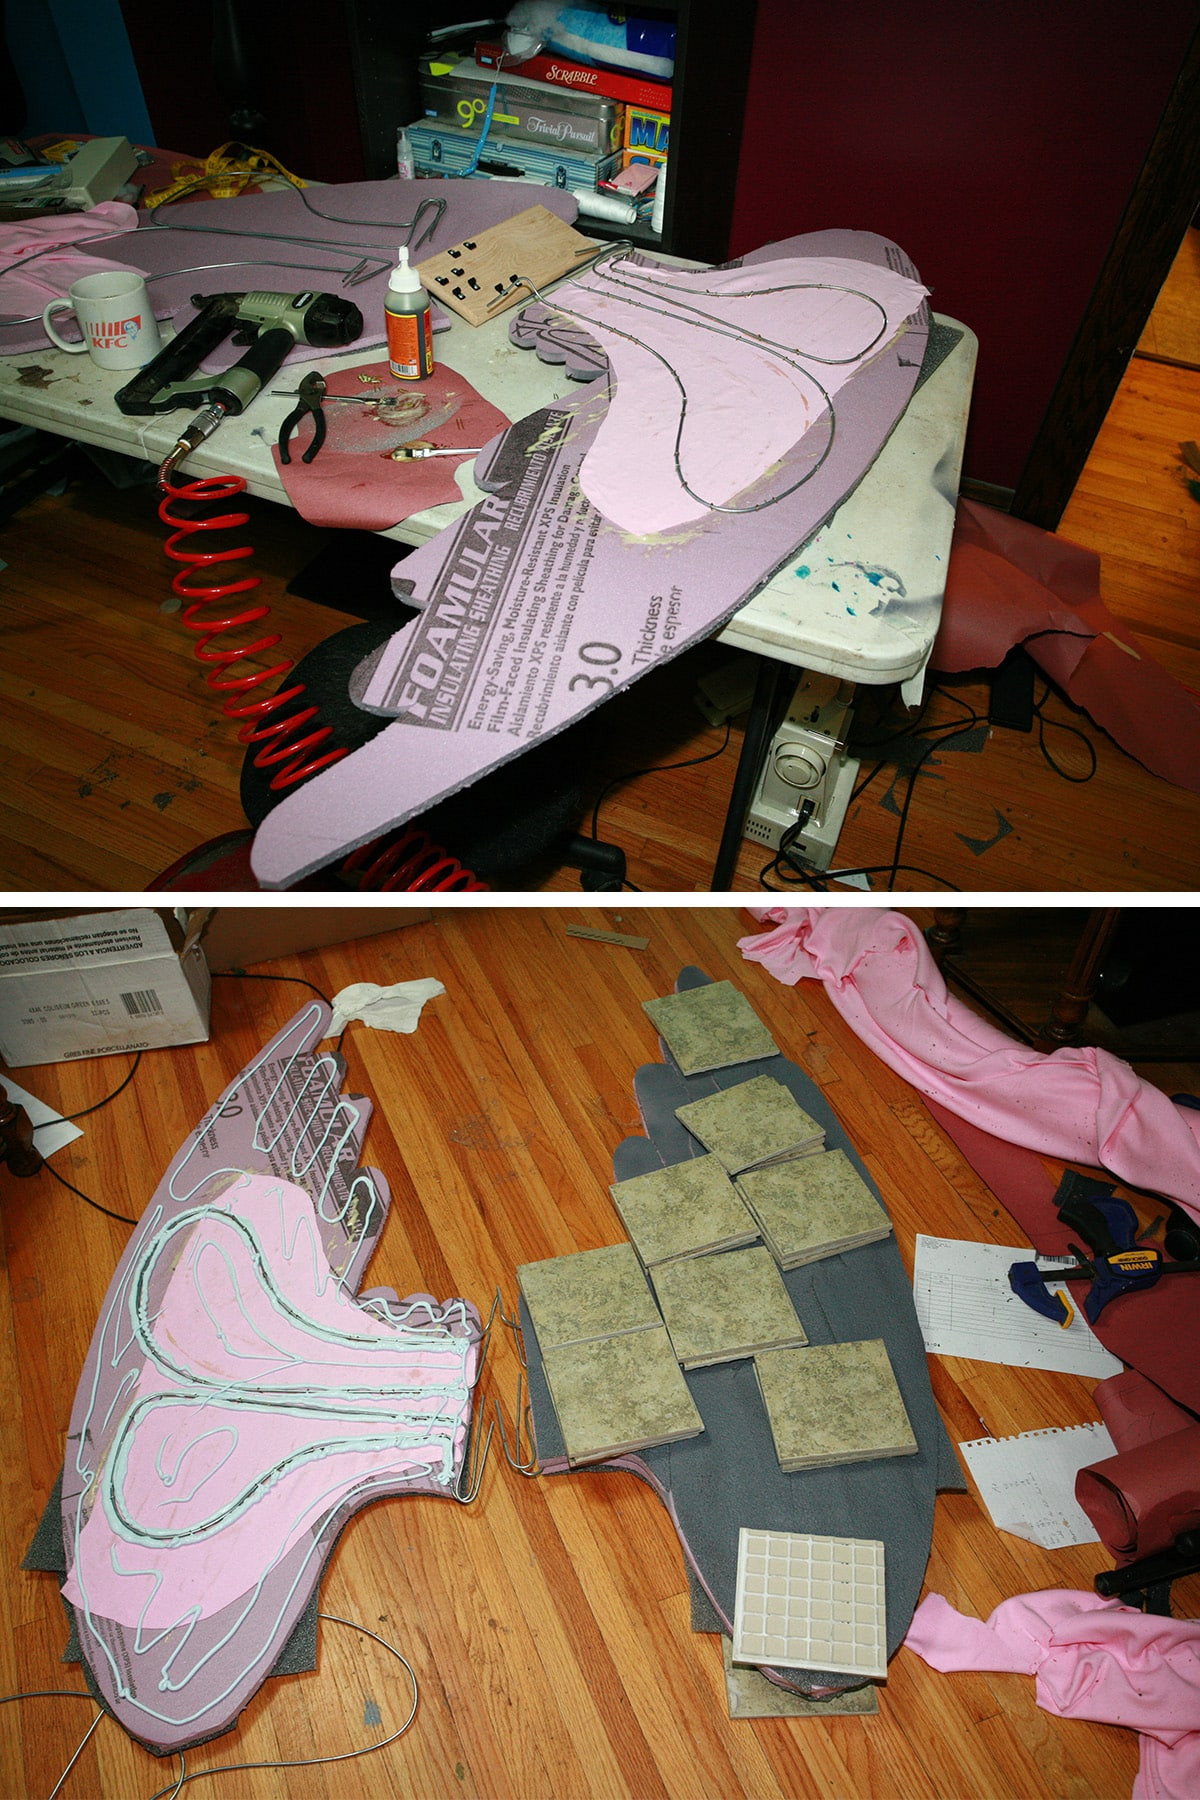 Wire loops being glued to large foam angel wings. Gluing wire framework to foam Weeping Angel wings.
This adhesive step required a substantial amount of foam adhesive – approximately four standard-size tubes for constructing two sets of wings.
(Image for the next step is not available): We filled any gaps or seams between the front and back foam wing layers with caulking. After allowing the caulking to dry completely, we hand-carved all wing edges to achieve a rounded, more organic shape.
Once the wings were fully dried and carved, I proceeded to paint them. First, I applied a coat of grey-colored spray primer to the entire wing surface. This primer coat provides a consistent base for subsequent paint layers. Following the primer, I applied a generous coating of granite texture spray paint, mirroring the texture used on the masks, dresses, and bodysuit to maintain a cohesive stone-like aesthetic across all costume components.
After the texture paint was dry, I felt the overall wing coloration appeared somewhat flat and lacked visual depth. To remedy this, I mixed very thin, watery washes of dark and light grey acrylic paint. Using a sponge, I applied these washes to create subtle shadows and highlights across the textured wing surfaces, adding dimension and visual interest to the finished Weeping Angel wings.
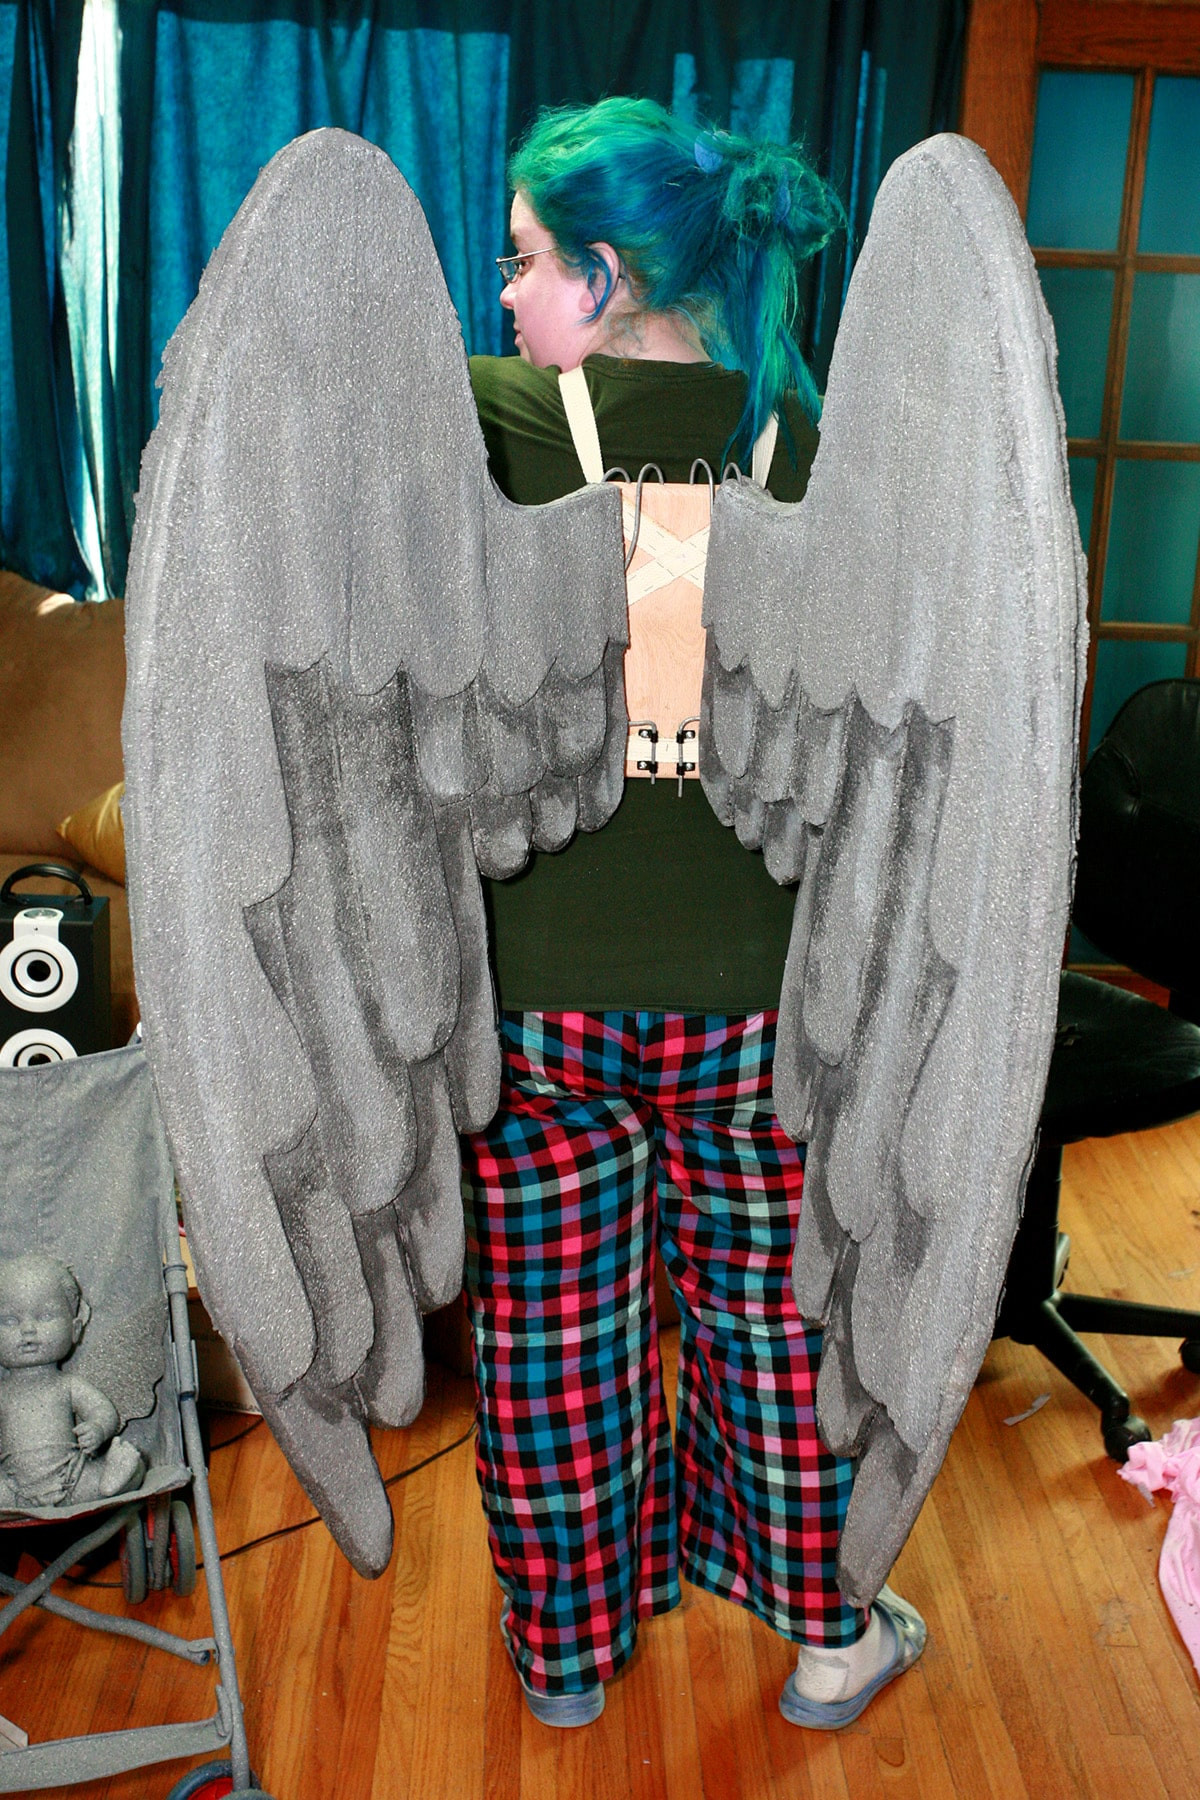 A person in pajama pants wearing a harness and large grey angel wings. Lightweight and adjustable Weeping Angel wings ready for cosplay.
Dressing as a Weeping Angel: Step-by-Step
To fully transform into a Weeping Angel, follow this dressing sequence:
- Bodysuit: Begin by putting on the bodysuit, leaving your hands extended out of the wrist openings for now.
- Wing Apparatus: Next, carefully position and put on the wing apparatus, securing the straps comfortably around your torso.
- Dress: Step into the dress and pull it up over the wing apparatus.
- Wings: Flip the back flap of the dress up and over one shoulder to access the wing apparatus. Gently pull the back bodice panels aside to fully expose the apparatus. Slide the wing support wires into their corresponding mounting points on the apparatus. Once the wings are securely in place, adjust the back bodice panels to conceal the apparatus. Finally, flip the back flap back down, tucking the bottom edge of the flap into the dress waistline for a clean finish.
- Mask: Carefully position and put on the Weeping Angel mask, securing the elastic straps.
- Wig: Complete the transformation by placing the Weeping Angel wig over your head, ensuring it is comfortably and securely positioned.
 A person fully transformed into a Weeping Angel statue. A completed Weeping Angel costume, ready to petrify.
DONE! The Weeping Angel costume is complete and ready to terrify. The modular design makes it surprisingly easy to get in and out of the costume – mission accomplished in terms of practicality and wearability!
Additionally, the lightweight construction of the wings and the ergonomic design of the wing apparatus ensure that the wings are not cumbersome or difficult to wear for extended periods.
My only personal challenge while wearing the full costume was overheating, a pre-existing issue due to a medical condition affecting my ability to regulate body temperature through sweating. However, Porter was able to comfortably wear his Weeping Angel costume for hours without any issues, demonstrating the costume’s overall comfort and wearability for most individuals.
The Weeping Angel Baby: A Stone-Cold Companion
To amplify the fun and unsettling nature of our Weeping Angel costumes, we decided that a Weeping Angel “baby” was essential… along with a granite-finished stroller to complete the macabre family tableau!
We visited a local thrift shop in search of a suitable baby doll and discovered a somewhat worn doll of approximately the right size.
After thoroughly washing the thrift store doll, I gathered the doll’s hair back with an elastic band – as much as the short, somewhat unruly hair would allow – and proceeded to paint the entire doll with grey acrylic paint.
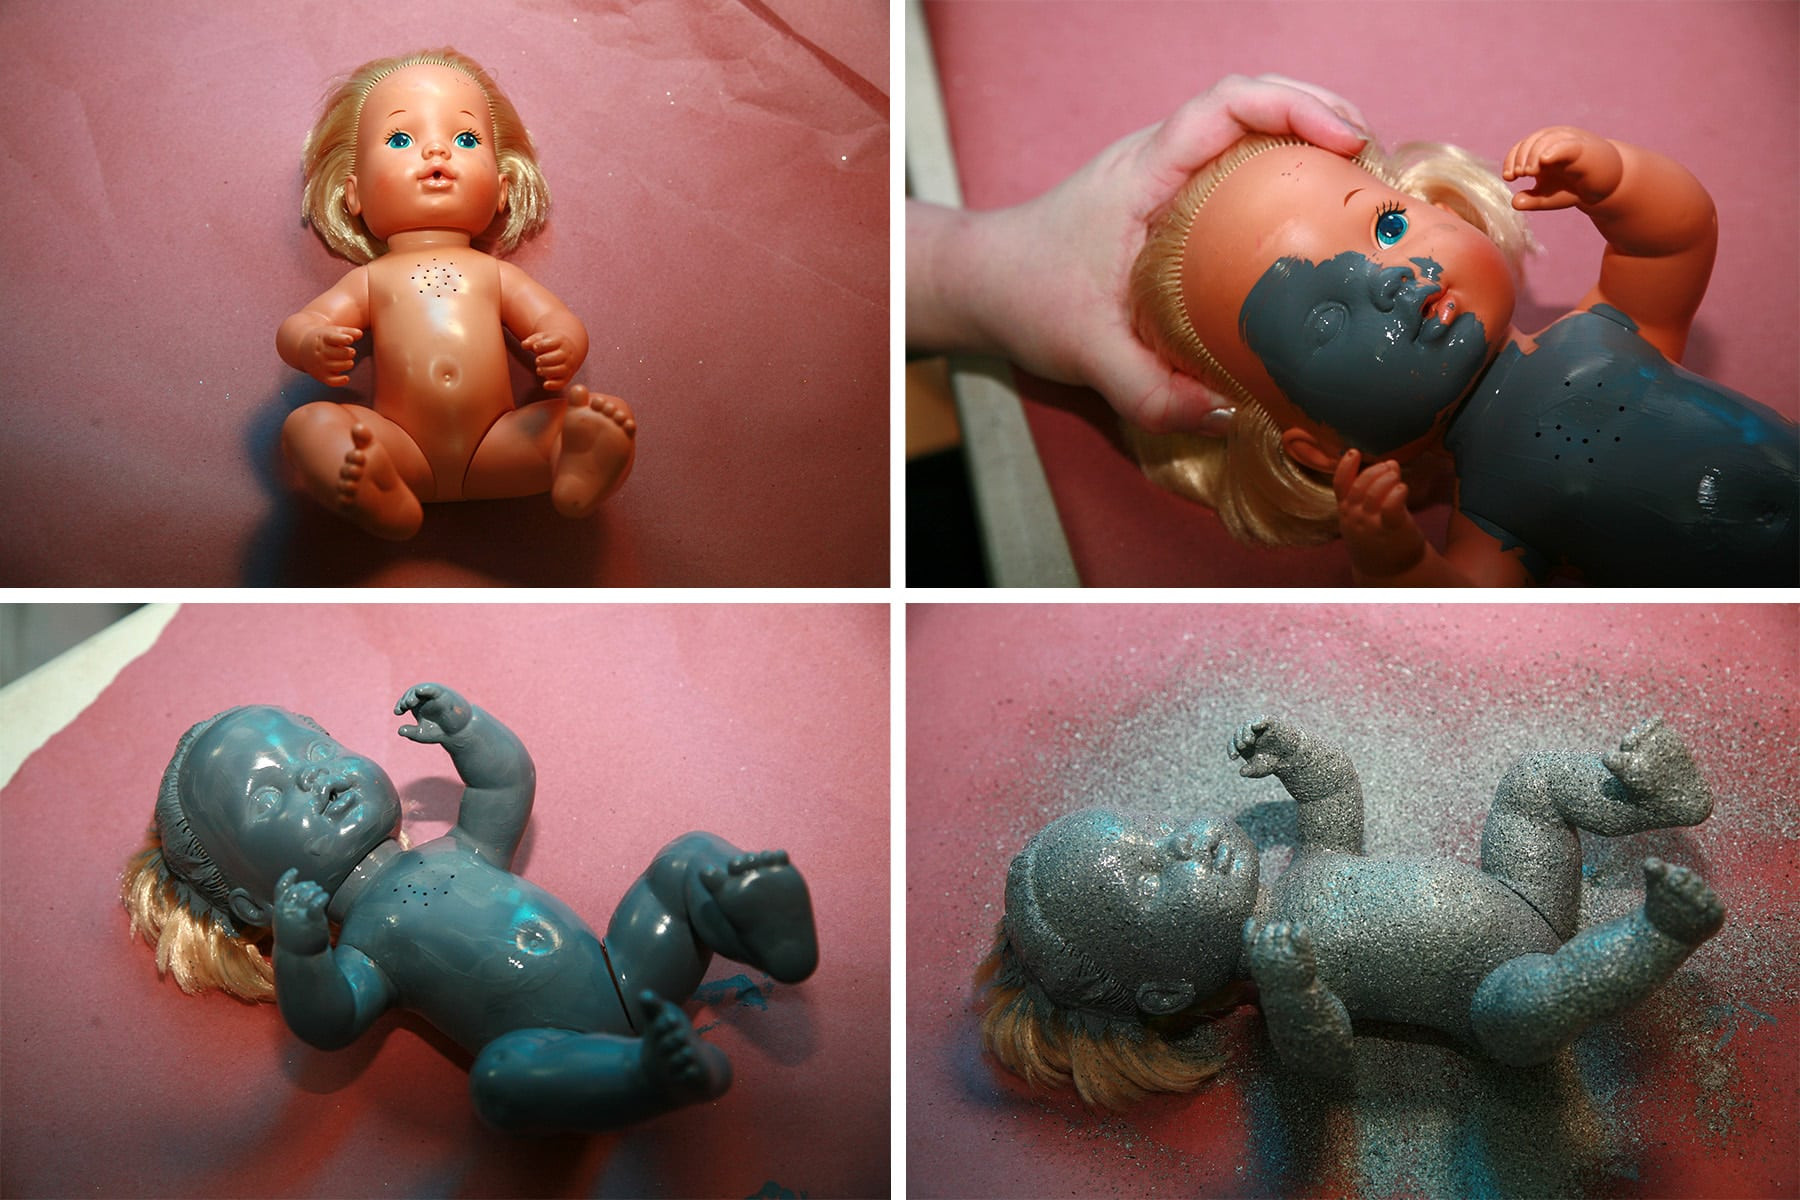 A four-panel image showing a baby doll being painted grey to become a Weeping Angel baby. A baby doll transformation into a miniature Weeping Angel.
Once the acrylic paint was dry, I applied a generous coat of granite texture spray to the doll, ensuring a consistent stone-like finish that matched the adult Weeping Angel costumes. I then decided the baby Weeping Angel needed a diaper for added detail, so I fashioned one from fabric scraps, sewed it directly onto the doll, and of course, spray-painted the diaper with texture spray as well!
To complete the miniature Weeping Angel transformation, I crafted small wings from scraps of sill plate insulation foam, scaled down to be proportionally appropriate for the baby doll.
 A person dressed as a Weeping Angel statue, holding a Weeping Angel baby doll. A Weeping Angel cosplayer with a petrified baby doll accessory.
And that concludes the Weeping Angel costume project! The entire undertaking – creating the costumes, not the baby doll accessory! – consumed a significant amount of time and likely exposed us to a less-than-healthy amount of spray paint fumes. However, we firmly believe that the final result – our award-winning Weeping Angel costumes – was absolutely worth every bit of effort and fume inhalation!
Explore more photos of the finished Weeping Angel costumes at the end of this post!
More Cosplay Guides
Looking for additional cosplay tutorials and inspiration? Here are more of our detailed guides:
Cosplay Photography Tips
Katniss Wedding Gown Wings
How I Made the Maleficent Costume
How I Made the MCU Hela Costume
How to Add a Sole to Boot Covers
How to Make Basic Spandex Gloves
How to Make Fancy Spandex Gloves
How to Make Maleficent’s Headpiece
How to Make Spandex Boot Covers
Maleficent Staff Tutorial
Poured Latex Smaug Top
Thranduil Crown Tutorial
Triceracop Costume
Share Your Cosplay Creations!
We’d love to see your Weeping Angel cosplay masterpieces! If you share your creations on Bluesky, please tag us – @SpandexSimplified.
Also, be sure to follow me on Pinterest and subscribe to our YouTube Channel to stay updated on all our cosplay adventures and tutorials.
The published adventures, at least!
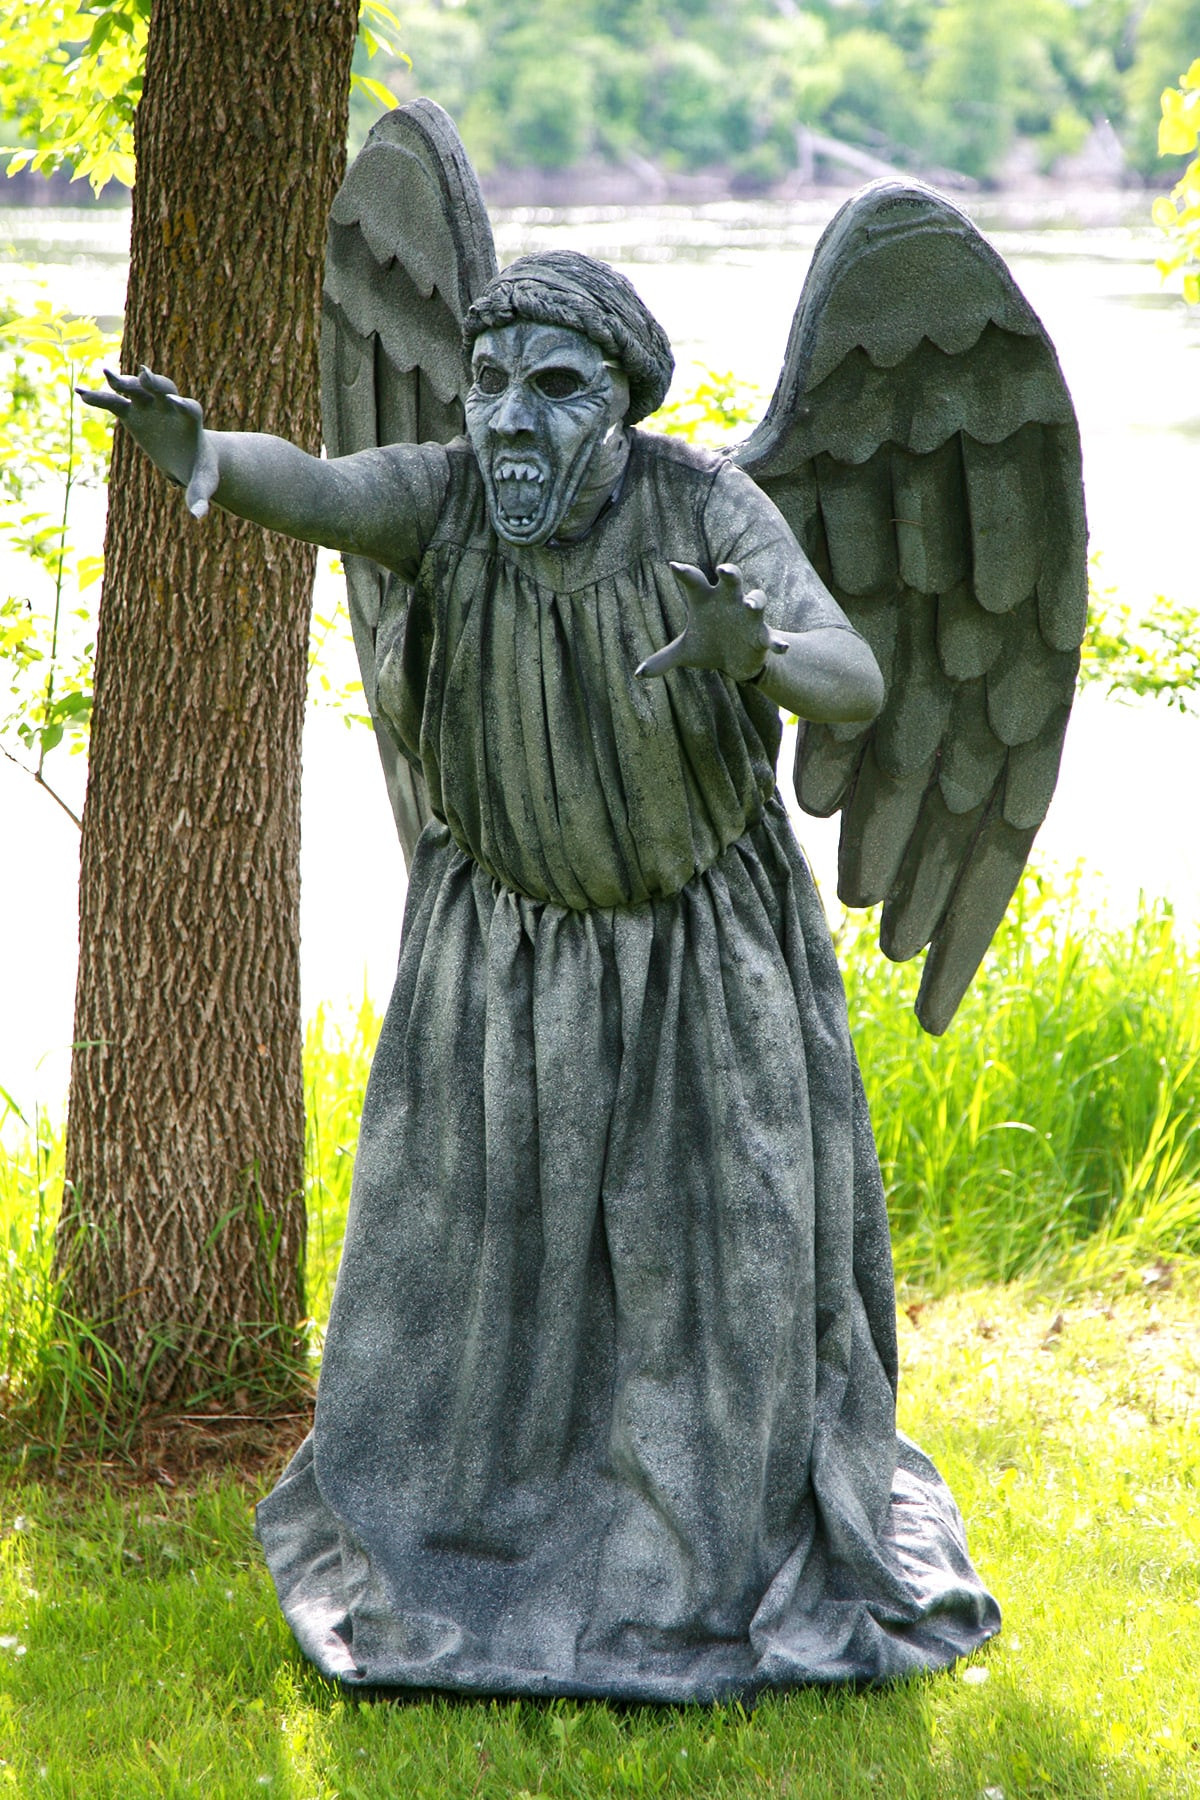 A person dressed as a Weeping Angel statue in a park setting.
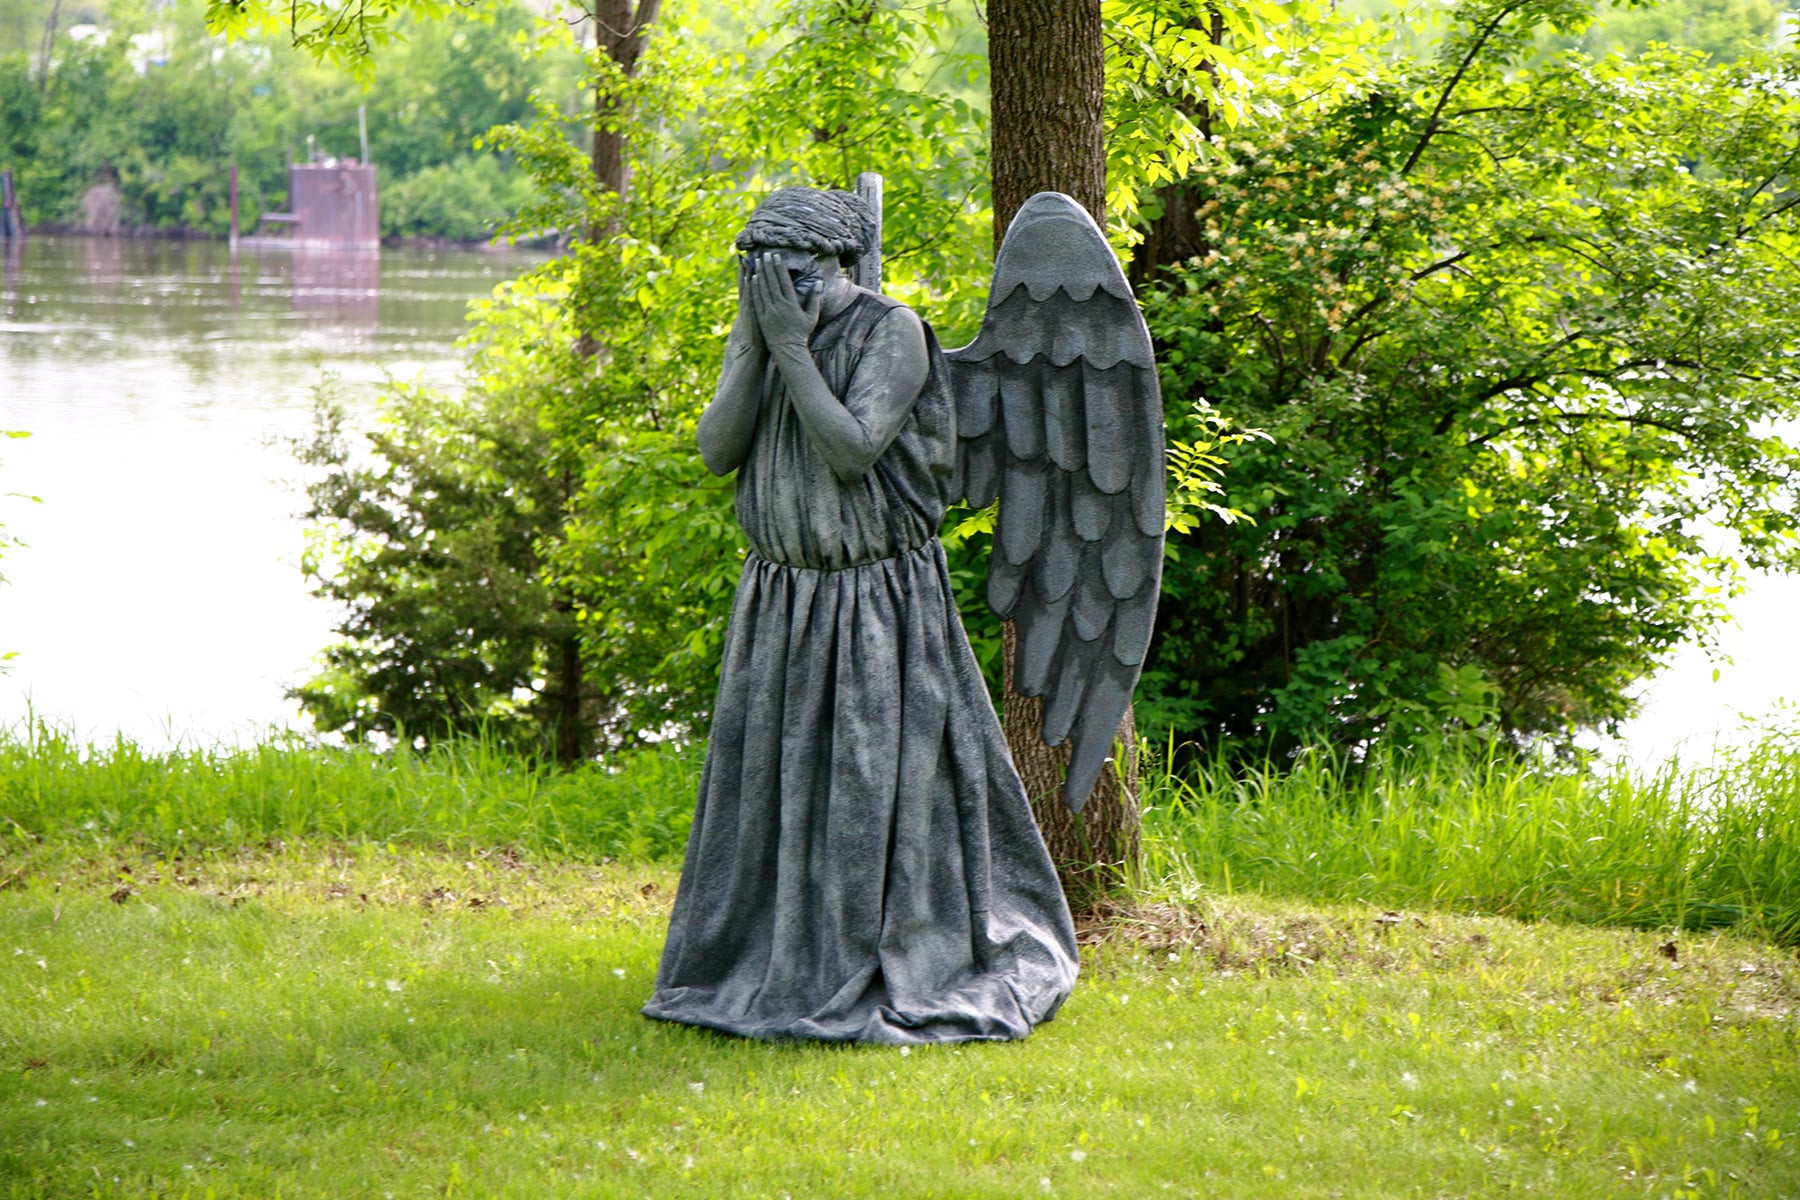
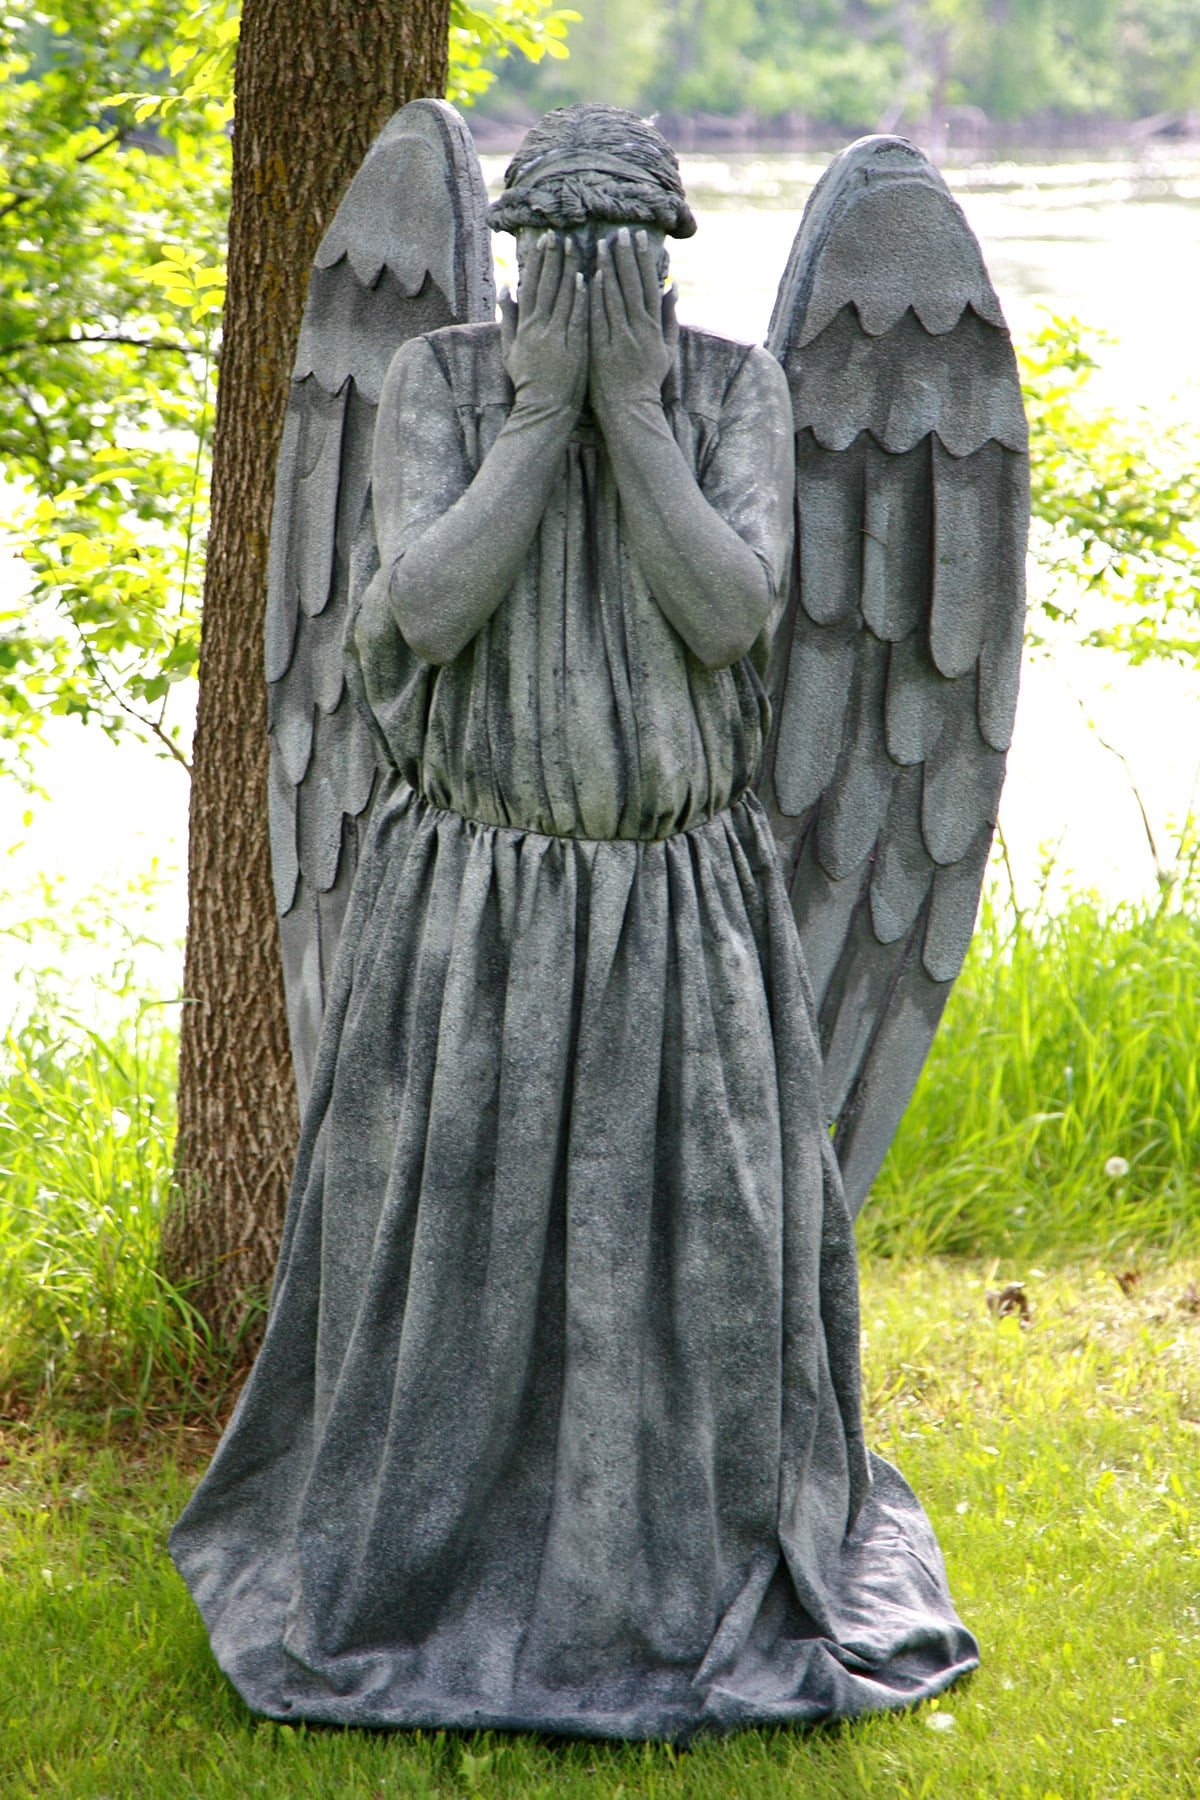 A Weeping Angel statue cosplayer standing in a park.
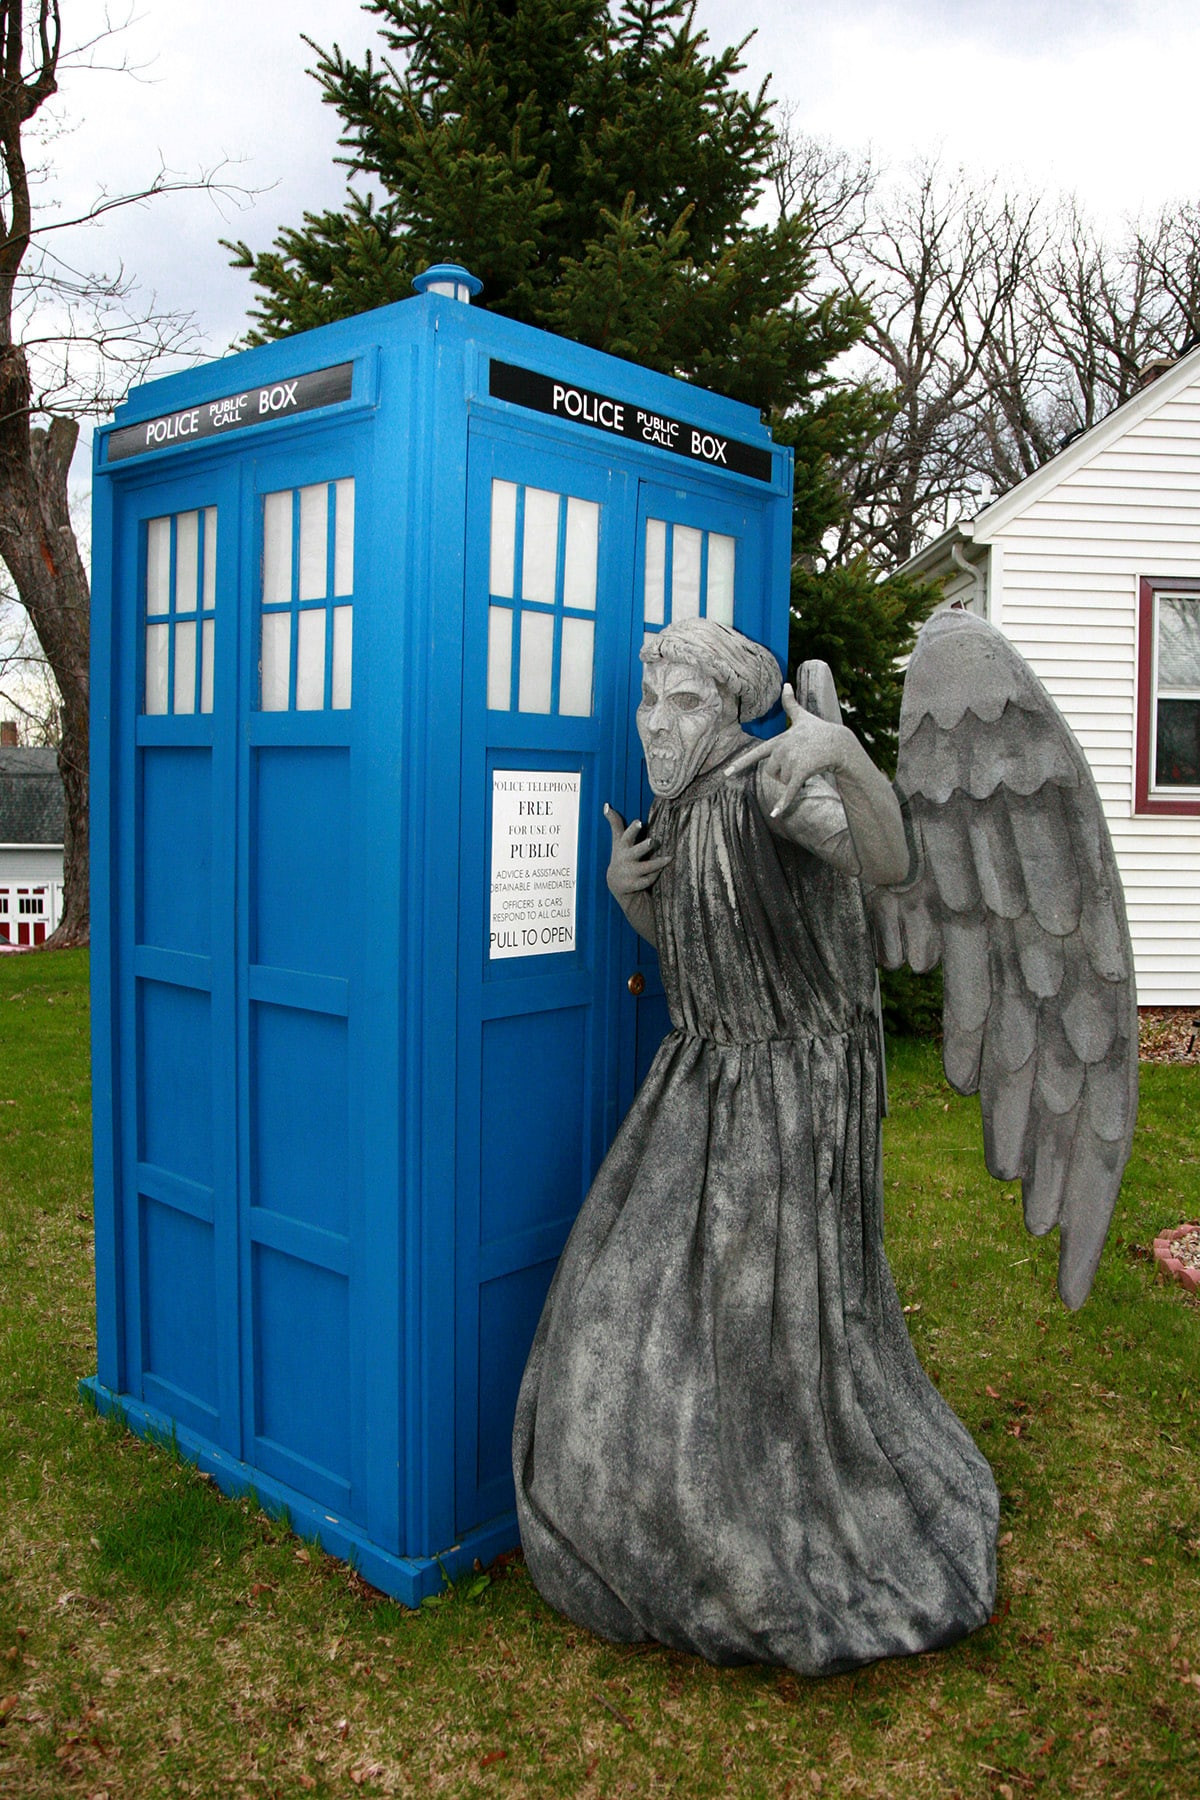 A Weeping Angel cosplayer leaning against a full-sized TARDIS prop.
 A Weeping Angel statue cosplayer in a park environment.
Related Cosplay Guides:
Triceracop Costume
Thranduil Crown Tutorial
Maleficent Staff Tutorial
Maleficent’s Headpiece
« Thranduil Crown Tutorial
Maleficent Staff Tutorial »