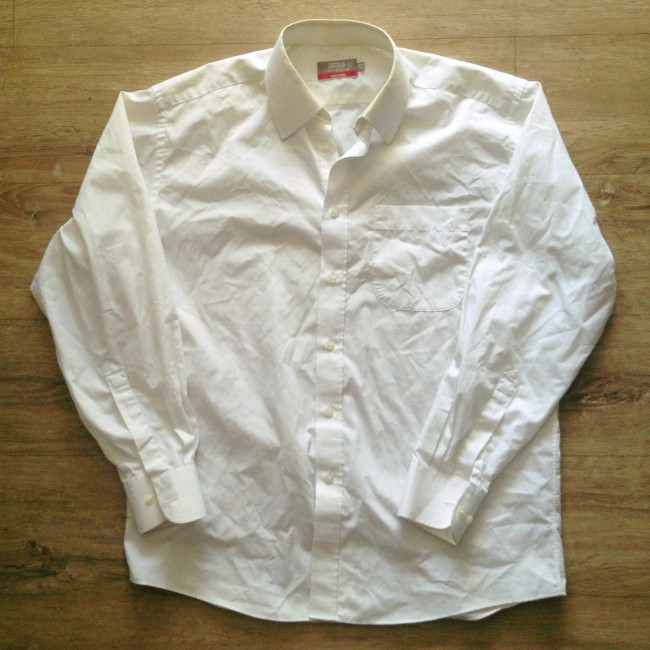
Spring cleaning often unearths hidden gems, and during our recent decluttering, my husband’s old shirt became the perfect canvas for a creative project. Inspired by my son’s love for imaginative play and his trusty doctor’s kit, I decided to upcycle the shirt into a child’s doctor coat. Like many children, he’s fascinated by role play, and his doctor’s bag is a frequent companion. It was time to create the ideal outfit to enhance his pretend play scenarios.
 Child in homemade doctor coat smiling
Materials for Your DIY Doctor Coat
The beauty of this project lies in its simplicity and cost-effectiveness. I utilized items I already had at home, making it a truly zero-cost endeavor, save for the time invested – approximately 2 hours. My sewing box was a treasure trove of leftover supplies from previous projects, including thread, bias binding, Velcro, and felt. Even if you need to purchase some materials, crafting a child’s doctor coat this way remains significantly more economical than buying a pre-made costume. Perhaps a friend might even share some supplies, making it a collaborative and budget-friendly craft!
Here’s what you’ll need to create your own child’s doctor coat:
- One old white shirt (preferably oversized for ease of movement)
- Scissors
- Pins
- Sewing machine (hand sewing is also possible, but will take longer)
- White and red cotton thread
- White bias binding (for a neat finish on the collar edge)
- White sew-on Velcro (optional, for easy fastening)
- Red felt (for the iconic doctor’s cross)
 Materials for making a child's doctor coat laid out
Step-by-Step Guide to Sewing a Child’s Doctor Coat
Let’s transform that old shirt into a fantastic child’s doctor coat with these straightforward steps.
Step 1: Sizing Up Your Little Doctor
Have your child try on the old shirt. This is crucial for getting the right fit. Mark with pins or a fabric marker where you want the sleeves to end and the desired length of the doctor coat. Remember to add a few extra centimeters to these measurements for hemming – this ensures a clean, finished edge.
 Marking sleeve and coat length on a shirt for child's doctor coat
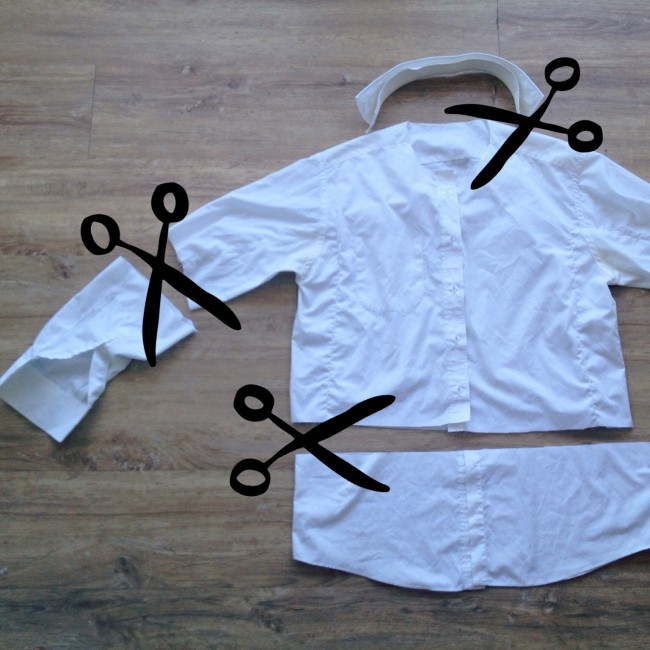
Step 2: Cutting and Shaping the Coat
Using your scissors, carefully cut along the marked lines to remove the excess fabric from the sleeves and the bottom hem of the shirt. Also, cut off the collar at this stage. Removing the collar gives the child’s doctor coat a more authentic lab coat appearance, distinguishing it from a regular shirt.
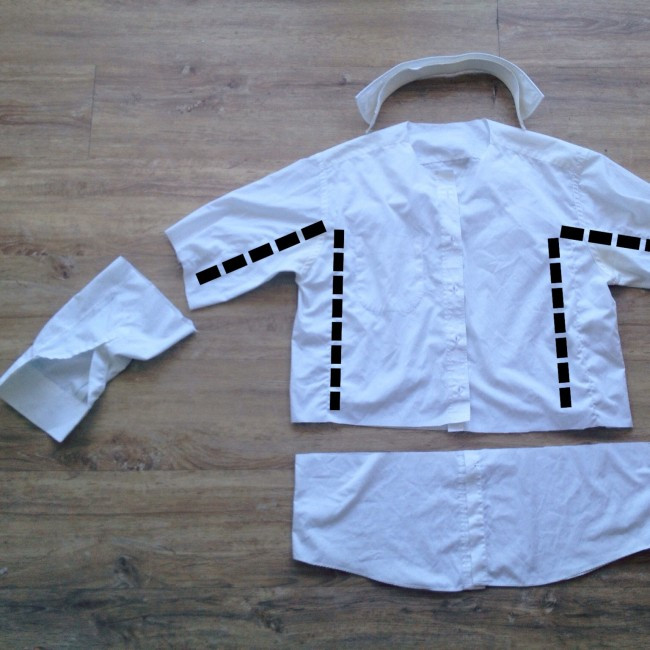
Step 3: Tailoring the Fit
Turn the shirt inside out. Have your child try it on again. Now, pin along the sleeves and sides to tailor the shirt to a more appropriate size for a child’s doctor coat. You’re essentially making the shirt smaller and more fitted. Sew along the pinned lines using your sewing machine (or by hand). Don’t stress about perfect symmetry; this is a costume for play! Eyeballing it is perfectly acceptable. As long as both sides are roughly similar, the doctor coat will look great. Once sewn, trim the excess material from the outside edge, leaving about 2cm (approximately ¾ inch) of fabric next to your new seam. This extra material prevents fraying and reinforces the seam.
 Pinning the sides of the shirt to size for a child's doctor coat
Step 4: Hemming for a Professional Finish
Hemming the raw edges of the sleeves and the bottom of the child’s doctor coat is essential to prevent fraying and give it a more polished, durable finish. To hem, simply turn the edge of the fabric inwards twice (about 1cm or ½ inch each time) and sew along the folded edge. This creates a neat, clean hem.
Step 5: Neaten the Collar Edge
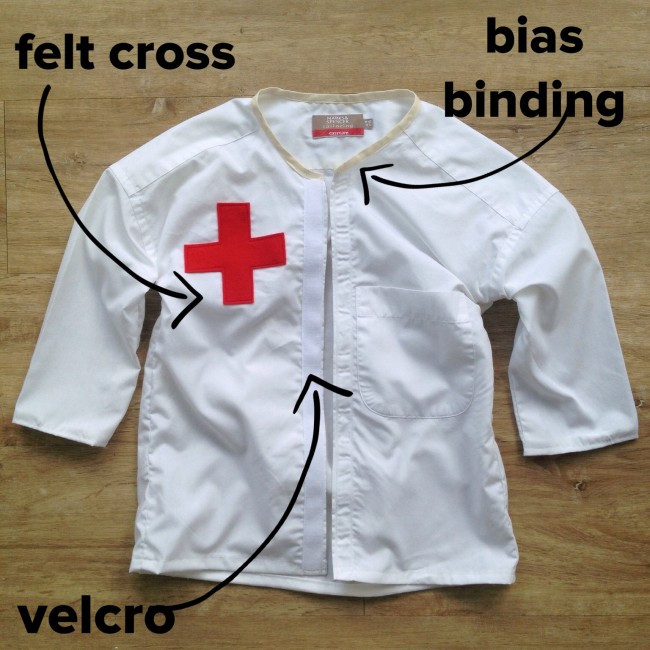
Sew bias binding along the raw edge where the collar was removed. This bias binding prevents fraying and provides a clean, professional-looking neckline for your child’s doctor coat. If you don’t have bias binding, you could technically leave the collar on. However, removing it enhances the lab coat style. Hemming the curved collar edge can be tricky, which is why bias binding is a simpler and more effective solution.
Step 6: Easy Fastening with Velcro (Optional)
While buttons are classic, Velcro offers a more child-friendly and quicker fastening option for a child’s doctor coat, especially for younger children who are still developing fine motor skills. If you opt for Velcro, carefully remove the buttons and buttonholes from the shirt. Hem the raw edges where the buttons and buttonholes were to prevent fraying. Then, sew strips of Velcro onto the front edges of the doctor coat for easy opening and closing. If you prefer to keep it simple, you can certainly leave the buttons in place.
Step 7: Adding the Doctor’s Cross
To truly transform your upcycled shirt into a recognizable child’s doctor coat, add the iconic red cross. Cut a large red cross shape from your red felt. Sew or glue this felt cross onto the chest area of the doctor coat. On the opposite side, the original shirt pocket becomes a functional and thematic detail – perfect for holding pretend thermometers or other essential doctor’s tools for imaginative play!
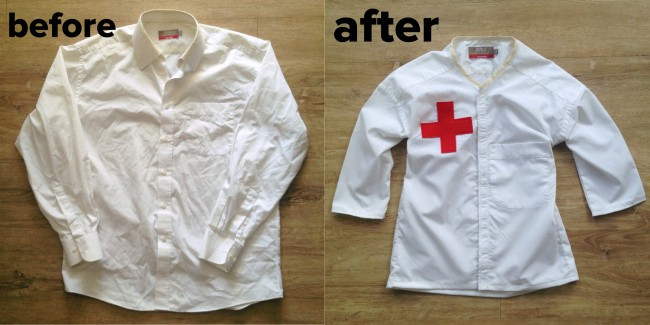 Before and after of the doctor coat transformation
The Finished Child’s Doctor Coat: Ready for Play!
And there you have it – a fantastic child’s doctor coat crafted from an old shirt! The entire project, including measuring, pinning, and sewing, took around two hours. A quick iron to smooth out any wrinkles, and your little doctor is ready to make their rounds and attend to all their patients. This DIY child’s doctor coat is perfect for fostering creativity, imaginative play, and even sparking an interest in the medical field. Enjoy watching your child’s imagination come to life!
[