Dealing with a 12-string guitar can sometimes feel like living with a cat that loves to scratch furniture. While generally wonderful, 12-strings are known for their quirks. One common issue is a “belly bulge,” a noticeable swelling of the guitar top behind the bridge. This bulge is a frequent problem in 12-string guitars due to the immense string tension, and it can lead to a host of other issues like high action, difficulty playing, and even structural damage over time. Fortunately, the JLD Bridge Doctor offers a straightforward solution to address mild to moderate belly bulge and restore your guitar’s playability.
If you’re researching how to install a Bridge Doctor, you’ll find numerous helpful blog posts and videos online. This article aims to go a step further by preparing you for some common challenges encountered during installation. By highlighting these potential hiccups, we hope to make your Bridge Doctor installation smoother and more efficient, ensuring you stay calm and “within spec” – especially if you’re working on your guitar before a performance or recording session.
Understanding Belly Bulge in 12-String Guitars
The belly bulge is a distortion of the guitar’s top, specifically the area behind the bridge, causing it to swell or “belly out.” This is primarily caused by the immense tension exerted by twelve strings on the guitar’s top and bridge. Over time, this constant pressure can cause the top to deform, especially if the guitar’s bracing is not robust enough or if it experiences fluctuations in humidity and temperature.
Common problems associated with belly bulge include:
- Increased Action: The bulging top raises the bridge height, leading to higher string action, making the guitar harder to play and potentially causing buzzing.
- Bridge Issues: In severe cases, the bridge itself can start to lift or become loose due to the stress.
- Sound Distortion: While sometimes subtle, a significant belly bulge can affect the guitar’s sound, potentially reducing sustain and clarity.
- Structural Stress: Continued bulging puts stress on the guitar’s bracing and overall structure, potentially leading to cracks or further damage in the long run.
While some bellying is expected in older guitars, especially 12-strings, excessive bulge needs to be addressed to maintain playability and prevent further damage.
The JLD Bridge Doctor: An Effective Solution
The JLD Bridge Doctor is a popular and effective device designed to correct belly bulge in acoustic guitars. It works by applying gentle counter-pressure to the guitar’s top from inside the body, effectively flattening the bulge and restoring the top’s proper profile. This, in turn, lowers the action, improves playability, and reduces stress on the guitar’s structure.
There are two main types of Bridge Doctor systems:
- Bolt-through-bridge version: This type requires drilling a small hole through the bridge for a bolt that connects to the Bridge Doctor inside the guitar. It’s known for its secure and effective pull.
- Pin version: This version utilizes special bridge pins that are attached to the Bridge Doctor. It’s considered easier to install as it avoids drilling and is a good option for those hesitant to modify their bridge permanently.
Both versions are designed for relatively easy installation and offer a significant improvement in addressing belly bulge without requiring complex luthier skills. For many guitarists, installing a Bridge Doctor is a manageable DIY project.
Installing the Bridge Doctor: Lessons Learned
Based on practical experience, here are some key “lessons learned” to help you navigate the Bridge Doctor installation process, particularly the pin version, more efficiently:
Tool Preparation is Key
Before you begin, gather all necessary tools. The instructions might seem straightforward, but having the right tools readily available will prevent frustration. For the pin version, you’ll definitely need a small but sturdy tool to tighten the brass pins. A safety pin actually works surprisingly well as a wrench for this purpose.
Lesson: Include a sturdy safety pin in your toolkit. It’s perfect for maneuvering and tightening the small brass pins.
Dealing with String Ends and Brass Pins
The brass pins in the pin-style Bridge Doctor have very small holes, especially those for the unwound strings. The standard string end, with its winding tail, often won’t fit through these tiny holes. You’ll need to carefully bend the trailing end of the string flush against the string winding, effectively minimizing its profile. This can be a bit fiddly and requires dexterity.
Lesson: Prepare your string ends! You’ll need two pairs of needle-nose pliers. Use one to hold the string windings just above the ball end securely. Use the second pair to crimp down the excess string winding that sticks up. This ensures the string end is slim enough to thread through the brass pin holes.
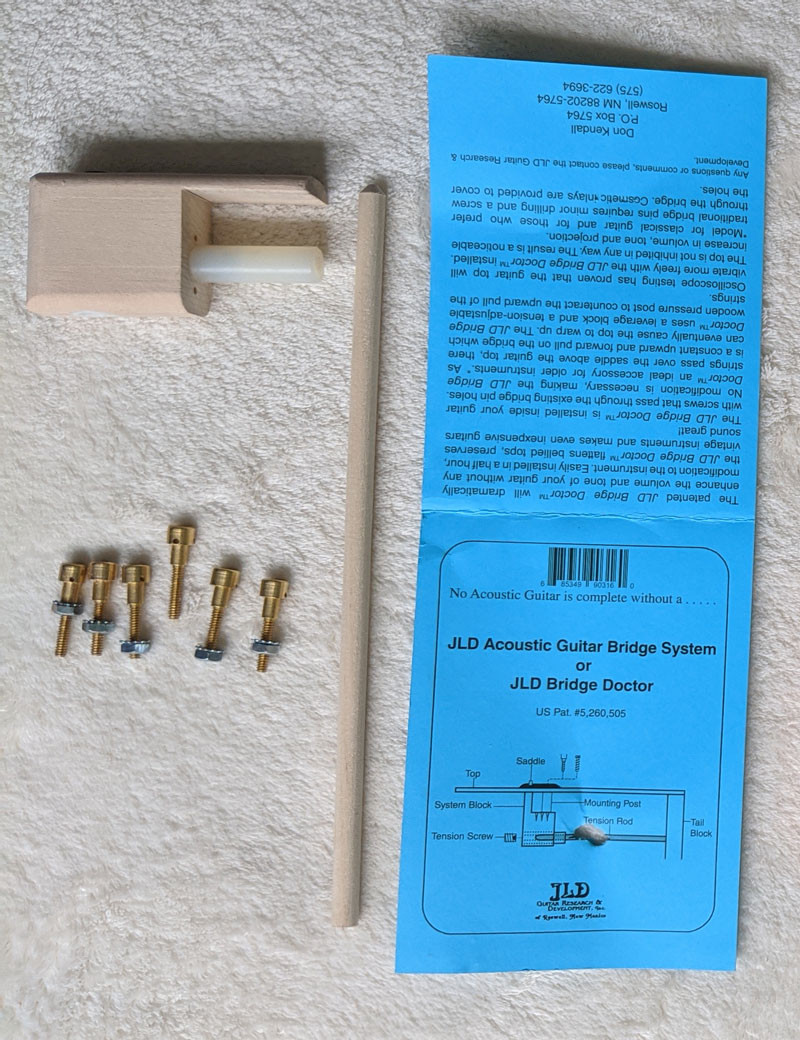 JLD Bridge Doctor with brass pins, as it comes in the package.
The Importance of Visibility
Working inside the guitar’s soundhole can be challenging due to limited visibility. Trying to see the Bridge Doctor components and manipulate them in the dark interior can slow down the process significantly. While a dedicated luthier’s mirror is ideal, you might not have one readily available.
Lesson: Your smartphone’s back-facing camera is an excellent substitute for a dental mirror! Turn on the camera and use it to look inside the guitar. The screen provides a clear view, allowing you to see what you’re doing and properly position the Bridge Doctor.
Cutting the Dowel Rod Correctly
The Bridge Doctor system includes a wooden dowel rod that presses against the guitar’s tail block. You need to cut this rod to the correct length based on your guitar’s dimensions. It’s crucial to do a trial fit before cutting. Rushing this step can lead to mistakes.
Lesson: Measure twice, cut once! And even better, consider having a spare dowel rod on hand. If you accidentally cut the first one too short (it happens!), you’ll have a backup and avoid delays. You can purchase a similar dowel rod at any hardware store. Ensure you shape the end that meets the tension screw to match the original dowel.
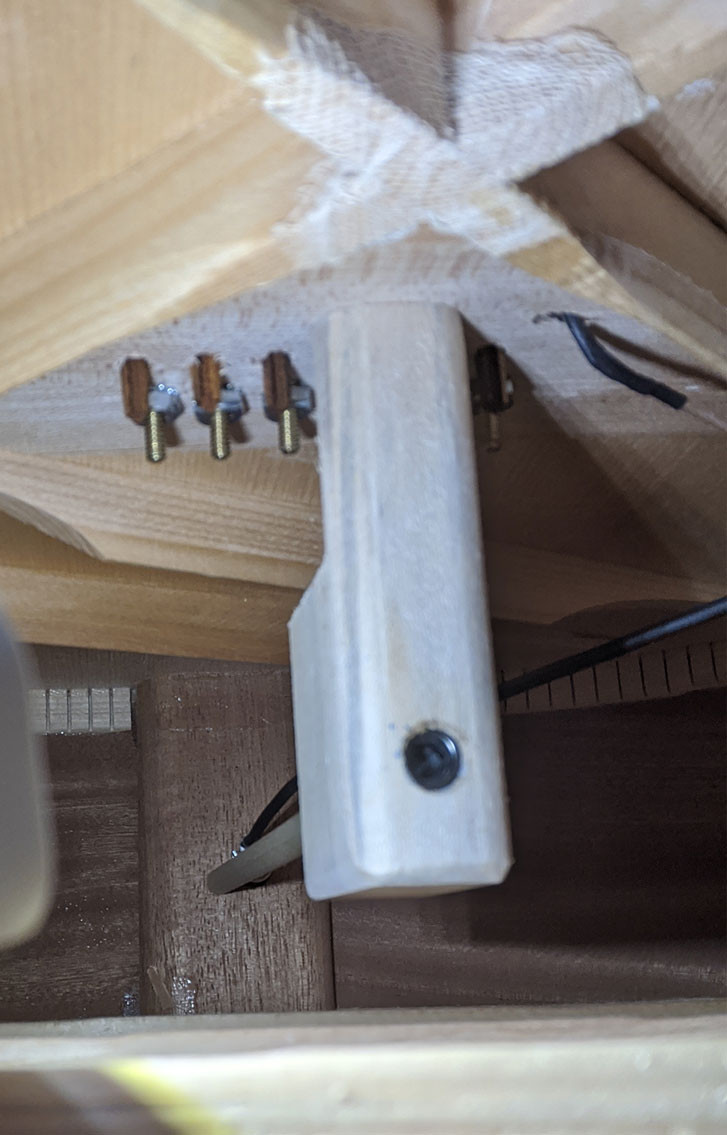 JLD Bridge Doctor installed inside the guitar.
Accounting for Additional Tasks
Installing the Bridge Doctor might reveal other maintenance needs for your guitar. For example, you might find that your bridge pins are worn or ill-fitting, or you might decide to change strings at the same time. These additional tasks add to the overall time needed for the repair. In this case, upgrading to rosewood bridge pins with abalone dots was a desirable enhancement.
Lesson: Factor in potential extra tasks when planning your time. Bridge pin replacement, string changes, or even minor bridge re-gluing (if needed) can extend the project duration. Having replacement parts like new bridge pins and strings ready is a good idea.
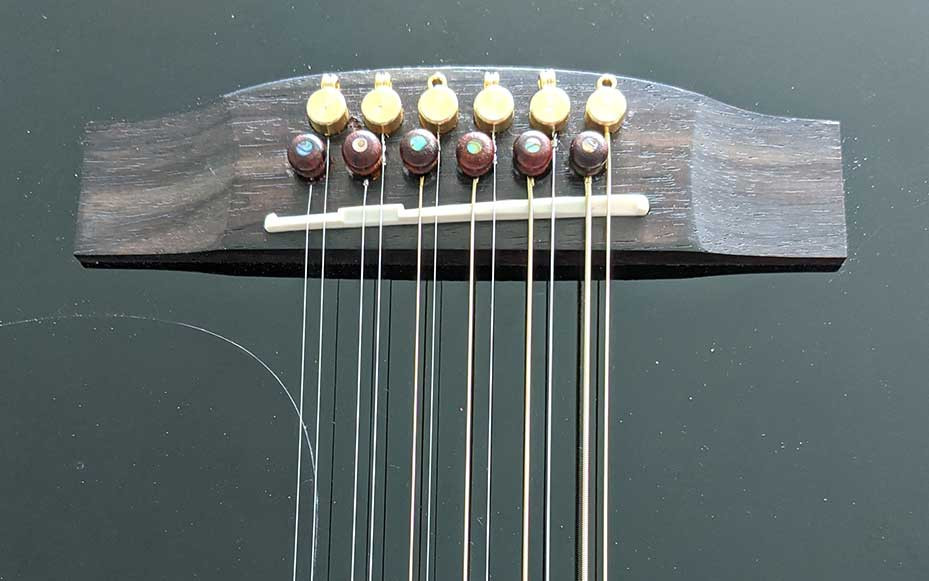 JLD Bridge Doctor brass pins replacing original bridge pins.
Bridge Doctor: A Worthwhile Repair
Despite any minor challenges during installation, the JLD Bridge Doctor is an incredibly effective solution for belly bulge. It’s a testament to clever engineering and provides a significant benefit for 12-string guitar owners. The improvement in playability and the restoration of the guitar’s top are well worth the effort.
If you’re prepared with the right tools and are aware of potential minor hurdles, installing a Bridge Doctor can be a relatively quick and satisfying repair. It empowers guitarists to address a common 12-string issue effectively and affordably.
Consider the JLD Bridge Doctor if your 12-string guitar is showing signs of belly bulge. It’s a straightforward path to restoring your guitar’s comfort and sound.
Explore JLD Bridge Doctor Options:
- Pin/Bolt-Mount Version: Link to Product
- Single Bolt-Mount Version: Link to Product
Disclaimer: This article contains affiliate links. If you purchase through these links, we may earn a small commission.