Spring cleaning often unearths hidden gems, and sometimes, those gems are hiding in plain sight in our wardrobes! If you’re decluttering and come across an old shirt destined for donation or the rag pile, consider transforming it into something magical for your little one: a Doctor Costume! Like many children, imaginative play is a cornerstone of development, and a doctor’s kit is a frequent flyer in our house. To enhance those pretend play sessions, what could be better than a homemade doctor coat crafted with love and a touch of upcycling ingenuity?
 Child modeling a doctor coat made from an upcycled white shirt, smiling and holding a toy stethoscope
This DIY project is not only a fantastic way to give new life to old clothes but also a budget-friendly alternative to store-bought costumes. Plus, it’s a wonderful opportunity to spend some quality time crafting and creating something special for your child.
Materials You’ll Need:
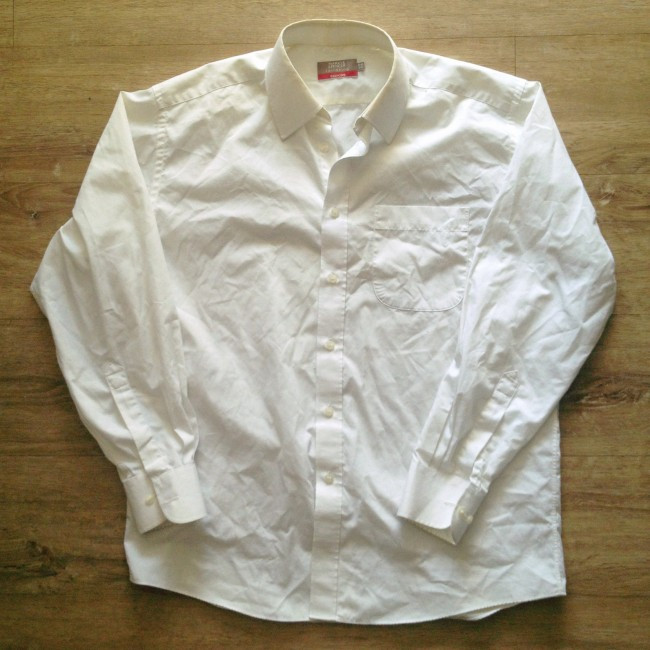
- One old white shirt (preferably adult-sized for a good length)
- Sharp scissors
- Pins for fabric
- Sewing machine (hand sewing is also possible but will take longer)
- White and red cotton thread
- White bias binding (or ribbon or fabric strip for neatening edges)
- White sew-on Velcro (optional, for easier fastening)
- Red felt square
The beauty of this project is its cost-effectiveness. You likely have many of these items already in your craft stash. Upcycling materials means you’re not only saving money but also contributing to sustainable practices by reducing textile waste. Even if you need to purchase a few supplies, the total cost will likely be significantly less than purchasing a pre-made doctor costume from a store.
 Close-up of sewing materials including thread, bias binding, velcro and felt alongside a white shirt
Step-by-Step Guide to Creating Your DIY Doctor Costume:
Step 1: Sizing it Up
The first step is to get a proper measurement. Have your child try on the old shirt. Roll up the sleeves to the desired length for a doctor’s coat and mark the spot with a pin or fabric marker. Similarly, determine the desired length of the coat. Doctor coats typically fall around mid-thigh or knee length for children, offering a professional and recognizable look. Remember to add a few extra centimeters to your markings for hemming – this will create a neat and durable finished edge.
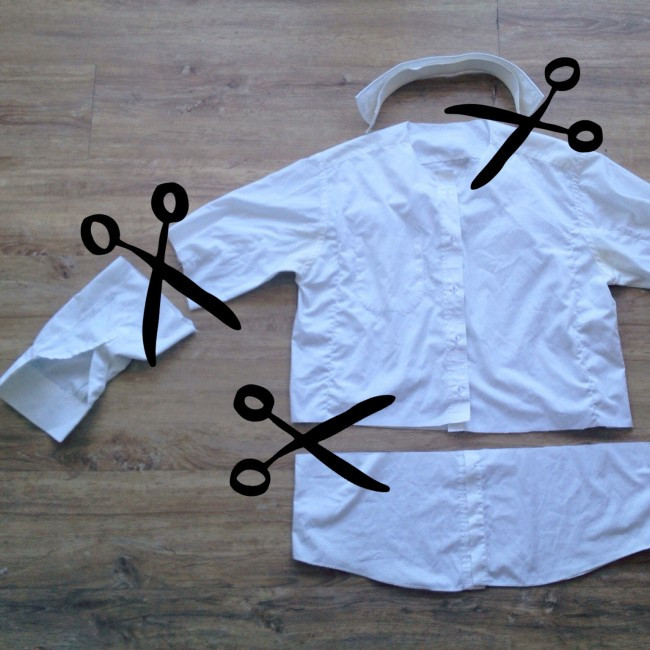
Step 2: Cutting and Shaping
Lay the shirt flat on a clean surface. Using sharp scissors, carefully cut along the marked lines for the sleeves and the bottom hem. For the collar, you have a couple of options. For a more traditional doctor’s coat look, you can remove the collar entirely. Alternatively, you can keep the collar for a slightly different style. If removing the collar, carefully cut along the seam where the collar is attached to the neckline of the shirt.
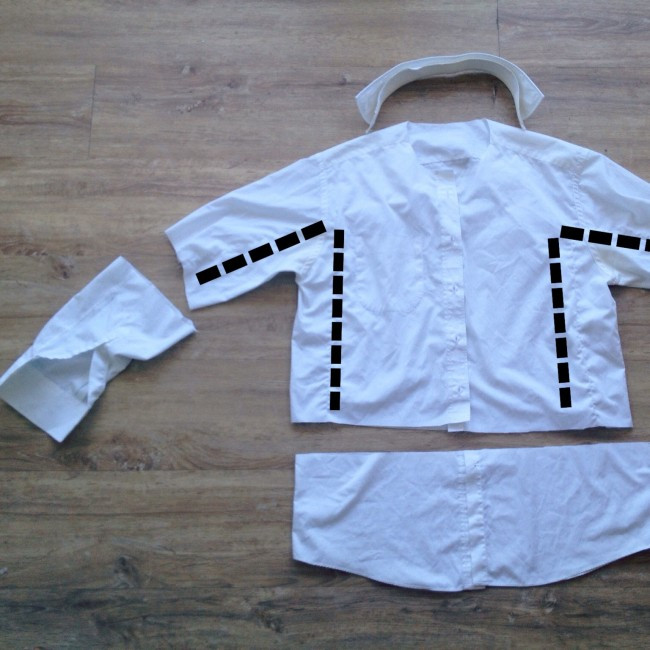 Image showing scissors cutting the collar off a white shirt to prepare for making a doctor costume
Step 3: Tailoring the Fit
Turn the shirt inside out. Have your child try it on again inside out. This step is crucial for achieving a better fit. Gently pin along the sleeves and sides of the shirt to make it smaller and more appropriately sized for your child. Aim for a comfortable fit that allows for movement during play. Using a sewing machine or hand stitching, sew along the pinned lines. Don’t worry about perfect symmetry – remember, this is a costume for play! Eyeballing it to ensure both sides are roughly similar is perfectly acceptable. Once sewn, trim off the excess fabric outside the seam, leaving about 2cm of fabric to prevent fraying and add durability to the seam.
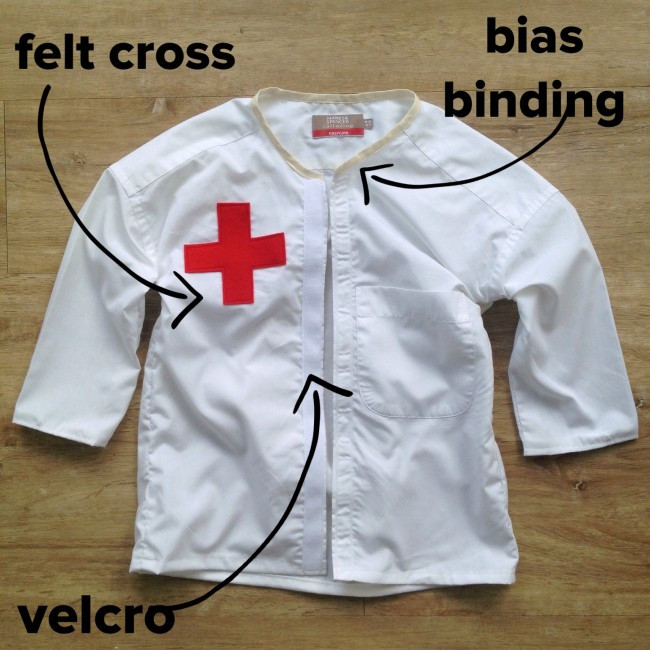 Image showing pins along the side of an inverted white shirt indicating where to sew to resize it into a doctor coat
Step 4: Hemming for a Professional Finish
Hemming the raw edges of the sleeves and the bottom of the coat is essential to prevent fraying and give your DIY doctor costume a more polished look. To hem, turn the raw edge of the fabric inwards by about 1cm, press with an iron for a crisper fold, and then fold it inwards again by another 1cm. Sew along this folded edge, securing the hem in place. Repeat this process for both sleeves and the bottom edge of the coat.
Step 5: Neaten the Neckline
If you removed the collar, you’ll need to finish the raw neckline edge to prevent fraying. Bias binding is ideal for this as it’s designed for curved edges. Open up one fold of the bias binding and align the raw edge of the neckline with the edge of the bias binding. Sew along the first fold of the bias binding, encasing the raw edge of the neckline. Then, fold the bias binding over to the other side of the fabric, tucking in the raw edge of the binding, and stitch in place to create a neat and professional neckline finish. If you don’t have bias binding, you could use a strip of white fabric or ribbon to achieve a similar effect. Alternatively, leaving the original collar can also work if you prefer that style or want to simplify this step.
Step 6: Choosing Your Fastening
Consider how you want the doctor coat to close. While you could leave the shirt buttons as they are, Velcro provides a much quicker and easier fastening option for young children, perfect for independent dressing during playtime. If opting for Velcro, carefully remove the buttons and buttonholes from the front of the shirt. Hem the raw edges where the buttons were removed, just like you hemmed the sleeves and bottom. Then, sew strips of sew-on Velcro to each side of the front opening, ensuring they align for easy closing. If you prefer to keep things simpler, leaving the buttons in place is perfectly fine!
Step 7: Adding the Doctor’s Emblem
To instantly recognizable doctor’s coat, add a red cross emblem. Cut a cross shape from your red felt square. The traditional Red Cross symbol is internationally recognized as a symbol of medical care and humanitarian aid. Sew or fabric glue the red felt cross onto the chest area of the doctor coat. Many shirts also have a chest pocket, which, in this case, becomes a perfect detail for a doctor’s coat! It’s ideal for storing pretend thermometers, bandages, or other essential doctor’s tools for imaginative play.
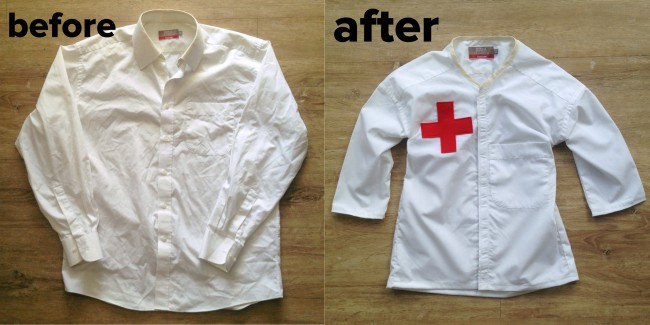 Image showing the before and after of the shirt transformation into a doctor coat, highlighting the red cross emblem
Congratulations, your upcycled DIY doctor costume is complete! From start to finish, this project can be accomplished in approximately two hours, factoring in measuring, cutting, sewing, and adding the finishing touches. A quick press with an iron will remove any wrinkles and give your homemade doctor coat a crisp, ready-for-house-calls appearance.
 Child proudly wearing the finished DIY doctor coat, holding a toy medical bag and smiling confidently
Now your little doctor is ready for hours of imaginative play, equipped with their very own personalized and lovingly crafted doctor costume. This DIY project is not only fun and rewarding but also teaches children about upcycling, creativity, and the joy of homemade gifts. Get ready for endless check-ups and pretend medical adventures!