
As someone who enjoys tackling home improvement projects, especially tiling, I’ve always sought tools that simplify the process and deliver professional-looking results. In my quest for tiling perfection, I discovered the Spin Doctor Tile Leveling System, and let me tell you, it’s been a game-changer. After using it on my last two tiling projects, I’m convinced this system is essential for achieving flawlessly level tiles with consistent spacing, eliminating the frustration of lippage – that annoying unevenness between tiles. And just to be clear, this isn’t a sponsored post; I purchased the Spin Doctor system myself and I’m sharing my honest experience because it genuinely impressed me.
Understanding the Spin Doctor Tile Leveling System
The Spin Doctor Tile Leveling System is ingeniously designed to address common tiling challenges faced by DIYers and professionals alike. Its primary goal is to prevent lippage, ensuring a smooth, even surface across your tiled area. Lippage occurs when adjacent tiles are set at different heights, creating an uneven and unprofessional finish. This system tackles this issue head-on, while also guaranteeing uniform tile spacing for a polished look.
Key Components of the Spin Doctor System
The Spin Doctor system is composed of two main parts, with an optional accessory to further enhance performance. Let’s break down each component:
Screw Caps: The Reusable Leveling Powerhouse
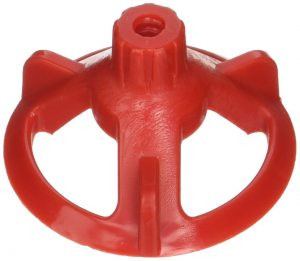
The screw caps are the heart of the Spin Doctor system. These robust, reusable caps are designed to apply downward pressure on tiles, effectively leveling them during the mortar setting process. What I particularly appreciate is their user-friendly design; they can be easily tightened by hand, eliminating the need for specialized tools. A single box of 100 caps is typically sufficient for most projects. While I initially bought two boxes, I found one to be ample, as the caps are easily reusable the next day once the mortar has set. These reusable spin doctor caps are a cost-effective and environmentally conscious choice for any tiling enthusiast.
Spacers: Ensuring Consistent Spacing and Leveling
![]()
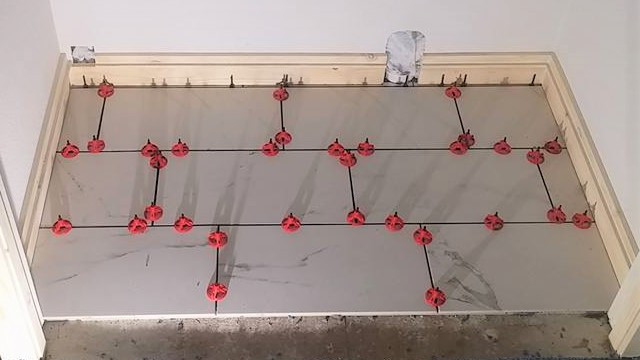
Spin Doctor tile leveling spacers are available in 1/8″ and 1/16″ sizes to accommodate various grout line preferences. These spacers are not your typical tile spacers; they are specifically engineered to work in conjunction with the screw caps. Featuring legs that grip under the tiles and a threaded top section, these spacers provide a secure anchor point for the caps to screw onto. This unique design allows you to clamp tiles together firmly, ensuring both levelness and consistent spacing. After the mortar has cured, typically overnight, the caps are easily unscrewed, and the top portion of the spacer is snapped off. A gentle kick or a light tap with a hammer, in the direction of the grout line, cleanly breaks off the excess spacer, leaving a perfectly spaced and level tile surface ready for grouting. The quantity of spacers needed depends on tile size and project area; for my 12″x24″ tiles across a bathroom, walk-in closet, and laundry closet, I used around 300 spacers.
Anti-Friction Shields (Optional): Added Protection
While offered as an optional component, the anti-friction shields are designed to further facilitate cap tightening and prevent tile movement during the leveling process. In my experience, using the Spin Doctor system without these shields was perfectly effective, and I didn’t encounter any issues. However, for very large or delicate tiles, they might offer an extra layer of security.
My Experience and Installation Tips for Spin Doctor Tile Leveling
Based on my hands-on experience with the Spin Doctor Tile Leveling System, here are some valuable installation tips to ensure optimal results:
- Maintain Wall Clearance: Avoid placing spacers too close to walls. Leaving adequate space makes spacer removal after the mortar sets much easier.
- Mortar Management: Be mindful of mortar squeezing up between tiles. Excess mortar can hinder spacer removal and complicate the grouting process.
- Edge Preparation for Pauses: If pausing your tiling project mid-way, remember to install spacers around all unfinished edges that will connect to subsequent tiles. Once the mortar cures, inserting spacers becomes impossible.
- Patience is Key: Tiling, especially as a DIY project, requires time and precision. While it may seem time-consuming initially, remember to focus on the long-term satisfaction of a beautifully tiled space.
Final Verdict: Why the Spin Doctor Tile Leveling System is a Must-Have
In conclusion, the Spin Doctor Tile Leveling System has earned my wholehearted endorsement. I genuinely doubt I’ll ever undertake another tiling project without it. For DIYers like myself who may not tile frequently, this system is incredibly valuable. It effectively eliminates common tiling challenges by ensuring even spacing, achieving level surfaces, and securely holding tiles in place as the mortar sets. If you’re aiming for professional-quality tile installation and want to simplify the process, I highly recommend giving the Spin Doctor Tile Leveling System a try on your next project. You’ll be amazed at the difference it makes!