Molding a Shock Doctor mouthguard, as explained by thebootdoctor.net, ensures a custom fit, maximizing comfort and protection during sports. This guide offers detailed steps and expert tips to achieve the perfect fit, keeping your teeth safe.
1. What Is A Shock Doctor Mouthguard And Why Is Proper Molding Important?
Yes, proper molding of a Shock Doctor mouthguard is crucial for it to effectively protect your teeth and gums. A Shock Doctor mouthguard is a protective device worn over the teeth during sports to prevent injuries to the mouth, teeth, and jaw. According to the American Dental Association (ADA), a properly fitted mouthguard can significantly reduce the risk of dental injuries during athletic activities. When a mouthguard is correctly molded, it conforms precisely to the unique contours of your mouth, providing a snug and secure fit. This custom fit is essential for several reasons:
- Enhanced Protection: A well-molded mouthguard absorbs and distributes impact forces more effectively, reducing the risk of fractures, dislocations, and soft tissue damage.
- Improved Comfort: A custom fit minimizes irritation and allows you to speak and breathe more easily.
- Better Retention: A properly molded mouthguard stays in place during activity, ensuring consistent protection without the need for constant readjustment.
Failing to mold a Shock Doctor mouthguard correctly can result in a loose or ill-fitting guard that may not provide adequate protection and could even dislodge during impact, leaving your teeth vulnerable. For athletes in Houston and across the USA, investing the time and effort to properly mold your Shock Doctor mouthguard is a critical step in safeguarding your oral health and ensuring peak performance. Thebootdoctor.net provides valuable resources and guidance to help you achieve the best possible fit.
2. What Materials And Tools Are Needed To Mold A Shock Doctor Mouthguard?
You’ll need a Shock Doctor mouthguard, a saucepan, water, a slotted spoon, a mirror, a bowl, and a timer. Gathering all the necessary materials and tools before you begin the molding process will ensure a smooth and efficient experience. Here’s a more detailed list:
- Shock Doctor Mouthguard: Ensure it’s the correct size and model for your needs. Check the packaging for any specific instructions related to your mouthguard.
- Saucepan: A clean saucepan is needed to heat the water. Make sure it’s large enough to fully submerge the mouthguard.
- Water: Use clean, potable water. The amount needed will depend on the size of your saucepan, but ensure there’s enough to cover the mouthguard completely.
- Slotted Spoon: This is essential for safely removing the mouthguard from the hot water without damaging it.
- Mirror: A mirror is crucial for aligning the mouthguard correctly in your mouth during the molding process.
- Bowl: A bowl filled with cold water is needed to cool the mouthguard after it has been heated and molded.
- Timer or Clock: Accuracy is key when heating the mouthguard. A timer or clock with a second hand will help you adhere to the recommended heating time.
Having these items readily available will streamline the molding process and help you achieve an optimal fit. Thebootdoctor.net also recommends having a clean, dry surface to place the heated mouthguard on before molding.
3. How To Prepare The Mouthguard And Water For The Molding Process?
Fill a saucepan with 3 to 4 inches of water and bring it to a rolling boil. Preparing the mouthguard and water correctly is a critical first step in the molding process. Here’s a detailed breakdown:
- Water Level: Ensure the saucepan contains enough water (3-4 inches) to fully submerge the mouthguard. If the mouthguard is not completely covered, it will not heat evenly, which can affect the final fit.
- Water Temperature: Bring the water to a rolling boil. This is essential for softening the mouthguard material so it can be molded to the contours of your teeth and gums.
- Safety First: Once the water reaches a rolling boil, carefully remove the saucepan from the heat source. This prevents the mouthguard from overheating and potentially melting or becoming deformed. Let the water stand for 30 seconds before placing the mouthguard in it.
- Mouthguard Inspection: Before submerging the mouthguard, inspect it for any defects or damage. If you notice any issues, do not proceed with the molding process and contact the manufacturer or retailer.
- Tether Attachment (If Applicable): If your Shock Doctor mouthguard has a tether for attaching it to a helmet, ensure it is securely attached before placing the mouthguard in the hot water.
Proper preparation ensures that the mouthguard is ready for molding and that you can proceed safely. According to sports dentistry experts, precise temperature control is vital for achieving the ideal balance between pliability and structural integrity. Thebootdoctor.net emphasizes these preparatory steps to ensure optimal results.
4. What Is The Correct Heating Time For A Shock Doctor Mouthguard?
Submerge the mouthguard in the hot water for 60 seconds, no longer. Accurate timing is crucial to prevent damage to the mouthguard and ensure proper molding.
- Specific Time: The recommended heating time for a Shock Doctor mouthguard is precisely 60 seconds. Exceeding this time can cause the material to become overly soft, lose its shape, or even melt.
- Immediate Submersion: After the water has stood for 30 seconds off the heat, immediately place the mouthguard into the hot water. This ensures consistent heating.
- Complete Submersion: Make sure the mouthguard is fully submerged in the water during the entire 60-second period. Use a slotted spoon to gently push it down if necessary.
- Timer Use: Use a timer or a clock with a second hand to accurately measure the 60 seconds. Do not estimate the time, as even a few seconds can make a difference.
According to the American Academy for Sports Dentistry, adhering to the manufacturer’s recommended heating time is essential for achieving the best fit and protection. Thebootdoctor.net highlights that proper timing is a key factor in the successful molding of your Shock Doctor mouthguard, and it can significantly affect the final outcome.
5. How To Safely Remove The Mouthguard From Hot Water?
Carefully remove the mouthguard from the hot water using a slotted spoon or the tether, if applicable. Safe removal of the mouthguard from the hot water is essential to prevent burns and ensure the mouthguard maintains its integrity.
- Slotted Spoon Method: If using a slotted spoon, gently scoop the mouthguard out of the water. The slots allow water to drain quickly, reducing the risk of burns.
- Tether Method: If your mouthguard has a tether, carefully lift it out of the water by the tether. Ensure the tether is securely attached to prevent the mouthguard from slipping and causing burns.
- Avoid Touching Hot Surfaces: Be careful not to touch the sides of the saucepan or the hot water directly with your hands. Use oven mitts or heat-resistant gloves for added protection if needed.
- Immediate Cooling: Once removed, immediately proceed to the next step, which is to cool the mouthguard briefly in tap water.
Following these steps will ensure a safe transition from heating to cooling, preventing injuries and maintaining the mouthguard’s condition for optimal molding. Thebootdoctor.net prioritizes safety in the molding process, emphasizing these precautions to protect users.
6. What Is The Proper Cooling Technique Before Molding?
Cool the mouthguard in tap water for only 1-2 seconds to bring the surface temperature to a comfortable level. Proper cooling is essential for ensuring the mouthguard is pliable enough to mold without being too hot to handle.
- Brief Rinse: Rinse the mouthguard under cool tap water for just 1-2 seconds. This short rinse is sufficient to lower the surface temperature to a safe and comfortable level.
- Avoid Over-Cooling: Do not cool the mouthguard for too long, as this can cause it to harden prematurely, making it difficult to mold properly.
- Surface Temperature Check: Before placing the mouthguard in your mouth, gently touch it to ensure it is not too hot. It should be warm and pliable but not scalding.
- Immediate Placement: After the brief cooling period, immediately proceed to place the mouthguard in your mouth for molding.
This cooling technique ensures that the mouthguard is at the ideal temperature for molding, providing a comfortable and effective fit. Thebootdoctor.net stresses the importance of this step to achieve the best possible outcome.
7. How To Position And Fit The Mouthguard Correctly?
Line up the mouthguard with the centerline of your upper teeth, fit it onto and around your upper teeth, and press firmly into the molars first, then the front teeth. Correct positioning and fitting are crucial for achieving a comfortable and protective custom fit.
- Lip Preparation: Lick your lips to moisten them. This helps the mouthguard adhere better and prevents sticking.
- Mirror Alignment: Use a mirror to carefully align the mouthguard with the centerline of your upper teeth. This ensures proper positioning and balance.
- Upper Teeth First: Gently fit the mouthguard onto and around your upper teeth. Ensure it covers all teeth up to the gum line.
- Molar Pressure: Press the mouthguard firmly into the molars first. This helps to secure the back of the mouthguard and ensures a snug fit.
- Front Teeth Pressure: Then, press firmly into the front teeth, ensuring the mouthguard covers them completely.
According to dental experts, precise alignment and pressure are key to molding the mouthguard to the unique contours of your mouth. Thebootdoctor.net highlights these steps as essential for achieving optimal protection and comfort.
8. What Biting And Suction Techniques Should Be Used During Molding?
Bring your lower jaw forward and up into the base of the mouthguard, bite down hard, suck in strongly, and use your fingers to press the edges of the mouthguard into your teeth and gum line for 20 seconds. Effective biting and suction techniques are essential for creating a custom fit that conforms precisely to your mouth.
- Jaw Alignment: Bring your lower jaw forward and up into the base of the mouthguard, aligning your teeth with the lower channel. This ensures proper occlusion and a comfortable fit.
- Firm Bite: Bite down hard on the mouthguard. This pressure helps to mold the material to the shape of your teeth and gums.
- Strong Suction: Suck in strongly while biting down. This creates a vacuum that helps the mouthguard conform tightly to your teeth and gums.
- Finger Pressure: Use your fingers to press the edges of the mouthguard into your teeth and gum line through your lips and cheeks. This ensures a close, custom fit around all surfaces.
- Sustained Pressure: Maintain this biting, suction, and finger pressure for 20 seconds. This allows the material to cool and harden in the correct shape.
According to sports dentistry professionals, these techniques ensure a secure and comfortable fit that provides optimal protection. Thebootdoctor.net emphasizes the importance of these steps for achieving a professional-quality molding result.
9. How To Cool And Test The Fit After Molding?
Remove the mouthguard and cool it in cold water for 30 seconds, then replace it in your mouth and test for a good, firm fit. Proper cooling and fit testing are essential for ensuring the mouthguard provides optimal protection and comfort.
- Cold Water Cooling: Remove the mouthguard from your mouth and immerse it in cold water for 30 seconds. This helps the material to harden and retain its molded shape.
- Fit Assessment: After cooling, replace the mouthguard in your mouth and check for a good, firm fit. It should feel snug and secure, covering all teeth up to the gum line.
- Movement Test: Try moving your jaw and head to ensure the mouthguard stays in place. It should not shift or dislodge easily.
- Comfort Check: Assess the comfort of the mouthguard. It should not cause any pain or irritation to your gums or soft tissues.
- Speaking Test: Try speaking with the mouthguard in place. You should be able to speak clearly without excessive difficulty.
According to experts in sports dentistry, a properly fitted mouthguard should provide a secure, comfortable fit that allows you to breathe and speak normally while providing optimal protection. Thebootdoctor.net recommends these steps to ensure the mouthguard meets these criteria.
10. What To Do If The Mouthguard Doesn’t Fit Properly On The First Try?
Repeat steps 1 through 8 if the fit is not accurate. If the mouthguard doesn’t fit properly on the first attempt, repeating the molding process can help achieve a better fit.
- Reheating: If the mouthguard doesn’t fit well, reheat it by repeating steps 1 through 4. This will soften the material again, allowing you to remold it.
- Adjustment: Pay close attention to the areas where the fit was inadequate. Focus on pressing those areas more firmly during the molding process (steps 6 and 7).
- Professional Advice: If you are still struggling to achieve a good fit after multiple attempts, consider consulting a dentist or a sports medicine professional. They may be able to provide additional guidance or recommend alternative solutions.
Thebootdoctor.net advises that patience and persistence are key. Repeating the process with careful attention to detail can often result in a satisfactory fit.
11. What Are Some Quick Tips For A Better Molding Experience?
The Gel Max Power Mouthguard will expand during the fitting process, and you can repeat the process if needed. Here are some quick tips for an enhanced molding experience:
- Mouthguard Expansion: Keep in mind that the Gel Max Power Mouthguard is designed to expand during the molding process. It may seem small initially, but it will conform to the shape of your mouth as you mold it.
- Multiple Attempts: Don’t be discouraged if you don’t achieve the perfect fit on your first try. You can repeat the molding process as needed until you are satisfied with the fit.
- Braces Compatibility: If you have braces, be aware that the Gel Max Power Mouthguard is not compatible. Shock Doctor offers a range of mouthguards specifically designed for use with braces.
- Contact Support: If you encounter any problems or have questions about the molding process, don’t hesitate to contact Shock Doctor’s customer support for assistance.
These tips can help you achieve a better fit and ensure that your mouthguard provides optimal protection and comfort. Thebootdoctor.net highlights these points to help users have a successful molding experience.
12. How Does The Gel Max Power Mouthguard Expand During Molding?
The Gel Max Power Mouthguard expands up to 20% during the fitting process when molded correctly. Understanding how the Gel Max Power Mouthguard expands during molding can help you achieve a better fit.
- Material Properties: The Gel Max material is designed to become pliable and expandable when heated. This allows it to conform to the unique contours of your mouth during the molding process.
- Expansion Process: As you heat the mouthguard and apply pressure with your fingers and teeth, the Gel Max material expands to fill the spaces between your teeth and gums.
- Custom Fit: This expansion ensures a custom fit that is both comfortable and protective. The mouthguard adapts to the shape of your mouth, providing a secure and snug fit.
- Visual Reference: Comparing the mouthguard before and after molding can illustrate the degree of expansion. This visual reference can help you understand how the mouthguard has adapted to your mouth.
- Optimal Protection: The expansion process is crucial for achieving optimal protection. The mouthguard effectively absorbs and distributes impact forces, reducing the risk of dental injuries.
According to material science experts, the unique properties of the Gel Max material allow it to provide a superior level of customization and protection. Thebootdoctor.net underscores the importance of this expansion process for achieving the best possible fit.
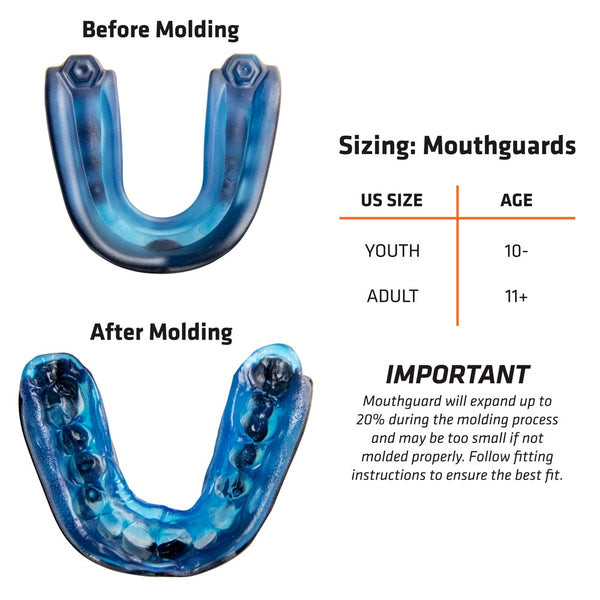 Gel Max Power Before and After
13. What To Do If The Mouthguard Is Not Compatible With Braces?
If the Gel Max Power Mouthguard is not compatible with braces, use a braces mouthguard. If you have braces, it’s important to use a mouthguard that is specifically designed to accommodate them.
- Braces-Specific Mouthguards: Shock Doctor offers a wide variety of braces mouthguards that are designed to fit comfortably over braces and provide optimal protection.
- Exchange Policy: If you have already purchased a Gel Max Power Mouthguard and need a braces mouthguard instead, contact Shock Doctor’s customer support to arrange a free exchange.
- Professional Recommendation: Consult with your orthodontist or dentist for recommendations on the best type of mouthguard for your specific braces.
Using the right type of mouthguard ensures that your braces are protected and that your teeth and gums are also safe from injury. Thebootdoctor.net recommends consulting with a professional to determine the best option for your needs.
14. What Are Common Problems Encountered During Molding And How To Solve Them?
Some common problems include improper fit, discomfort, and difficulty breathing. Addressing these issues promptly ensures optimal protection and comfort.
| Problem | Possible Cause | Solution |
|---|---|---|
| Improper Fit | Incorrect molding technique, insufficient heating, or wrong size. | Repeat the molding process, ensuring proper heating and technique. Verify the mouthguard size is correct. |
| Discomfort | Poor fit, pressure points, or irritation. | Remold the mouthguard, focusing on areas of discomfort. Ensure proper alignment and pressure. |
| Difficulty Breathing | Obstructed airflow, poor fit, or incorrect positioning. | Remold the mouthguard, ensuring proper positioning and airflow. Consider a different model if necessary. |
| Mouthguard Falls Out Easily | Insufficient molding, loose fit, or incorrect size. | Repeat the molding process, focusing on a tighter fit. Verify the mouthguard size is correct. |
| Material Deformity | Overheating, improper handling, or defective product. | Contact customer support for assistance. Do not use a deformed mouthguard. |
Thebootdoctor.net emphasizes addressing these common issues to ensure the mouthguard provides the intended protection and comfort.
15. What Are The Benefits Of Using A Shock Doctor Mouthguard?
Using a Shock Doctor mouthguard offers superior protection, custom fit, and enhanced comfort. These benefits make it a preferred choice for athletes.
- Superior Protection: Shock Doctor mouthguards are designed to absorb and distribute impact forces, reducing the risk of dental injuries.
- Custom Fit: The molding process allows for a custom fit that conforms precisely to the contours of your mouth, providing optimal protection and comfort.
- Enhanced Comfort: The custom fit minimizes irritation and allows you to speak and breathe more easily.
- Durable Materials: Shock Doctor mouthguards are made from high-quality materials that are designed to withstand the rigors of sports activities.
- Variety of Options: Shock Doctor offers a wide range of mouthguards to suit different sports, ages, and needs, including models for use with braces.
- Trusted Brand: Shock Doctor is a trusted brand among athletes and sports professionals, known for its commitment to quality and innovation.
These benefits make Shock Doctor mouthguards a valuable investment in your oral health and safety. Thebootdoctor.net highlights these advantages to help users make informed decisions.
16. How To Clean And Maintain A Shock Doctor Mouthguard?
Rinse your mouthguard with cold water after each use and clean it regularly with mild soap and a soft brush. Proper cleaning and maintenance are essential for prolonging the life of your Shock Doctor mouthguard and preventing the buildup of bacteria.
- Rinse After Each Use: After each use, rinse your mouthguard thoroughly with cold water to remove saliva, debris, and bacteria.
- Regular Cleaning: Clean your mouthguard regularly with mild soap and a soft brush. Gently scrub all surfaces to remove any buildup.
- Avoid Hot Water: Do not use hot water to clean your mouthguard, as this can cause it to deform.
- Proper Storage: Store your mouthguard in a ventilated case to allow it to air dry. This helps prevent the growth of bacteria and mold.
- Avoid Harsh Chemicals: Do not use harsh chemicals, such as bleach or mouthwash, to clean your mouthguard, as these can damage the material.
- Regular Inspection: Inspect your mouthguard regularly for any signs of wear and tear. Replace it if you notice any cracks, tears, or deformities.
Following these cleaning and maintenance tips will help keep your Shock Doctor mouthguard in good condition and ensure that it continues to provide optimal protection. Thebootdoctor.net emphasizes the importance of these practices for maintaining oral health and safety.
17. How Often Should A Shock Doctor Mouthguard Be Replaced?
Replace your Shock Doctor mouthguard every season or as soon as you notice signs of wear and tear. Regular replacement ensures continued protection and hygiene.
- Seasonal Replacement: It’s generally recommended to replace your mouthguard every sports season, as the material can degrade over time, reducing its effectiveness.
- Signs of Wear and Tear: Inspect your mouthguard regularly for signs of wear and tear, such as cracks, tears, or deformities. If you notice any of these issues, replace the mouthguard immediately.
- After Dental Work: If you undergo any dental work, such as fillings or orthodontics, you may need to replace your mouthguard to ensure a proper fit.
- Children and Adolescents: Children and adolescents may need to replace their mouthguards more frequently, as their mouths are still growing and changing.
Thebootdoctor.net advises that timely replacement of your mouthguard is crucial for maintaining optimal protection and hygiene.
18. Where Can You Purchase Shock Doctor Mouthguards?
You can purchase Shock Doctor mouthguards at sporting goods stores, online retailers, and some dental offices. Convenient access ensures you can find the right mouthguard for your needs.
- Sporting Goods Stores: Many sporting goods stores carry a variety of Shock Doctor mouthguards, allowing you to try them on and get expert advice.
- Online Retailers: Online retailers such as Amazon, Walmart, and the Shock Doctor website offer a wide selection of mouthguards, with convenient shipping options.
- Dental Offices: Some dental offices also sell Shock Doctor mouthguards, providing you with professional guidance and ensuring a proper fit.
Thebootdoctor.net recommends checking with your dentist or sports medicine professional for personalized recommendations on the best type of mouthguard for your specific needs.
19. What Are The Alternatives To Shock Doctor Mouthguards?
Alternatives include custom-fitted mouthguards from dentists and other brands of boil-and-bite mouthguards. Exploring alternatives helps you make an informed decision based on your specific needs and budget.
- Custom-Fitted Mouthguards: Custom-fitted mouthguards are made by a dentist to precisely fit your mouth. They offer the best possible protection and comfort but are typically more expensive.
- Other Boil-and-Bite Brands: Several other brands offer boil-and-bite mouthguards that can be molded at home. These can be a more affordable alternative to custom-fitted mouthguards.
- Stock Mouthguards: Stock mouthguards are pre-made and do not offer a custom fit. They are the least expensive option but may not provide optimal protection or comfort.
According to dental experts, custom-fitted mouthguards offer the best protection, but boil-and-bite mouthguards can be a good alternative for many athletes. Thebootdoctor.net recommends weighing the pros and cons of each option before making a decision.
20. Why Choose Thebootdoctor.net For More Information On Foot And Body Health?
Thebootdoctor.net offers reliable information, expert advice, and comprehensive resources for foot and body health. Choosing the right resource ensures you receive accurate and trustworthy guidance.
- Reliable Information: Thebootdoctor.net provides accurate and up-to-date information on a wide range of foot and body health topics, based on the latest research and expert opinions.
- Expert Advice: The website features articles and advice from experienced healthcare professionals, including podiatrists, physical therapists, and sports medicine specialists.
- Comprehensive Resources: Thebootdoctor.net offers a wealth of resources, including articles, videos, and product reviews, to help you make informed decisions about your health.
- User-Friendly Interface: The website is designed to be easy to navigate, with clear and concise information that is accessible to everyone.
- Commitment to Quality: Thebootdoctor.net is committed to providing high-quality, evidence-based information to help you achieve optimal foot and body health.
By choosing Thebootdoctor.net, you can be confident that you are receiving the best possible information and guidance. Whether you’re seeking advice on injury prevention, treatment options, or general wellness, Thebootdoctor.net is your trusted resource for foot and body health.
FAQ: How to Mold a Mouthguard Shock Doctor
1. What happens if I overheat my Shock Doctor mouthguard?
Overheating can cause deformation, making it unusable. Always follow the recommended heating time to prevent damage.
2. Can I remold my Shock Doctor mouthguard multiple times?
Yes, you can repeat the molding process if needed to achieve a better fit, but avoid excessive reheating.
3. Is it normal for the mouthguard to feel tight after molding?
A snug fit is normal, but it should not be painful. If it’s too tight, repeat the molding process.
4. How do I know if my mouthguard is providing adequate protection?
It should fit securely, cover all teeth, and allow you to speak and breathe comfortably.
5. Can I use a microwave to heat the water for molding?
No, using a saucepan on a stovetop is recommended for controlled heating.
6. What if my mouthguard has sharp edges after molding?
Use a small, sharp knife or scissors to carefully trim any sharp edges.
7. How can I prevent my mouthguard from developing a bad odor?
Regular cleaning and proper storage in a ventilated case can prevent odors.
8. What should I do if my mouthguard causes gum irritation?
Remold the mouthguard, focusing on the areas causing irritation. If the issue persists, consult a dentist.
9. Can I use toothpaste to clean my Shock Doctor mouthguard?
No, toothpaste can be abrasive. Use mild soap and a soft brush instead.
10. Is it safe to share my mouthguard with someone else?
No, sharing mouthguards can spread bacteria and infections. Each person should have their own.
(CTA)Ready to take the next step in protecting your oral health? Visit thebootdoctor.net for more articles, information, and expert advice on foot and body health. Contact us today to learn more about how we can help you stay active and pain-free. Address: 6565 Fannin St, Houston, TX 77030, United States. Phone: +1 (713) 791-1414. Website: thebootdoctor.net